Microsoft Entra ID (Formerly Azure AD)
Learn to configure Microsoft Entra ID SSO with BigPanda.
Microsoft Entra ID (Formerly Azure AD (Active Directory)) Sign-On automatically signs users in when they are on their corporate devices connected to your corporate network. When enabled, users don't need to type in their passwords to sign in to Microsoft Entra ID, and usually, even type in their usernames. This feature provides your users easy access to BigPanda without needing any additional on-premises components.
Use the instructions on this page to configure the Microsoft Entra ID solution in BigPanda.
For information about key features and requirements for BigPanda SSO integrations, see Single Sign-On.
Before You Start
To integrate Microsoft Entra ID with BigPanda, you need:
- A Microsoft Entra ID subscription and user account. If you don't already have a subscription or an account, you can Create a free user account.
- One of the following roles in Microsoft Entra ID: Global Administrator, Cloud Application Administrator, Application Administrator, or owner of the service principal.
- A BigPanda account with the Single Sign On role set to Full Access. See Roles and Resource Permissions for more information.
Add the BigPanda Application in Microsoft Entra ID
Before you begin configuring single sign-on, you need to add the BigPanda application from the Microsoft Entra ID gallery. A test user account can be used to assign to the application and test the single sign-on configuration.
For more information on how to add an application from the gallery, see the Quickstart: Add application from the gallery.
Create and Assign an AD Test User
Follow the guidelines in the create and assign a user account article to create a test user account in the Microsoft Entra ID portal. The same account must also be created in BigPanda to test signing in. See User Management for more information on account creation in BigPanda.
Configure Microsoft Entra ID SSO
Complete the following steps to enable Microsoft Entra ID single sign-on in the Microsoft Entra ID portal.
- In the Microsoft Entra ID portal, on the BigPanda application integration page, find the Manage section and select single sign-on.
- On the Select a single sign-on method page, select SAML.
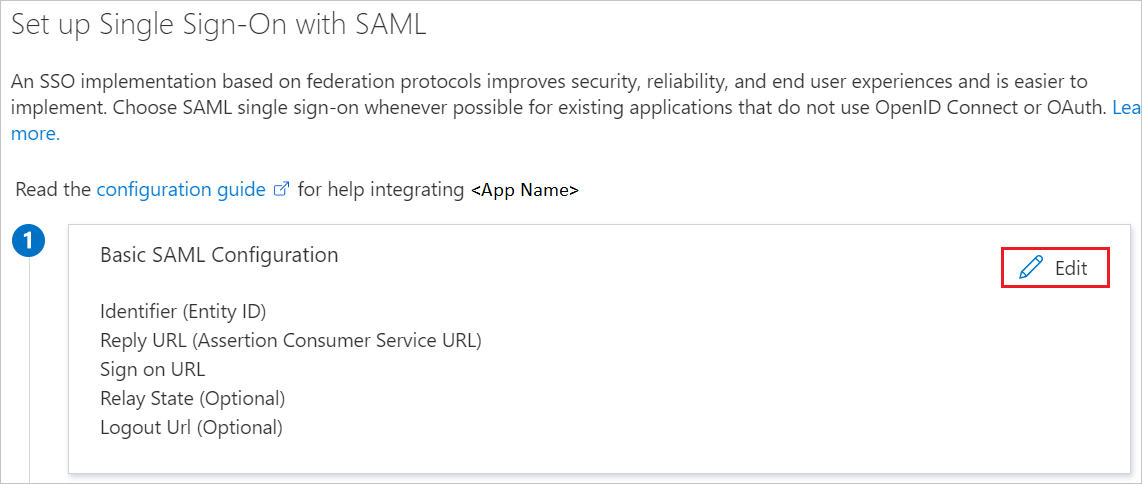
- On the Set up single sign-on with SAML page, select the pencil icon for Basic SAML Configuration to edit the settings.

Edit Basic SAML Configuration
- In the Basic SAML Configuration section, populate the following fields:
- In the Identifier textbox, paste the URL:
https://bigpanda.io/SAML2 - In the Reply URL textbox, paste a URL using the following pattern:
https://api.bigpanda.io/login/<YOUR_ORG_NAME>/azure/callback
- In the Identifier textbox, paste the URL:
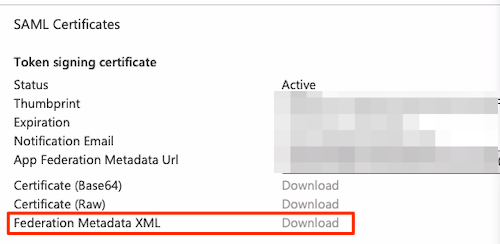
- On the Set up single sign-on with SAML page, in the SAML Signing Certificate section, find Federation Metadata XML and select Download to save the file.

Microsoft Entra ID Federation Metadata
- In the Set up BigPanda section, copy the Login URL.

Microsoft Entra ID Application Links
Add Microsoft Entra ID to BigPanda
After adding BigPanda in the Microsoft Entra ID Gallery, you can then set up SSO with Microsoft Entra ID in BigPanda Settings.
- Within BigPanda, navigate to Settings > Single Sign-On.
- Select the Microsoft Entra ID icon.
- Under Configure Microsoft Entra ID Information in BigPanda, populate the following fields with the information copied from Microsoft Entra ID:
- Identifier (Entity ID) - Paste
https://bigpanda.io/SAML2into the box. - Login URL - The login URL copied from Microsoft Entra ID.
- SAML Certificate - The SAML certificate, copied from the Federation Metadata XML file downloaded from Microsoft Entra ID. The certificate is between the
<X509Certificate>tags in the file. Paste the certificate without the BEGIN CERTIFICATE and END CERTIFICATE lines, and without whitespaces.
- Identifier (Entity ID) - Paste
- Click Configure Microsoft Entra ID to save.
Validate the Microsoft Entra ID Integration
Before enabling the Microsoft Entra ID integration for your entire organization, test it with your own account.
- Click Logout and Validate.
- In Microsoft Entra ID, ensure the test user has been assigned to BigPanda in the User and Groups section.
- Log in to BigPanda with Microsoft Entra ID SSO. Be sure to leave the BigPanda password field blank.
- If your login was successful, return to the Microsoft Entra ID SSO configuration page and click Activate SSO to enable SSO for your entire organization.
Until you enable the Microsoft Entra ID integration for the entire organization, all users can log in to BigPanda with their original credentials. Once enabled, they will be required to use the Microsoft Entra ID authentication.
JIT Provisioning with Microsoft Entra ID
After configuring the Microsoft Entra ID SSO integration, you can also enable JIT provisioning. SSO with Just-In-Time (JIT) Provisioning automatically creates user accounts in BigPanda when users first log in via SSO, eliminating the need for manual account creation. Account creation is based on rules and properties defined in your SSO provider’s object.
See the SSO Configuration page for setup steps. Follow the instructions below to set up firstName and lastName claims for JIT provisioning.
Set firstName and lastName claims in Microsoft Entra ID for JIT Provisioning
Microsoft Entra ID does not provide firstName and lastName claims by default. BigPanda uses these claims to set the name field for users created via JIT provisioning. To correctly map first names and last names using Microsoft Entra ID, you'll need to add a custom claim for each attribute:
- In Microsoft Entra ID, navigate to Attributes & Claims and select Add new claim to open the Manage user claims page.
- In the Name field, enter the name of the claim. You will need to add a firstName claim and a lastName claim separately.
- In the Source field, select Attribute.
- In the Source attribute field, enter the source where the claim is going to retrieve its value. For firstName, enter user.givenname and for lastName, enter user.surname.
- Click Save.

Microsoft Entra ID Manage Claims
Updated 9 months ago
