Manage Environments
Environments filter incidents on properties such as source and priority and group them together for easy visibility and action. Environments make it easy for your team to focus on incidents relevant to their role and responsibilities. Environments can be used to filter the incident feed, create live dashboards, set up sharing rules, and simplify incident search.
Your BigPanda Environments can be customized to fit your organization's areas of responsibility and processes. Create, edit, or delete environments to help your teams stay focused on the most relevant information or to fit your AutoShare and analytics needs.
For example, you can define custom environments for:
An engineering team that is responsible for incidents related to a particular set of applications.
Level-1 or NOC operators that work only on high-severity incidents.
The emergency contacts of a customer-facing service. Include only critical alerts from the service, and then set up an AutoShare to immediately notify the emergency contacts.
Business asset- or region-specific incidents. Use the environment to create Dashboards or Analytics Reporting.
Incidents missing key tag or priority enrichment. Review incidents in the environment periodically to find correlation patterns that may be missing in your system setup.
Environment limits
We recommend limiting your organization to 300 environments for best BigPanda UI experience. Additional environments will degrade UI performance.
Each organization can have up to 500 environments total.
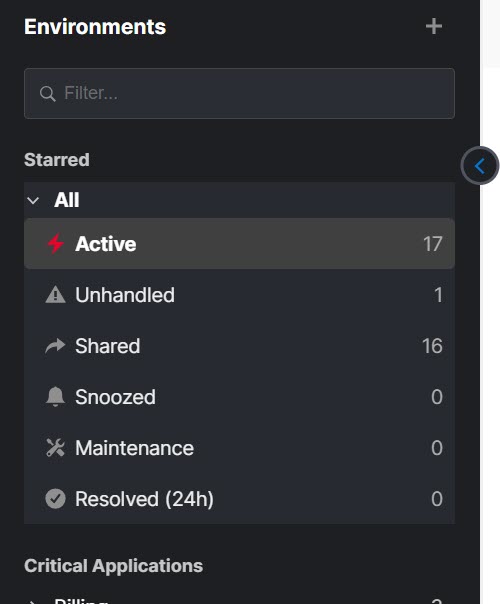
Environments Pane
Relevant Permissions
Roles with the following permissions are granted varying levels of access to BigPanda environments:
Permission Name | Description |
|---|---|
Manage Environments | View, create, edit, and delete environments in the UI and API, and view the incidents environments contain. |
Environment - Incident Actions | Full access ability to perform actions on all enrichment tags and incidents (assign, snooze, share, comment), minus environment configuration in the specified environment(s). |
Environment - View | Read-only access to all enrichment tags and incidents in the specified environment(s) without the ability to change or perform any incident action. |
See the Roles Management page to learn more about environment permissions in BigPanda.
Audit logs
When multiple users are working in the BigPanda platform, it’s vital to see historic information on system configuration changes. Audit logs are available for environments in BigPanda, allowing admins to keep track of configuration changes.
Users with the Audit Logs permission can view historical configuration changes and actions made related to environments. See the Use the Audit Log documentation for more information.
Automatic Environment Creation
To streamline environment creation, BigPanda can automatically create an environment during the initial setup of a monitoring integration. Simply select to create an integration at the Create an App Key step, and a new environment will be created with the same name as the integration. This environment will automatically group alerts sent from that integration and add them to the By Integration Source, or General environment group.
To automatically add an integration source environment:
During the Create an App Key step on the initial setup of a monitoring integration, select the Auto Create environment to group incidents from this monitoring tool checkbox.
 |
Auto Create Environment Checkbox
Upon generating the app key, a new environment will be created with the same name as the integration. This environment will be added to the By Integration Source, or General environment group, and will be viewable by all users for your organization.
The environment will automatically include all incidents with one or more alerts from that integration source. Environments will include incidents with warning or higher severity, but will not include incidents with acknowledged or maintenance statuses.
The environment can be edited to adjust environment group, name, role access, or classification criteria.
Automatic environment creation
Automatic environment creation happens on the initial creation of the new monitoring integration.
For customers onboarded before 2023, the Auto Create environment to group incidents from this monitoring tool checkbox will be unselected by default. For new customers who will have Default Environments configured during setup, the checkbox will be selected by default.
Default Environments
To help classify incidents into useful groups, BigPanda includes default environments for organizations that onboard in 2023 or later. These environments are created automatically based on your system configuration and are viewable by all users for your organization. Default environments can be edited to adjust environment group, name, role access, or classification criteria.
Default environments will be created in two environment groups:
By Integration Source
Priority
Integration Source
To streamline environment creation, BigPanda can automatically create an environment during the initial setup of a monitoring integration. Simply select to create an integration at the Create an App Key step, and a new environment will be created with the same name as the integration.
This environment will automatically group alerts sent from that integration and add them to the By Integration Source, or General environment group.
To automatically add an integration source environment:
During the Create an App Key step on the initial setup of a monitoring integration, select the Auto Create environment to group incidents from this monitoring tool checkbox.

Auto Create Environment Checkbox
Upon generating the app key, a new environment will be created with the same name as the integration. This environment will be added to the By Integration Source, or General environment group, and will be viewable by all users for your organization.
The environment will automatically include all incidents with one or more alerts from that integration source. Environments will include incidents with warning or higher severity, but will not include incidents with acknowledged or maintenance statuses.
The environment can be edited to adjust environment group, name, role access, or classification criteria.
Automatic environment creation
Automatic environment creation happens on the initial creation of the new monitoring integration. If you rename the integration later, make sure to manually update the matching environment.
For customers onboarded before 2023, the Auto Create environment to group incidents from this monitoring tool checkbox will be unselected by default. For new customers who will have Default Environments configured during setup, the checkbox will be selected by default.
Priority
The Priority environment group automatically creates environments based on the 'priority' incident tag within BigPanda. The first time an incident is marked with a priority label, an environment will be created for that priority level.
To assign a priority label, operators can manually assign an incident a priority level in the incident feed, or an administrator can configure automatic priority enrichment.
The environment will have the same name as the priority level, and will automatically include all incidents from all monitoring sources that have that priority level. Environments will include incidents with warning or higher severity, but will not include incidents with acknowledged or maintenance statuses.
Priority level names and colors can be configured under the priority tag.
To stop the automatic creation of Priority environments, reach out to support.
Create an Environment
You can create new environments to fit any of your workflow and process needs.
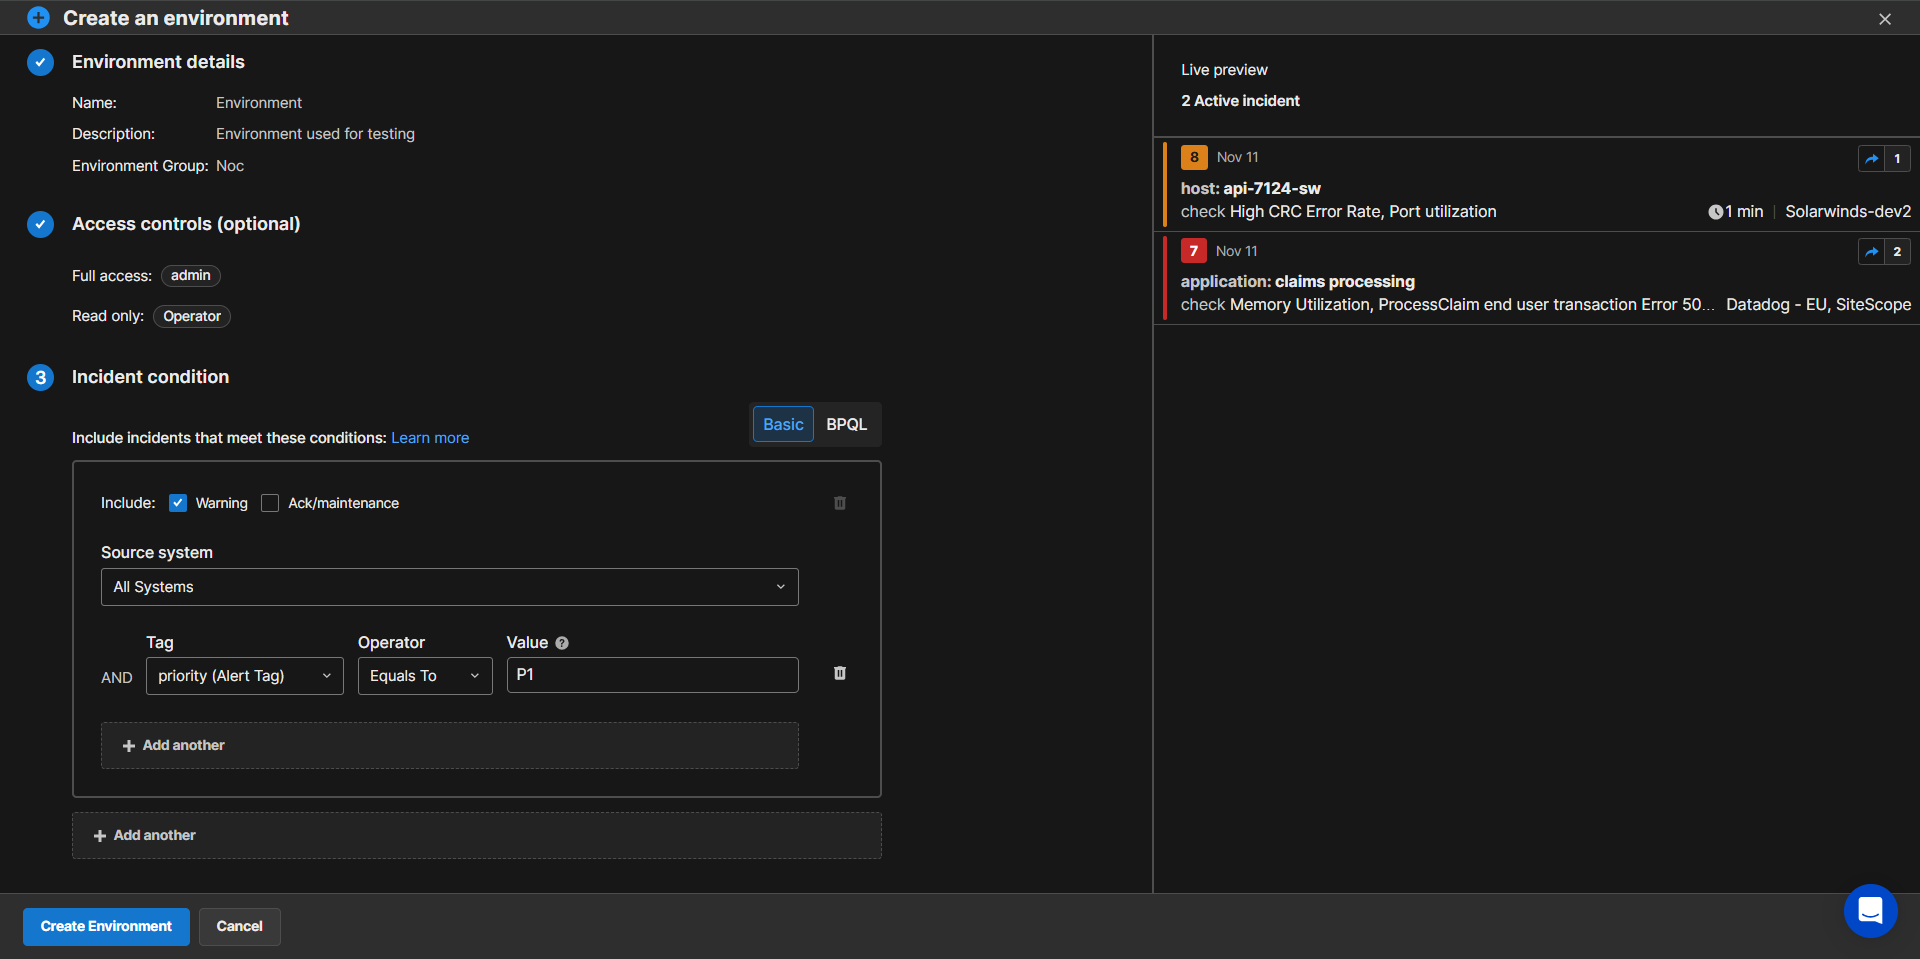
To create a new environment:
Navigate to the Incidents tab.
At the top of the environments pane on the left, select the plus sign icon.
From the menu, select New Environment.
In the Create an environment screen within the Environment details section, populate the following fields:
Field
Description
Name
The environment name is what appears in the Environments Pane and selection dropdowns within AutoShare and Live Dashboards. Each environment name must be unique.
The name should be short, specific, and meaningful to everyone in your organization.
The environment name can include spaces and be up to 200 characters long.
Description
You can use the description field to help your team members understand the purpose of an environment.
The description will appear in the Environments pane when you hover over the environment name.
Group (Optional)
Assigns the environment to an environment group. By default, all environments belong to the General group. Each environment can only belong to one group.
Select Create a New Group to create a new group for the environment.
(Optional) In the Access Control section, you can select roles that can view or take action on incidents in the environment. Populate the following fields:
Field
Description
Edit environment access
Select roles that can edit environment settings or conditions. Cannot create, duplicate, or delete environments.
Incident actions
Select the roles that should be able to use all incident actions (assign, snooze, share, comment) within the environment.
The Admin and User roles are automatically selected since they have full incident action permissions by default.
View incidents
Select the roles that should have read-only permissions for all incident actions (assign, snooze, share, comment) within the environment.
If no roles are selected, only users with access to all environments will be able to access the environment.
In the Incident Conditions section, you can set environment rules to limit and define which incidents appear in the environment. See the Incident Conditions section below for more information.
When satisfied with the environment settings, click Create Environment.
(Optional) After you have created the environment, you can open the environment editor to configure AutoShare rules. Select Advanced Settings and then click Create AutoShare to open the Create a new AutoShare screen.
AutoShare rules
If you have already created AutoShare rules for an environment, they will appear in the Advanced settings section under AutoShare rules.
Duplicate an environment
No need to start every environment from scratch! Duplicate an environment to create a new environment based on its settings. Click the Three Dots to the right of the environment name and select Duplicate. Adjust the settings to fit the new environment requirements and remember to give the environment a unique name.
Environment Criteria
When defining environments, you can filter incidents based on their alert properties or tags. You can filter environments by any standard or custom tags.
An incident is included in an environment if at least one of the active alerts meets the filter criteria. For example, if you add a condition that the check value must be CPU, an incident containing a CPU and memory alert will be included. Similarly, if you configure the environment to include only critical alerts, an incident that contains one active critical alert and several warning alerts will be included. This logic gives you maximum visibility into any incidents that are potentially related.
Environments with incident tags
When creating environments within BigPanda, you can also leverage incident tags such as priority, team, assignee, or business asset, speeding up triage and incident investigation.
The Basic editor provides a visual framework for adding environment criteria. To add incident conditions to your environment:
After All Systems from the Source System drop-down menu, select a Tag from the dropdown list. Standard and custom tags are auto-populated from your system. To narrow the options, type the name of the desired tag in the search bar at the top of the dropdown.
Select an Operator from the drop-down menu.
Enter the value(s) in the text box to filter by. When using the
Equals ToorNot Equals Tooperators, enter the value you want to match. When using the In or Not In operators, enter a comma-separated list of the exact values you want to match. Do not use spaces between comma-separated values.(Optional) To add additional criteria, repeat the environment criteria steps.
To add an additional top-level condition or secondary source, click Add Another. To delete a top-level condition or secondary source, click the Trash icon at the top right of the editor box for that source.
When satisfied with the environment settings, click Create Environment.
Wildcards
When using the Equals To or Not equals to operators, you can use an asterisk (*) as a wildcard to match multiple values that contain a common element. For example, entering “db-_.domain.com” finds all values that start with db- and end with domain.com.
You cannot use wildcards with the In list and Not in list operators.
Use the BPQL Editor
In addition to the Basic editor, you can use the BigPanda Query Language (BPQL) editor to create environment criteria and conditions without the limitations of the Basic editor.
To use the editor, select BPQL at the top of the environment criteria editor. Enter your BPQL query in the text box to define your incident conditions
When creating criteria and conditions using BPQL, the Query Assist feature helps you build a query. See Query Assist for more information.
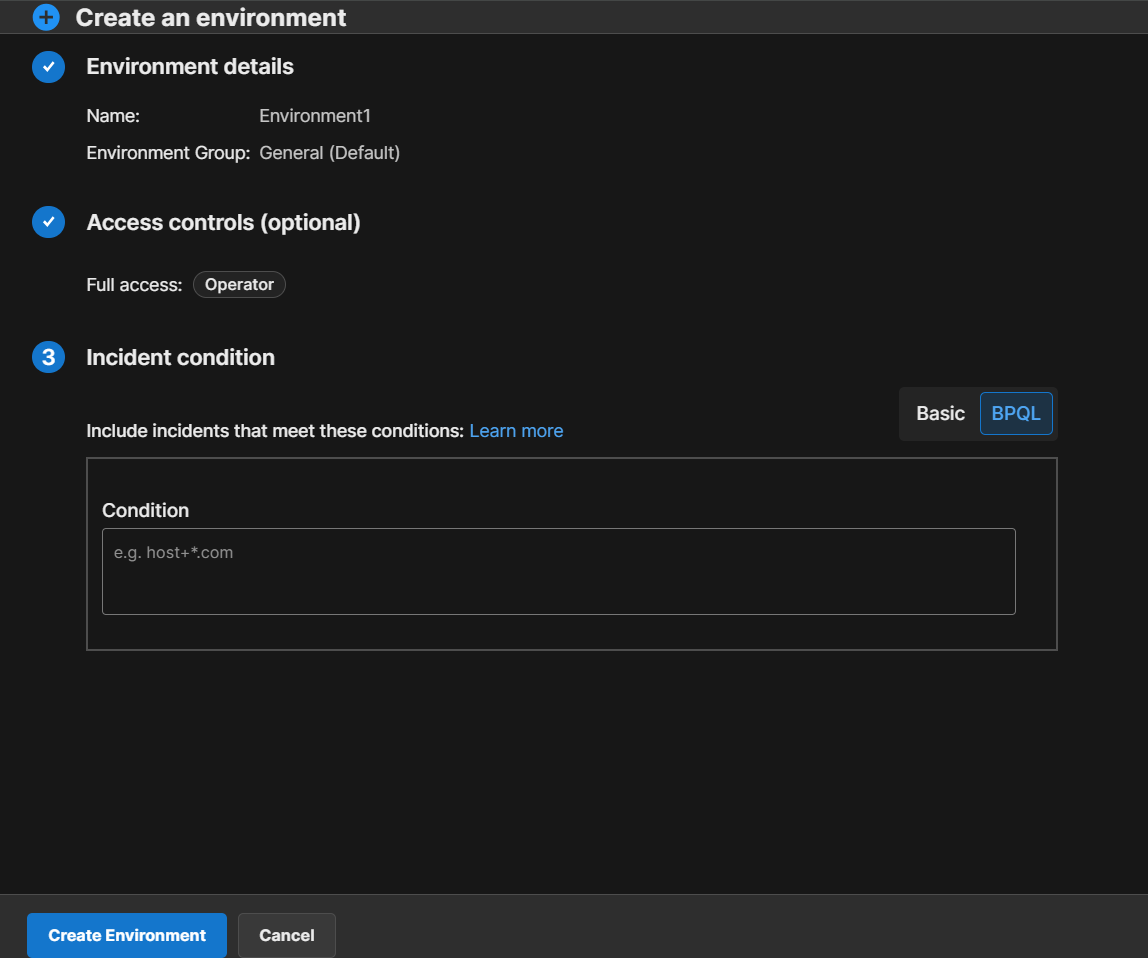
The Environments BPQL Editor
If you previously created conditions with the Basic editor they will be translated automatically into BPQL in the BPQL editor Condition field.
BPQL environment editor
If you use the BPQL environment editor to create or edit an environment, the Basic environment editor will no longer be available. Once you click Create Environment, the environment will permanently be in BPQL mode.
However, if you create an environment with the Basic editor, you can later switch to using the BPQL editor when you edit the environment.
Example Environment Queries:
An environment with only Critical Incidents - no incidents with only the acknowledged or warning statuses -
from All Systems: source_system = * AND status = critical AND zero_impact != "true"An environment with all incidents that include a
CPU overloaded checkfrom All Nagios Systems: source_system = /nagios..*/ AND check = "CPU overloaded" AND zero_impact != “"tru”e"An environment for all incidents from All Systems that affected a database
host: source_system = * AND host = “database” AND zero_impact != "true"
Reserved words
Certain words in BigPanda are reserved when using BPQL. When using these words to build environments, the system builds the environment according to the reserved meaning and is not able to treat them as a custom alert tag.
zero_impact= iffalsethis means the environment has no incidents with the acknowledged or maintenance statusstatus= the current status of the incident. Possible statuses are: Critical, Warning, Unknown, Ok, or Acknowledgedseverity= the max status reached by alerts in an incident. Possible statuses are: Critical, Warning, Unknown, Ok, or Acknowledgedsource_system= the ID of the source system that produced the incident
To learn more about composing using BPQL, please see the BigPanda Query Language (BPQL) documentation.
Example Environment Configuration
You can create Environments based on the different responsibilities within your Ops teams. This example demonstrates how to define an Environment for a DBA team that focuses on incidents for production databases and related analytics applications.
At the top of the screen, click the Incidents tab.
At the top of the left pane, click the plus sign icon.
From the menu, select New Environment.
In Environment Name, enter DBA.
In the Source field, select Nagios (ALL).
Click the Plus sign.
Select the tag, select the operator, and enter the value as listed in a row of the following table.
Repeat Steps 5 – 6 for each row in the table.
Tag | Operator | Value |
|---|---|---|
Host | Equals To | _db._ |
Hostgroups | Not Equals To | staging |
Check | Not Equals To | keepalive |
Filter conditions
These filter conditions are defined for a hypothetical sample environment. You can adapt the conditions as necessary to meet your infrastructure configuration and the needs of your teams.
8. Click Add Another to open a new source condition box.
9. In the Source field, select New Relic (ALL).
10. Click the Plus sign beneath the New Relic (ALL) source.
11. Select the tag, select the operator, and enter the value as listed in a row of the following table.
12. Repeat Steps 10 – 11 for each row in the table.
Tag | Operator | Value |
|---|---|---|
Application | Equals To | Analytics |
Description | Equals To |
|
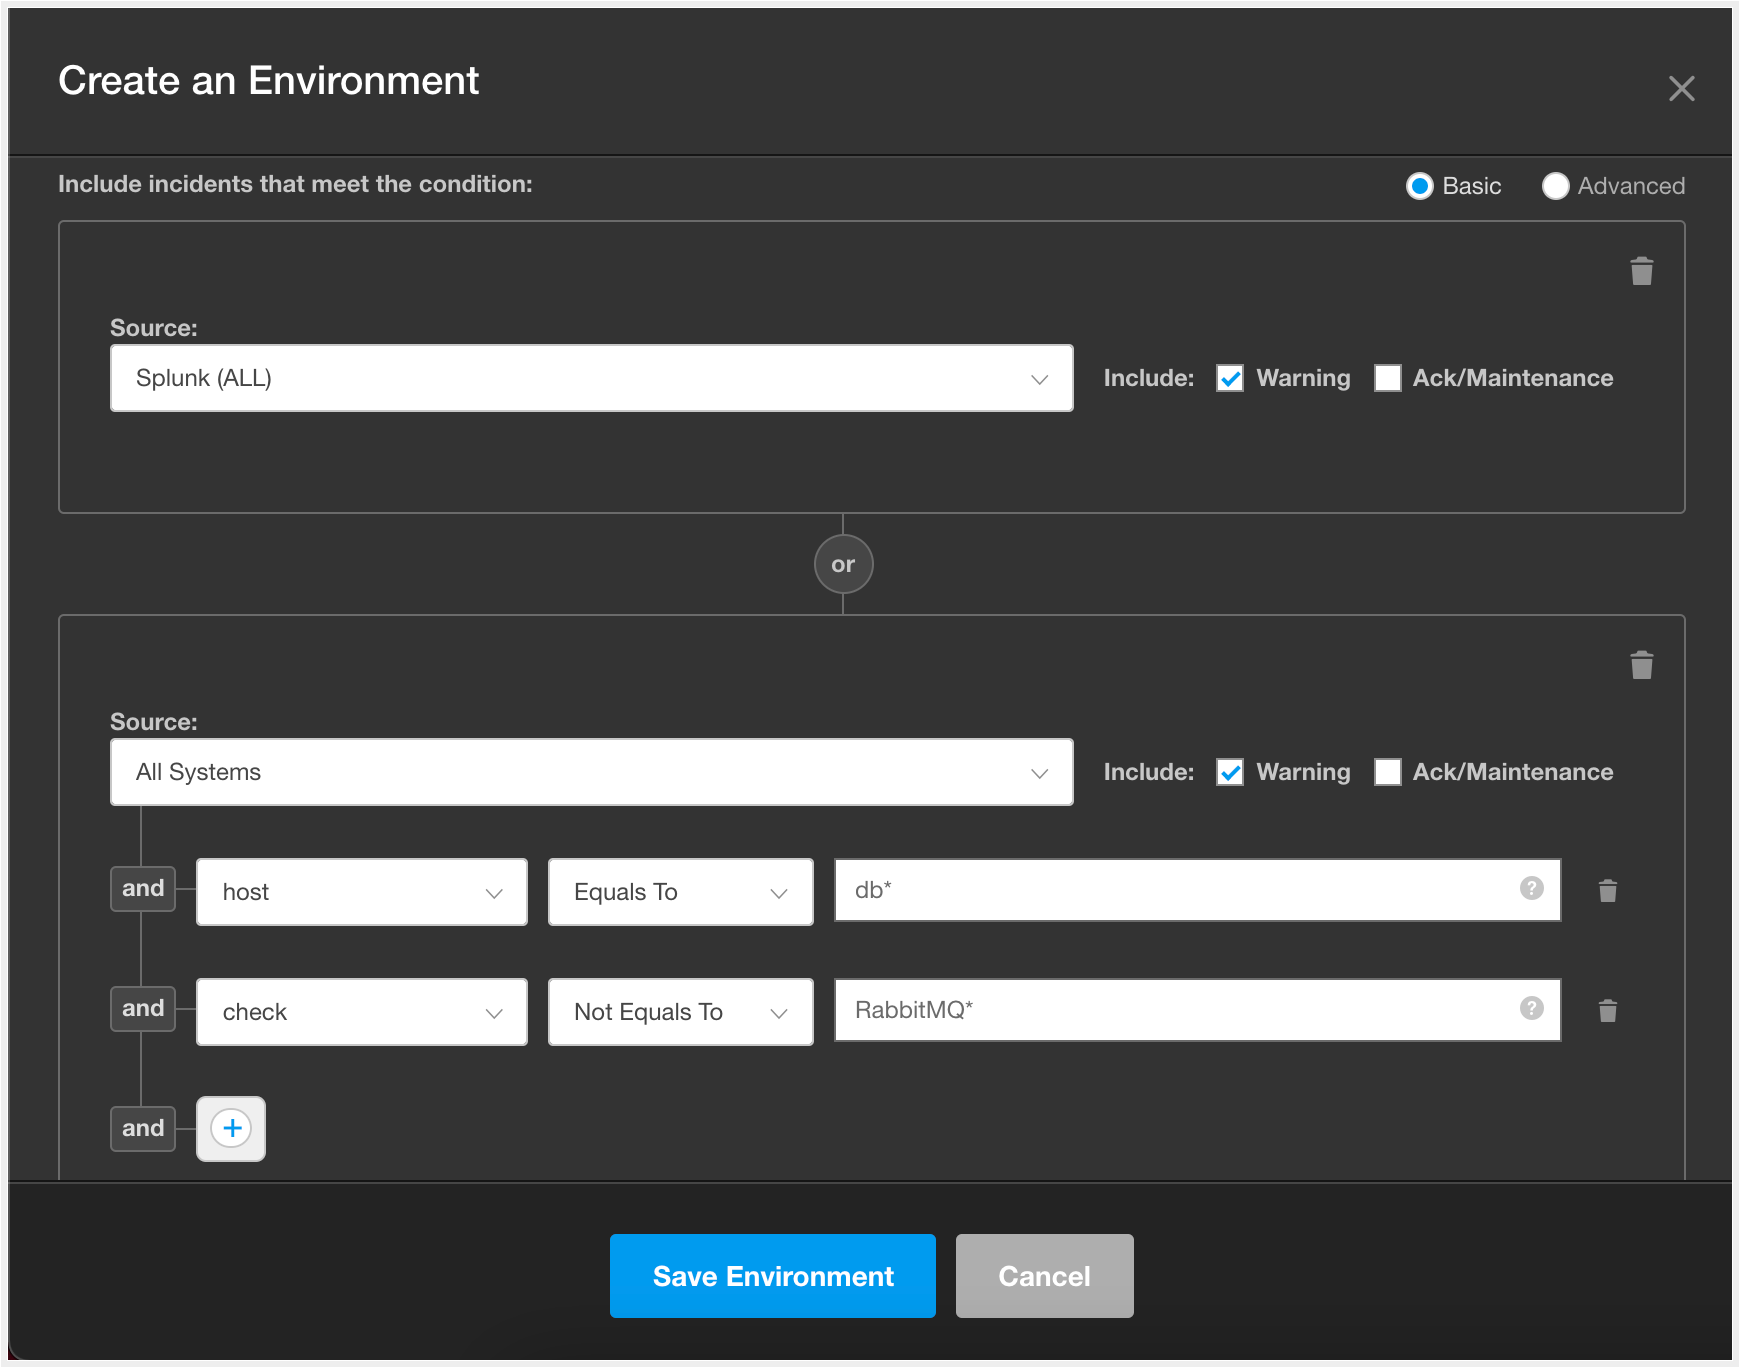 |
Example DBA Environment Settings
If the Advanced Editor has been enabled, you can also create this environment by navigating to the Advanced editor and entering:
(sourcesystem = /nagios../ AND Host = /.db../ AND Hostgroups != "staging" AND check != "keepalive" AND zeroimpact != "true") OR (source_system = /new relic../ AND Application = "Analytics" AND Description = /.ping./ AND zero_impact != "true")
13. Review the Preview pane to ensure that the correct incidents are included.
14. Click Save Environment.
The environment now appears at the bottom of the environments list. The environment will update as new relevant incidents come in for your DBA team to review.
Edit Environments
Environments can be edited to better fit the needs of your changing organization and processes.
To edit an environment:
Hover over a desired Environment's name in the Environments pane.
Click the Three Dots icon.
Select Edit.
Make any desired edits to the environment settings or filters.
Click Save Environment to finalize the changes.
The environment is updated to show incidents that meet the new settings. If the new settings add incidents to the environment that would trigger an AutoShare, the incidents will be shared.
Delete Environments
If an environment becomes irrelevant or is clouding your view, it can be deleted at any time. Environments are deleted from the Environments pane.
To delete an environment:
Hover over a desired Environment's name in the Environments pane.
Click the Three Dots icon.
Select Delete.
A confirmation prompt will appear, select Delete Environment to confirm the deletion, or Cancel to return to the Incidents tab.
The environment is permanently deleted from BigPanda.
Caution when deleting
Environments are used in AutoShare, Analytics, and Dashboards, so it is best practice to ensure that an environment is not being used in any process before deleting it.
Sort Environments
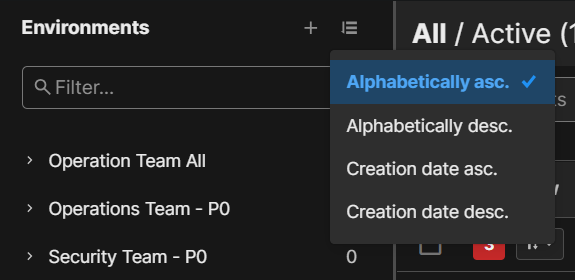
You can sort the list of environments Alphabetically or by Creation date.
To sort the list, navigate to the upper right corner of the Environments pane and click the Sort button.
Manage Environment Groups
Environment groups allow you to customize the BigPanda console to better fit the organizational structure and processes of your organization. Create, edit, or delete environment groups to help your teams stay focused on the most relevant information to them.
Environment groups are managed from the Environments pane.
Create a New Environment Group
A new environment group can be created at any time. New environment groups appear at the bottom of the environments list in the environments pane and cannot be reordered.
To create a new environment group:
At the top of the Environments pane on the left, click the plus sign icon.
From the menu, select New Group.
Enter a Group Name.
Select Create Group.
The environment group now appears at the bottom of the Environments pane and is available in the Apply to group dropdown when creating or editing environments.
Group order
In BigPanda, Groups appear on the left panel in the order they were created and cannot be rearranged.
Assign an Environment to an Environment Group
Environments can be assigned or reassigned to environment groups at any time. Each environment can only be assigned to a single group at a time.
To assign an environment to an environment group:
In the Environments pane, hover over a desired environment name.
Click the Three Dots icon.
Select Edit.
Under the Apply to group dropdown, select the desired group name.
Select Save Environment.
The environment now appears under the group heading in the left pane and can be hidden or shown with the environment group.
Edit an Environment Group
To edit an environment group:
In the Environments pane, hover over a desired environment group name.
Click the Three Dots icon.
Select Edit.
Make any desired edits to the environment Group Name.
Click Update Group to finalize the changes.
The environment group will automatically update in the Environments pane and the Apply to group dropdown.
Delete an Environment Group
Environment groups can be deleted at any time. Deleting an environment group does not delete the associated environments. All environments assigned to the group will be reassigned to the General environment group.
To delete an environment group:
In the Environments pane, hover over a desired environment group name.
Select the Three Dots icon.
Select Delete.
A confirmation prompt will appear, select Delete Group to confirm the deletion or Cancel to return to the Incidents tab.
The environment group is permanently deleted from BigPanda.
BigPanda Environments API
The BigPanda Environments API is able to pull environment details, and can create, update, and delete environments or environment groups.
Once an environment has been created or edited using the Environments API, the Basic environment builder will no longer be available for that environment.
For more information about the Environments API, please see the Environments API reference page.
Next Steps
Learn more about viewing incidents in Environments
Find your way around the BigPanda Settings page
Learn how to manage environments using the Environments API