Jira Changes
The BigPanda Jira app creates a Jira webhook that sends BigPanda all new and updated issues matching the customer-provided JQL filter. The change data is processed and normalized according to the configuration provided in the BigPanda Jira app. The prepared change record is then sent to the BigPanda Console.
Once in the console, these changes are available for use in the RCA process with BigPanda's Root Cause Changes feature.
Supported Versions | Type | Authentication Type |
|---|---|---|
Jira Cloud or Jira Server | Native App or Webhook | API Key and Bearer Token |
Key Features
Native app to easily integrate BigPanda with Jira.
JQL filters to target your projects and issues for change management.
Easy configuration via the configuration form located in the BigPanda Jira app, where you can:
Map custom statuses in Jira to BigPanda statuses.
Map custom fields in Jira to BigPanda tags.
Hide any undesired fields from the BigPanda UI.
Data Models
BigPanda converts and organizes Jira issue information into tags.
Default Field Mapping
BigPanda Tag | Jira Field | Description |
|---|---|---|
|
| The unique identifier for the change. |
|
| The change status. |
|
| When the change started. |
|
| Summary of the change. |
|
| When the change ended. |
The mapping between Jira fields and BigPanda tags can be customized in the app configuration.
Default Status Mapping
BigPanda Status | Jira Statuses | Description |
|---|---|---|
| [none] | A change has been planned but is not yet in progress. |
|
| A change is currently in progress. |
|
| A change was resolved. |
| [none] | A change was cancelled or aborted. |
The mapping between Jira and BigPanda statuses can be customized in the app configuration.
Install the Integration
Install the integration by following these steps:
Create an app key
Create an app key in BigPanda.
Integration specific
You'll need a separate app key for each integrated system.

App key configuration in BigPanda
Create an API Key
Navigate to Settings > API Keys to create a new API key. You will need this for authorizing and configuring the integration. Once you generate the API key, be sure to copy and save it, as this key will only be visible once.
Install & Connect the BigPanda App
Install the BigPanda application from the Atlassian Marketplace, following the instructions in Jira's documentation for integrating new apps.
Jira admin permissions needed for install
Only Jira admins can add a new app, but once the BigPanda app is added to your Jira, it can be configured and managed without admin permissions.
Once the BigPanda app is installed:
In Jira, navigate to Apps > BigPanda in the sidebar menu.
Fill in the API Key and App Key fields with the following values:
API Key: API Key Created Earlier
App Key:
<Your App Key>
Click Save.
Configure the integration in Jira
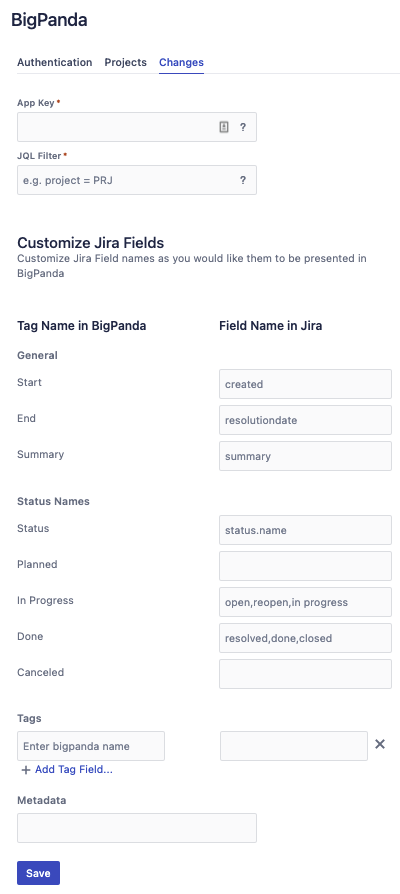
To finish creating the integration, log into Jira and navigate to Apps > BigPanda, then click the Changes tab. Enter the following information:
App Key:
<Your App Key>JQL Filter: The saved search filter you want to use. The integration will send BigPanda all new and updated issues that match this filter. (Note that only this subset of JQL clauses are currently supported by Jira's webhook.)
The default configuration uses a fixed set of Jira fields for creating a change in BigPanda. Generally you will want to customize which Jira fields are used when creating change records in BigPanda.
The additional fields on the configuration page can be updated to reflect your unique environment needs.
Jira Cloud Configuration
Additional settings can be configured for Jira cloud, including Status Names, Field format, Tags, and Metadata.
Configure the Integration
In the main Jira menu, select BigPanda to open the configuration editor.
 |
Configuration Editor
General Section
The General section allows you to specify the Jira field name for the following BigPanda tags:
startendsummary
Status Names Section
The Status Names section allows you to specify:
The Jira field for the change
status.The mapping of Jira statuses to BigPanda statuses.
Field Format
Provide a comma-separated list of Jira statuses for each BigPanda Status (ie: done, resolved, closed, completed)
Field Format
Provide a comma-separated list of Jira statuses for each BigPanda Status (ie: done, resolved, closed, completed)
Tags Section
By default, all Jira issue fields are mapped to tags in BigPanda using their field names.
Customize Jira field names and BigPanda tag names in the Tags section.
Metadata
BigPanda Changes allows you to hide specific tags from the Console without losing the ability to leverage these tags in correlation. To use the Metadata section to hide specific tags, provide a comma-separated list of the field names you wish to exclude.
Jira Server
Configure the webhook
A webhook URL needs to be created with all the necessary query parameters to make sure BigPanda processes the Jira Issues correctly.
This table represents all the required and optional query parameters the webhook can leverage.
Query Parameter | Value Options | Description |
|---|---|---|
| BigPanda API Key | |
| App key for the Change API integration. | |
| true/false | Overrides the default status field. |
| Jira field | If |
| true/false | Overrides the default status mapping. |
| URI encoded Object Object keys: BigPanda Change statuses Object value: Array of Jira statuses to match | If Reference default status mapping |
| Jira field | (Optional) Overrides the default start field |
| Jira field | (Optional) Overrides the default end field |
| Jira field | (Optional) Overrides the default summary field |
| URI encoded Object Object keys: Jira field Object value: BigPanda tag name | (Optional) This parameter allows you to provide a user friendly name to any Jira field. |
| URI encoded Array Ex: ["jirafield"] encoded: %5B%22jirafield%22%5D | (Optiona) List of Jira fields to hide from the BigPanda Console. |
Start with the base URL:
https://inbound.bigpanda.io/jira/changesAdd the required query parameters to the URL. Example:
https://inbound.bigpanda.io/jira/changes?api_key=1234567890&app_key=0987654321&override_status_field=false&override_status_mapping=false
Add any additional query parameters to meet your desired configuration
URL Encoding
For the status_mapping and tags parameters, it is required to URI encode the values. These values are added to the call URL sent to the webhook.
For example, the default status map:
{
  "Planned": ["approved", "in review"],
  "In Progress": ["pending"],
  "Done": ["done", "finished"],
  "Canceled": ["cancelled", "rejected"]
}
Would look like this once encoded:
https://inbound.bigpanda.io/jira/changes?api_key=1234555590&app_key=0987655551&override_status_field=false&override_status_mapping=true&status_mapping=%7B%0A%20%20%22Planned%22%3A%20%5B%22approved%22%2C%20%22in%20review%22%5D%2C%0A%20%20%22In%20Progress%22%3A%20%5B%22pending%22%5D%2C%0A%20%20%22Done%22%3A%20%5B%22done%22%2C%20%22finished%22%5D%2C%0A%20%20%22Canceled%22%3A%20%5B%22cancelled%22%2C%20%22rejected%22%5D%0A%7D
Remove Extra Spaces
All extra spaces must be removed prior to encoding the object.
Encoder resource
Quickly decode or encode json with an automatic encoder such as that at urlencoder.org.
Create the Webhook
Log into your Jira instance.
In the left panel, go to Jira Settings > System > Webhooks.
Click on Create a Webhook.
Enter a name for the webhook.
Add your generated webhook from the previous step.
Add a JQL Query to the webhook so that only the projects you want are pushed to BigPanda.
Check the Issue created and updated checkboxes.
Click create at the bottom.
Uninstall the integration
BigPanda must be fully uninstalled before being integrated with a new Jira instance
A BigPanda instance can only be integrated with one Jira instance at a time. If you want to integrate BigPanda with another Jira instance, you must follow all of these steps to fully delete the integration from both BigPanda and Jira.
Deleting an integration requires that you remove the integration in both the integrated system and BigPanda. We recommend that you first uninstall the integration on the integrated system to prevent traffic from being sent and rejected by BigPanda, since the app_key will not exist once you delete the integration in BigPanda.
Uninstall the BigPanda app in Jira
Before deleting the integration in BigPanda, uninstall the BigPanda app in Jira. To do this, navigate to Apps > Manage. Select the BigPanda app, then choose Uninstall.
Stop sending data from BigPanda
In BigPanda, disable any settings that send data to the integrated system. This includes modifying or removing AutoShare rules or Environments that are tied to the integration.
Delete the integration in BigPanda
Take the following steps to delete the integration from BigPanda:
In BigPanda, navigate to the Integrations tab and select the desired integration from the list.
In the integration details on the right of the page, click the trash icon, then confirm you want to delete the integration. The integration will be removed immediately.
Data will not be automatically removed
This procedure does not remove any data from BigPanda or the integrated system. As needed, remove data from each system before deleting the integration.