Manage Incident Enrichment
Incident tags are key-value pairs that can be added to incidents for additional incident enrichment. Tags can be used to sort your incidents to ensure that you have visibility on the most relevant tasks. To learn more about how incident tags work, please see the Incident Tags documentation.
You are able to create, edit, or deactivate incident tags to fit the needs of your organization. Incident tags are managed from the Incident Tags settings page.
Priority tag
The Priority tag is enabled in your system by default with pre-configured settings. You cannot create a Priority tag in your system, but you are still able to edit or deactivate it from the Incident Tags settings.

When managing Incident tags, consider what summary information could be useful for incident management. For example, you can create a tag named ticket status to track the progress of an incident and then enter values such as: To Do, In progress, and Done.
Once configured, incident tags can be manually added to incidents from the Overview tab of the Incident Details pane. Incident Tags can also be configured to automatically be added or assigned to incoming and updating incidents based on incident or alert criteria. To learn more about adding automatic incident tags, please see the Automatic Incident Tag Enrichment documentation.
Relevant Permissions
Roles with the following permissions can access Incident Tags:
Role Name | Description |
|---|---|
Manage Environments | View, create, edit, and delete Environments in the UI and API, and view the incident tags environments contain. See Environment Permissions for more information. |
Incident Enrichment | View, create, and edit Incident Tags in BigPanda Settings. |
Permission access levels can be adjusted by selecting either View or Full Access. To learn more about how BigPanda's permissions work, see the Roles Management documentation.
Create an Incident Tag
You can create new incident tags and add them to incidents in your system at any time.
To create an incident tag:
Navigate to Settings > Incident Enrichment.
Click New Incident Tag.
Enter your tag information in the relevant fields .
When satisfied with your tag settings, select Create Tag.
Tags are activated upon creation and will be immediately available for use. For tags with automatic enrichment configured, the tag will apply to any incoming or updating incidents that meet the enrichment conditions. To learn more about automated tags, please see the Automatic Incident Tags documentation.
You can have up to 100 unique tag definitions configured for your organization.
Unique tag definitions
You can have up to 100 unique tag definitions configured for your organization.
Duplicate tags
If you need to create a tag that is similar to an existing tag, use the Duplicate icon on the existing tag’s ribbon to create a copy. Each tag must have a unique name, and it is best practice to change the tag description to help you identify the differences between the two tags. Make the necessary edits and then select Create Tag to create the new tag.
Tag Options
Field | Description |
|---|---|
Tag Name | Your incident tag name. The tag name is the first half of the key-value pair that will show up on incidents. Each tag name must be unique. The name should be short, specific, and meaningful to everyone in your organization. For example, choose the name Ticket, ID, or Status. The name will appear as the left part of the key-value pairs in the incident details pane. The tag name can contain up to 20 characters and can include spaces. |
Type | Select a type for your tag: List (Single-select): Users or automation can select one option from a dropdown list of preset values. List (Multi-select): Users or automation can select multiple options from a dropdown list of preset values. Multi-value: an array of multiple text values that adds customized information to your incidents. For example, create a tag named “affected services” to list all of the organization’s services affected by the incident, such as: Billing, Payment. Free Text: a free text tag that adds customized information to your incidents. For example, it is useful to create a tag providing a link to a Jira ticket. The tag type cannot be edited after a tag is created. |
Description (Optional) | Add additional information or context for the tag and its use. The note appears in the tag details of the settings screen. |
Closed List of Values | For list-type tags only. The list of values that will appear in the dropdown. For each item, enter a Name that will appear in the list. A description can be added for each item to give additional context for the item’s role. This description will be visible in the tag description in the settings screen and in the Edit Tag screen. Each enrichment rule may have up to 1000 values listed. At least one value must be included for a list-type tag. You can search items currently added to the list by name or description. |
Enable Manual Input | Check the box to enable users to manually change the tag values. Manually changing tag data will stop incident enrichment for that tag. If the box is unchecked, users cannot manually edit this tag within the Incidents tab. If an incident tag was edited by a user and Enable Manual Input is subsequently unchecked, the user’s edits will remain on the tag, but they will no longer be able to make changes. |
Automatic Enrichment (Optional) | Automatic Enrichment allows you to define a formula or set value for calculating incident tag values based on incident or alert conditions, providing you with enriched data about your incidents. For list-type tags, the enrichment value must match at least one item in the list of predefined values. To learn more about using Automatic Enrichment to automatically assign or add tags to incidents, please see the Automatic Incident Tags documentation. |
Tag Calculation Limitations
Many alert tags and metadata have unique properties in BigPanda and cannot be used to create incident tags:
id
status
active
severity
flapping
shared
snooze
maintenance
correlation_matchers_log
start
changed_at
updated_at
end
alerts
assignee
assigner
environments
folders
incident_tags
source_system
number_of_alerts
is_flapping
is_snoozed
is_in_maintenance
attachments
comments
Default Incident Tags
BigPanda provides several configurable, system-generated incident tags by default. These tags are based on industry best practices and are designed to provide you with essential and actionable incident information.
Enabling defaults
Accounts created after April 4th, 2024 will have this feature enabled by default. If you’re interested in enabling this functionality for your organization, contact your BigPanda account team.
Note that once the feature is enabled, the default tags will need to be manually activated. They have unique identifiers and will not interfere with existing tag schemas.
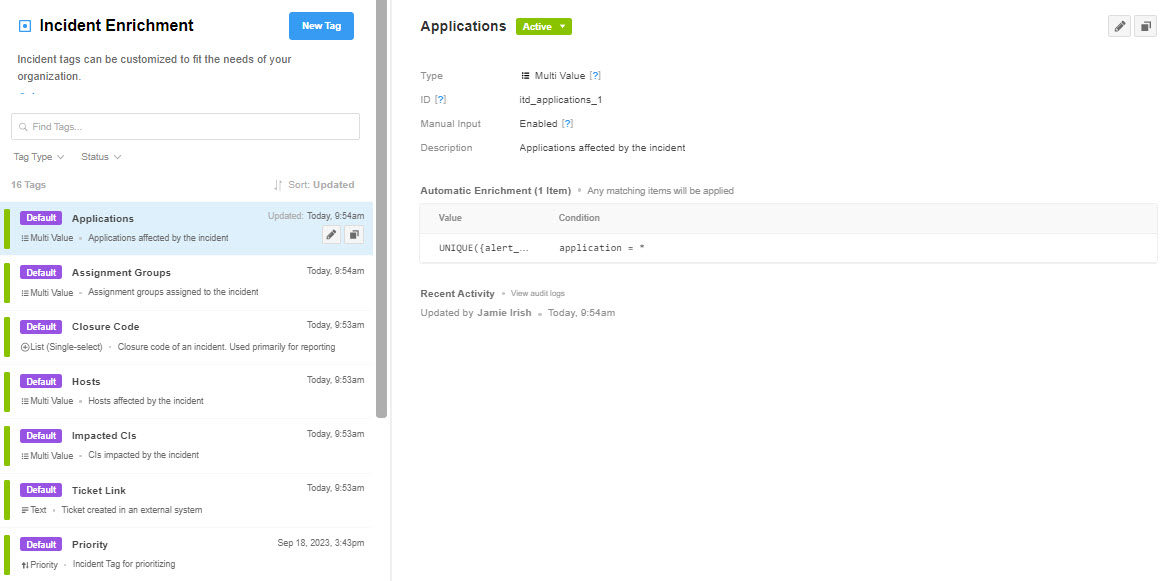
To view these default tags, navigate to Settings > Incident Enrichment. Default tags will have a purple badge to distinguish them from the incident tags you manually create.
Default tags can be edited or deactivated like normal tags, but they cannot be deleted.
Default Incident Tags
Field | Description | Unique ID | Type |
|---|---|---|---|
Hosts | Name of the target system(s) that generated the alert. |
| Multi-value |
Impacted CIs | Configuration items impacted by the incident. |
| Multi-value |
Closure Code | Explanation of the incident's resolution. This single-select list pre-populates with these seven values, but can be edited to fit your use case:
|
| List (Single-select) |
Ticket Link | A link to the relevant ticket in your ITSM. |
| Text |
Assignment Groups | Assignment group(s) in the integrated outbound tool(s). |
| Multi-Value |
Applications | The impacted application(s). |
| Multi-Value |
Priority | Importance or severity of the alert. |
| Priority |
Automatic values
If you want to automatically populate the values for these incident tags, you’ll need to configure Automatic Incident Tag Enrichment.
Default Incident Tags for AI
If your organization has AI features enabled, you’ll also see four AI-specific default tags.
Field | Description | Unique ID | Type |
|---|---|---|---|
AI Reasoning | Explanation of the logical path the AI traveled to suggest the root cause. |
| Text |
AI Root Cause | The timeline and context of alert events. Describes how these alert events might be related. |
| Text |
AI Title | A high level description of the incident. |
| Text |
AI Summary | The full alert data for the incident and summarizes key impact and situation changes for the incident. |
| Text |
Manage Incident Tags
You can edit, temporarily deactivate, or permanently delete each incident tag you created. You can also filter the list of incident tags by entering a search term in the field above the list.
To manage incident tags:
Navigate to Settings > Incident Enrichment. A list of existing incident tags appears.
Select the incident tag you wish to edit, activate/deactivate, or delete.
Use any of the following options to modify the incident tag:
Option | Description |
|---|---|
Edit | Once created, you can edit incident tags at any time. a. Click the Pencil icon on the incident tag ribbon, or the Edit Incident Tag Details button in the incident tag details pane. b. The Tag Editor opens, allowing you to make changes to the tag settings. c. When satisfied with the tag settings, click Update Tag. |
Duplicate | Duplicate a pattern to use a previously created pattern as a template for a new pattern. a. Click the Copy icon. b. Adjust the incident tag as necessary to fit the new properties. The system will not allow duplicate incident tags and will trigger an error message if you try to save the tag while it is identical to any other incident tag in the system. c. Click Duplicate Tag when you are happy with the changes. |
Active or Deactivate | Using the toggle button, select Active or Deactivate. A deactivated Text or Multi-value incident tag will no longer appear in the Overview tab of new and incoming incidents. The tag will still appear on any incidents it was previously added to. A deactivated incident tag will still appear on the Incident Tag list in the BigPanda settings in case you wish to reactivate it in the future. If a Priority incident tag is deactivated, the priority dropdown menu no longer appears in the Incident feed and the Priority tag cannot be added to an incident. When the Priority tag is deactivated, incidents are still marked with their original priority but they are no longer sortable and priority can no longer be assigned. A tag can be activated at any time. The tag will then be available to be manually added to any active incidents. If the tag has automatic enrichment enabled, it will only be automatically added or assigned to new or updating incidents. To learn more about automatic enrichment tags, please see the Automatic Incident Tag Enrichment documentation. |
Delete | Delete an incident tag when you are sure that it no longer applies to your infrastructure or process. A deleted incident tag cannot be recovered. a. Click the Trash icon. b. Click Delete to confirm, or Cancel to return to the previous page |
Incident Tag ID
Each incident tag is assigned a system-generated incident tag ID which may be different than the tag name. The incident tag ID is used in the Incidents V2 API, for performing search queries, and for defining BPQL conditions using incident tags.
The incident tag ID is located on the Incident Enrichment screen in the tag details pane.
You can also find incident tag IDs by selecting an incident tag name in BPQL Query Assist. The incident tag ID appears in the search bar after clicking the incident tag name.
Priority Tag Customization
The Priority tag is preconfigured with five levels each assigned a name and color. You are able to edit these settings to create a customized hierarchy for your incidents.
You will not be able to change the tag type for the Priority tag, but can edit the tag name or note.
 |
Edit Priority Incident Tag Options
You can define the following fields for each Priority Level:
Field | Description |
|---|---|
Name | Name the priority level. Default priority levels are P1 through P5, but can be modified as desired (e.g., critical, warning, urgent). When the name of a priority tag is changed, the change applies to all existing incidents as well as new incidents. The level name can contain up to ten characters. |
Color | Select a color for the priority level. You are able to choose custom colors using the color picker. Up to two levels can have the same color. |
Description (Optional) | Provide additional details about the priority level. The note appears in the priority tag details of the Incident Tag settings screen. |
Each priority level is able to be activated or deactivated using the Active toggle to the right of the level. A deactivated priority level is removed from the incident priority menu and can no longer be assigned as a level of priority to incidents. However, a deactivated priority level is still visible for incidents that have already been assigned this level.
When a level is deactivated, incidents marked with that level are still sortable by priority.
BigPanda Incident Tags API
The BigPanda Incident Tags Definitions API is able to create and update incident tags, as well as get incident tag definitions. For more information about the Incident Tags API, please see the Incident Tags API reference page.
Next Steps
Take the Incident Tags and Automatic Incident Triage BigPanda University Course
Learn more about Automatic Incident Tag Enrichment
Dig into Incidents in BigPanda
Learn more about navigating the BigPanda Settings page