Major Incident Management (MIM) Templates (IA)
Major Incident Management (MIM) workflows automate and accelerate major incident management with preset actions.
When starting a major incident, Biggy will prompt you to select a MIM template. For more information about handling major incidents, see the Manage Major Incidents documentation.
As major incident management processes vary across services and scenarios, you can configure multiple templates.
Configure MIM templates in the web app at Manage > Workflows > MIM Templates.
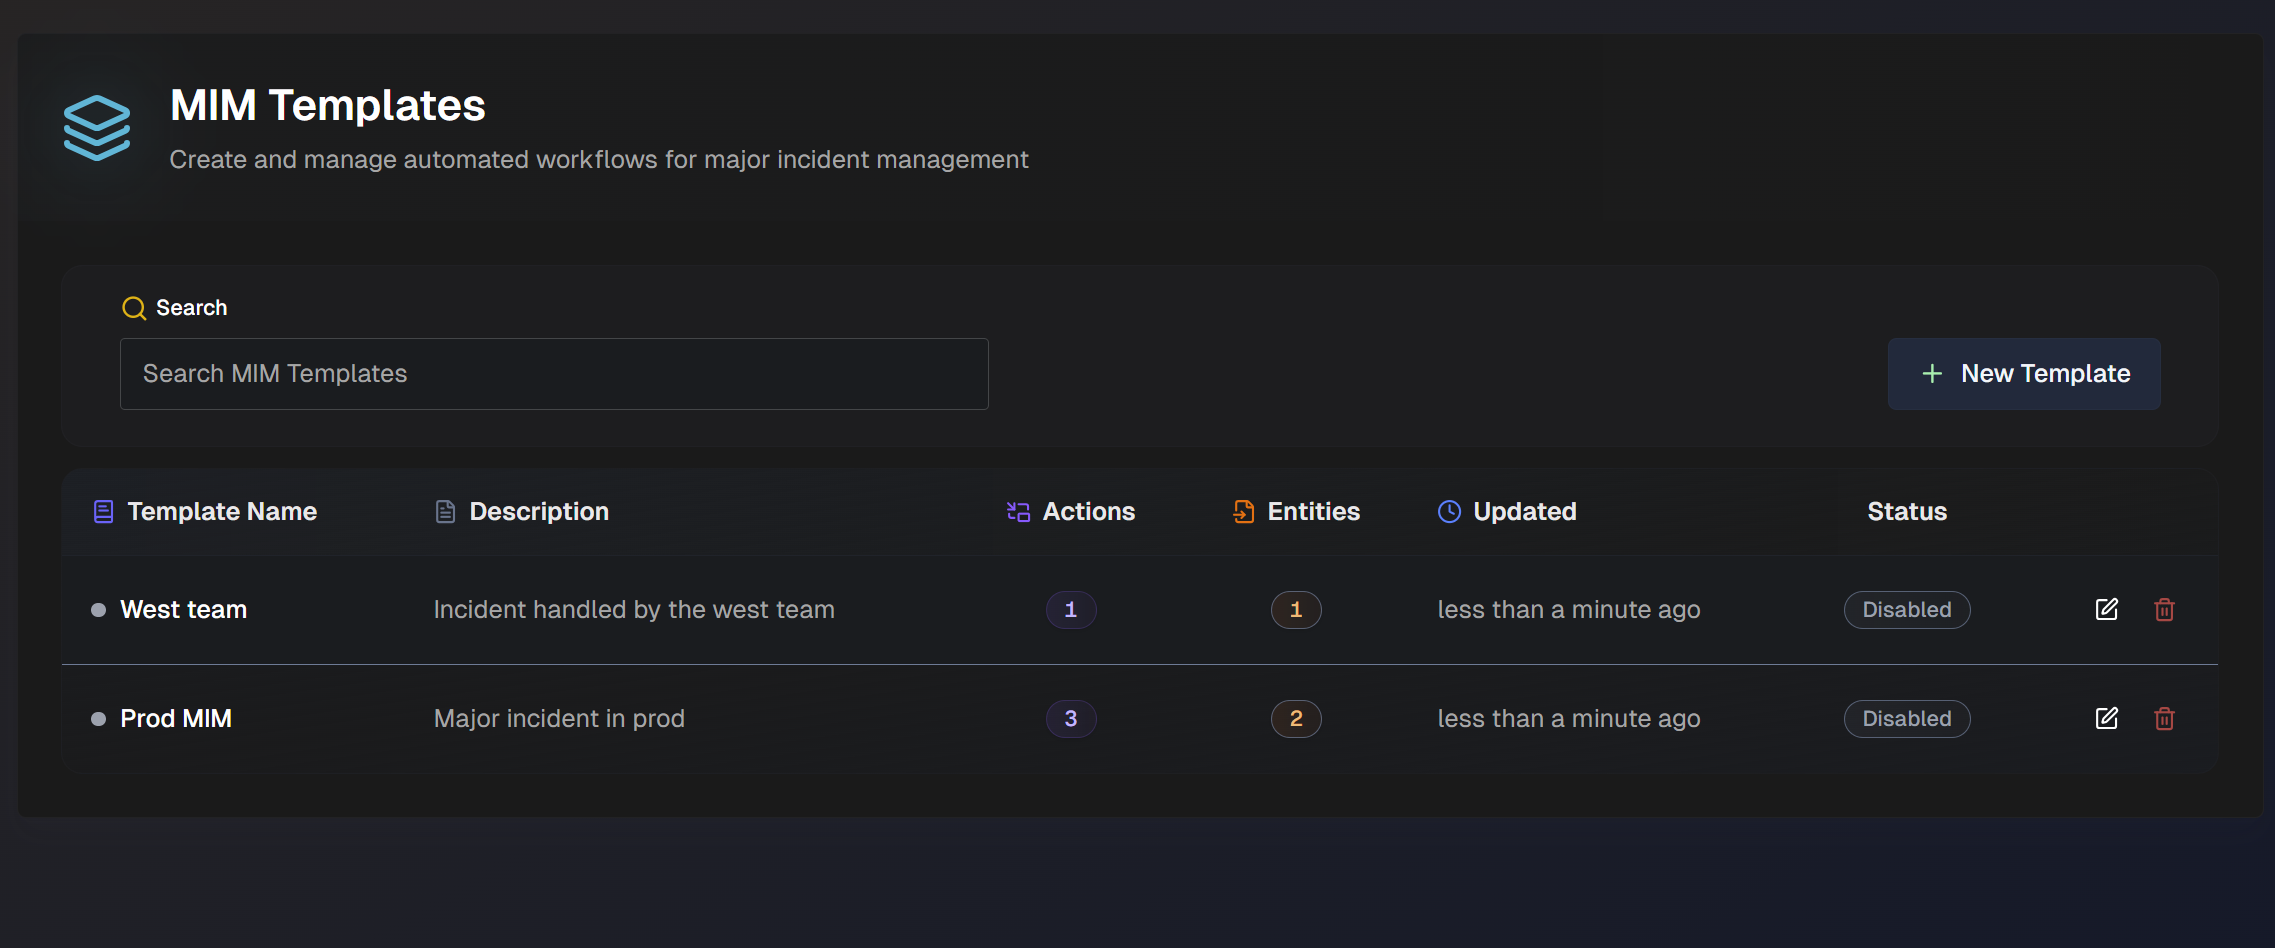
In the MIM Templates list, you can see information about each existing template:
Template Name
Description
Number of actions
Number of entities
Last updated time
Status (Enabled or Disabled)
To make a template the default, click the Star icon. Default templates appear first in the selection list when initiating a MIM.
To edit an existing template, click the Pencil icon.
To create a new MIM template from an existing one, click the Clone icon.
To delete a template, click the Trash Can icon.
Use the Search bar at the top of the page to find a specific template.
Create or Update a MIM Template
To create a new MIM template, click New Template.
Choose between the Guided Setup, Quick Start, or Start from Scratch.
Clone a template
If your organization has already created one or more MIM templates, you can create a new template using an existing one.
Use the Clone button to copy an existing template. Choose a unique name for the new template. You can then edit or add fields to the new cloned template.
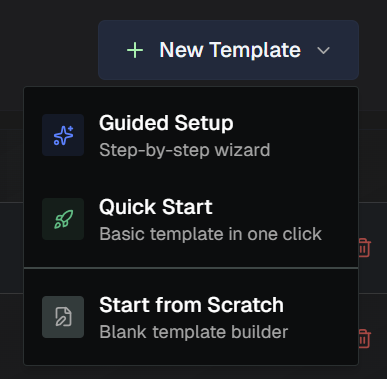
The Guided Setup walks you through each step of creating the template in a step-by-step wizard. This option is especially helpful if it's your first time creating a MIM template.
Quick Start creates a basic preset template containing an incident announcement, recurring status updates, and a resolution summary.
After finishing the guided setup or quick start, you can edit any fields as needed in the full template builder.
To open the full, blank template builder, select Start from Scratch.
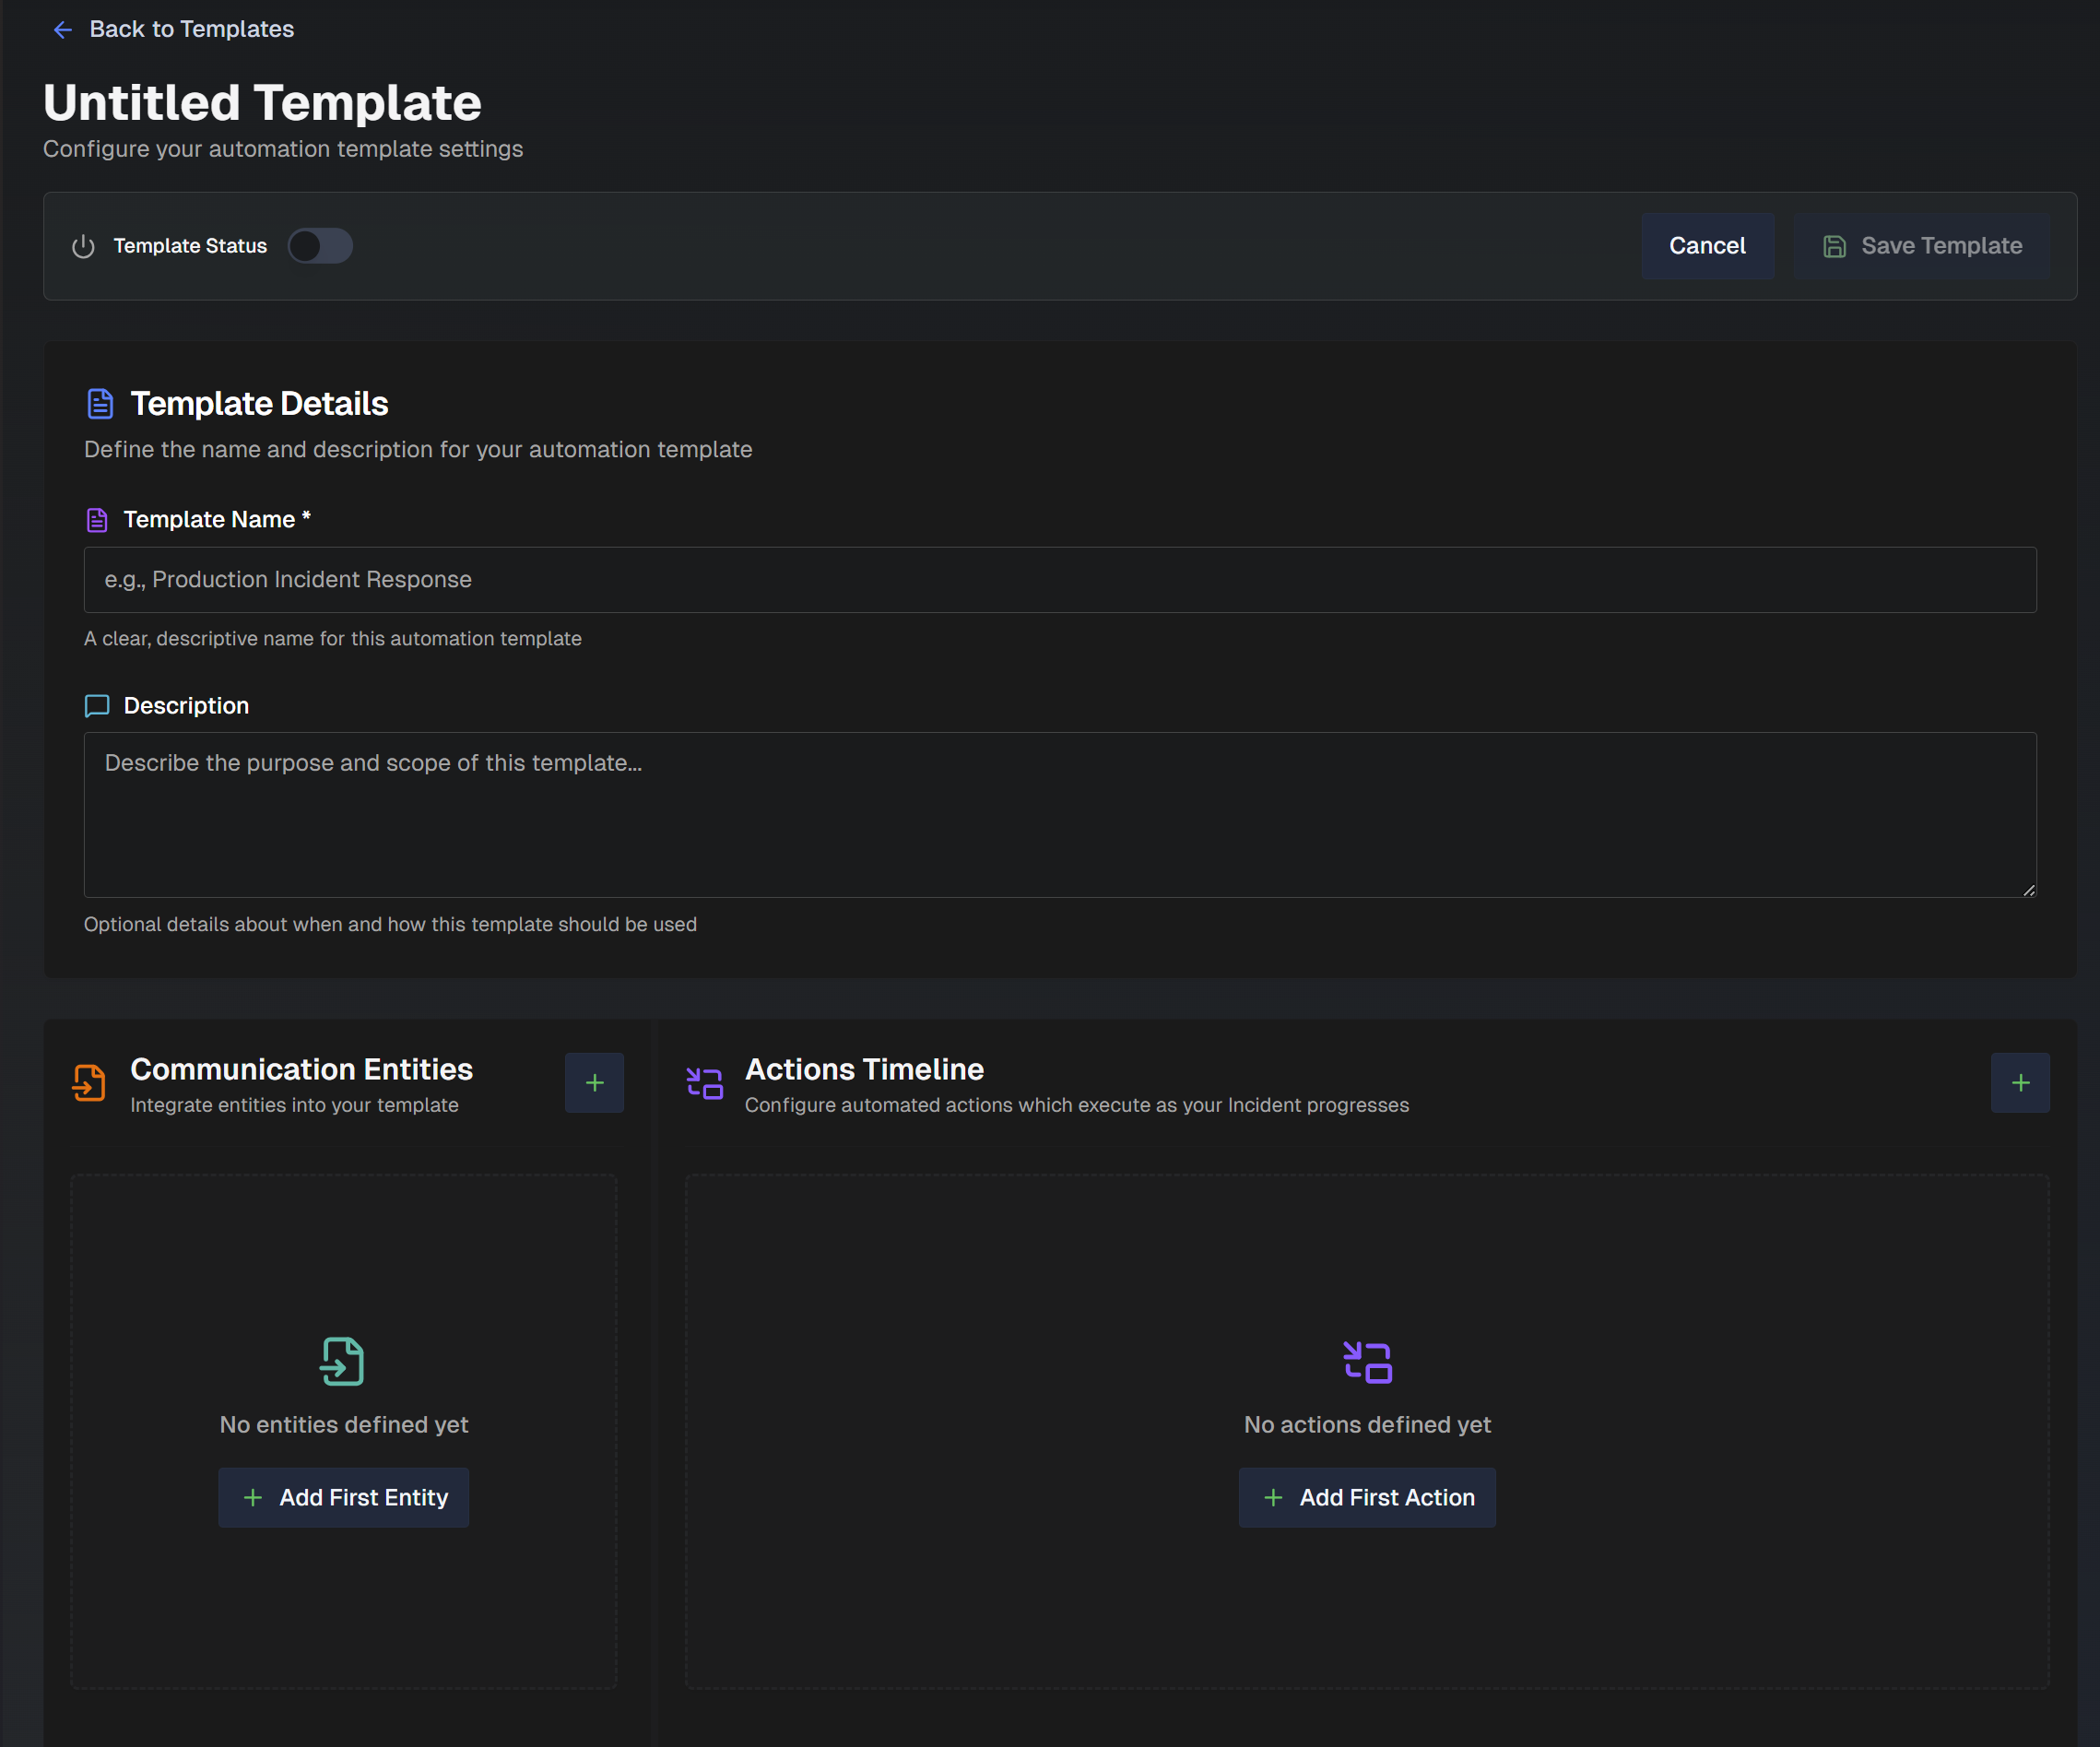
At the top left of the page, use the Template Status toggle to determine whether the template is active or inactive. Only active templates can be selected when initiating a major incident.
Populate the Template Details, Communication Entities, and Actions Timeline sections to create a new template:
Template Details
In the Template Details section, provide basic information to help other users understand the template's purpose.
Field | Description |
|---|---|
Template Name (Required) | A clear, descriptive name for the template. |
Description | Details about how and when this template should be used. |
Incident Priority | Select whether the incident priority is predetermined in this template, or if it should be chosen at MIM creation. The custom priority values configured in General Settings are used. Select one of the following options:
|
Banner Content | Control how much incident detail the pinned MIM banner shows in Slack and Teams. Choose from the following options: Banner content settings apply to new MIMs created from this template; running MIMs retain their original layout. Slack and Teams show the same sections. On Teams, text sections render in the facts table above links and action items.
|
Threaded Teams Output | Post incident updates as replies under the original Teams channel post instead of new channel posts. Applies to Teams channels only; meeting and group chats are unaffected. |
Default Members | Define which users or user groups are invited when a MIM starts. Select to invite people or groups to all incidents or to incidents with a specific priority level. |
Broadcast Channels | Select one or more channels to receive an incident announcement. Select whether incidents should only be posted in the channel when the priority is a specific level, and the notification behavior on incident resolution. When an incident's priority changes mid-incident, newly matched channels receive the announcement. Broadcast posts are updated in place and never removed mid-incident. A Slack channel set to Delete notification has its announcement removed when the incident completes, keeping live-view channels limited to active incidents. Reopening the incident posts a new announcement. |
Status Page | Enable the Status Page section to auto-generate an internal Status Page when a MIM is created using this template. The status page will update as the incident progresses. After enabling this section, populate the following information:
|
Communication Entities
In the Communication Entities section, configure which channels or communication sources (such as chat channels, ServiceNow tickets, or emails) will be monitored for updates, used to post automated actions, or used for on-call paging. Multiple communication entities can be added to a single MIM template.
If your template has existing communication entities, basic information about each entity will be displayed in the Communication Entities section of the template.
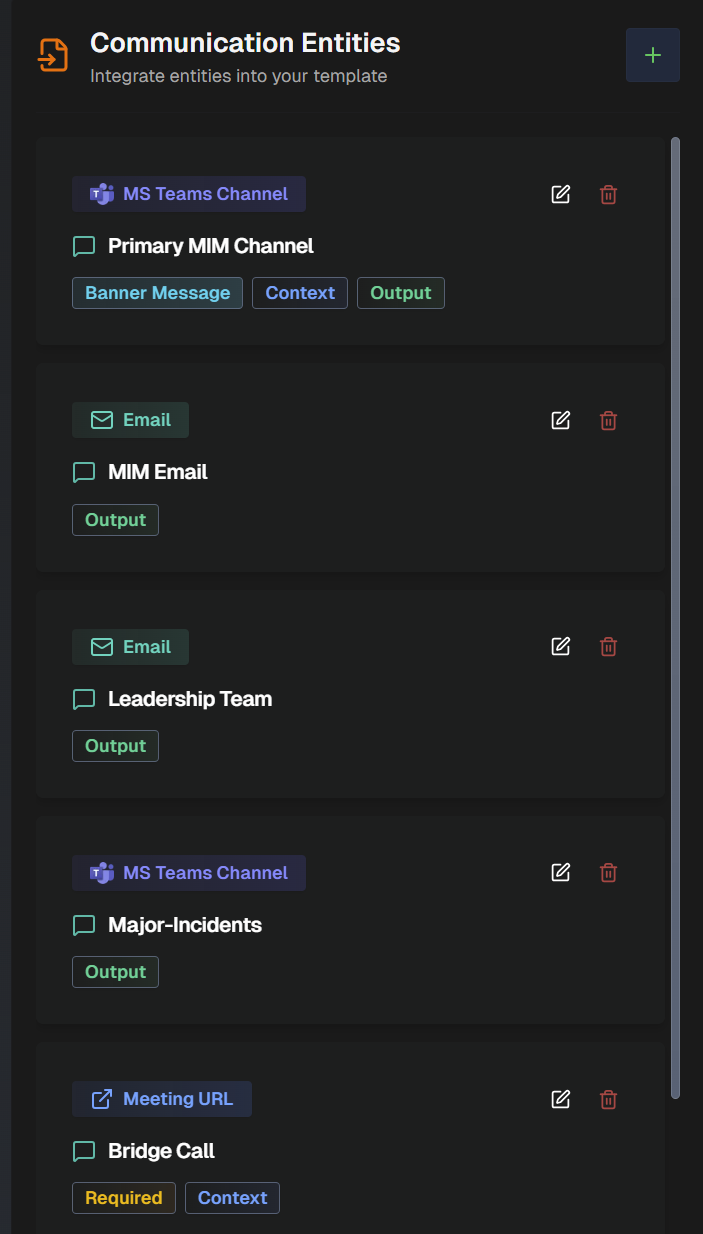
You can edit or delete any existing communication entity. In the list of communication entities, click the Pencil icon to edit a communication entity, or click the Trash Can icon to delete an entity.
To add a new communication entity, click the + button on the right side of the Communication Entity section, or + Add First Entity to open the Add Communication Entity page.
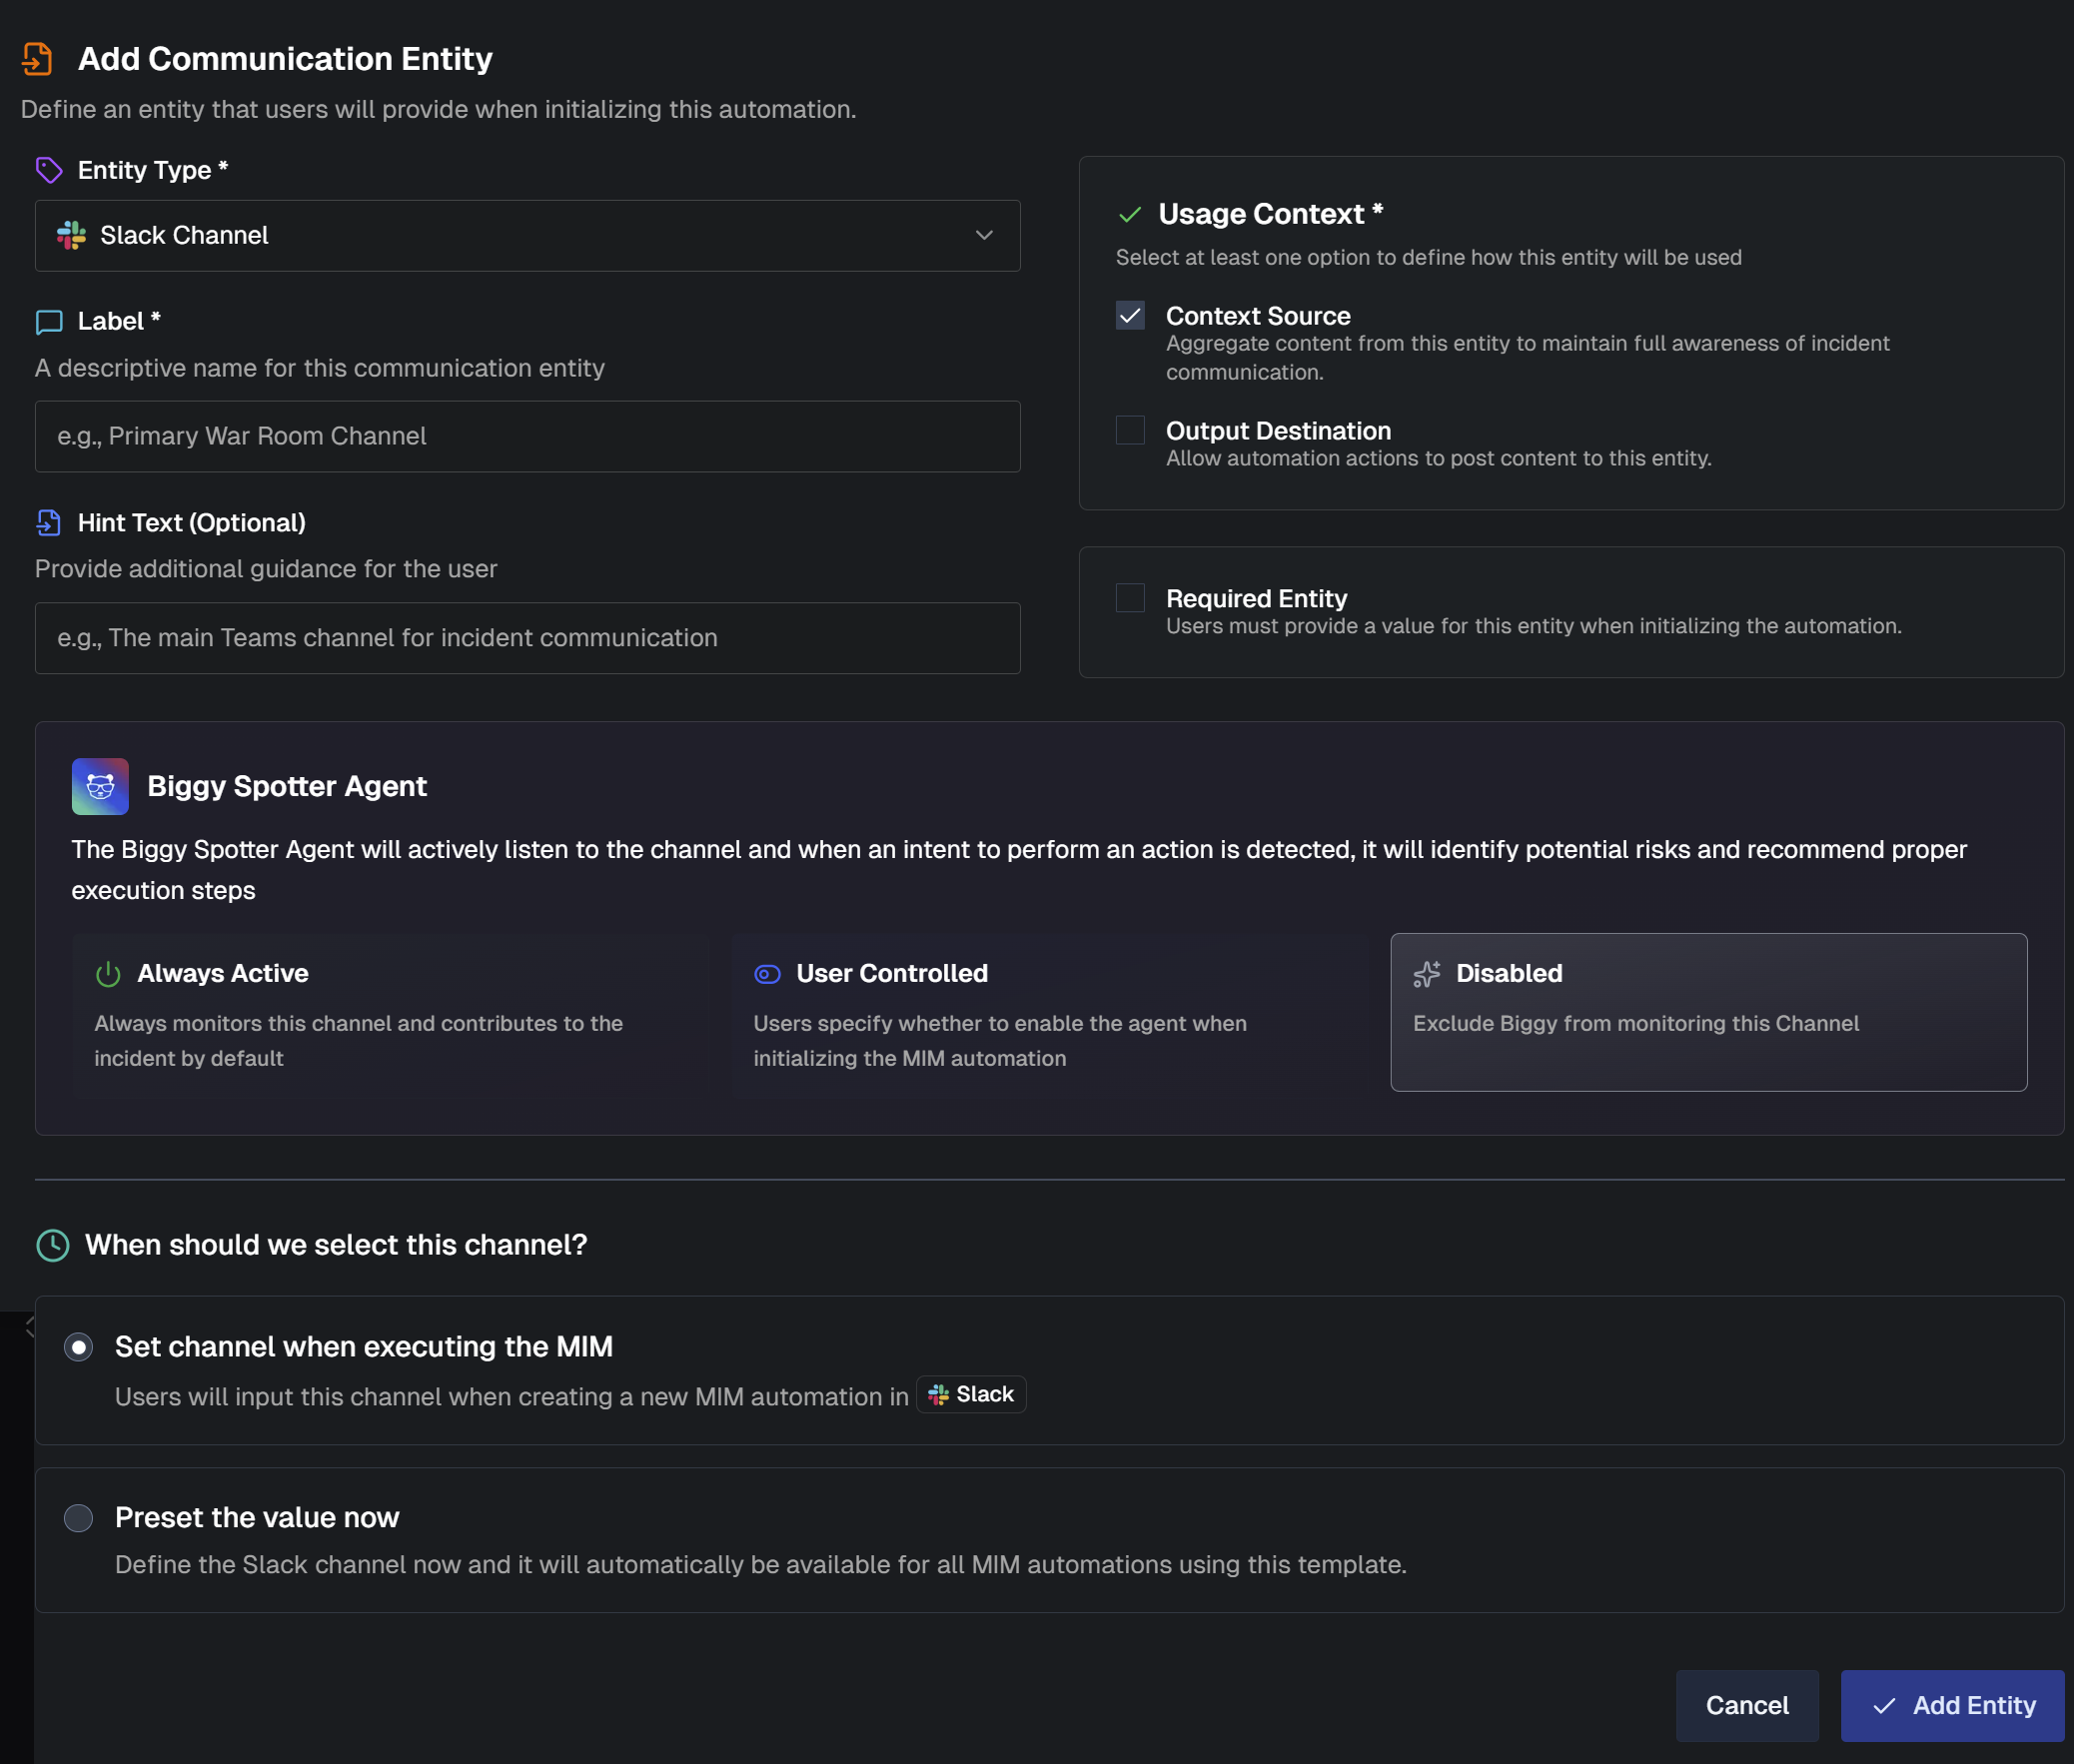
Populate the following information for all entity types:
Field | Description |
|---|---|
Entity Type | Select the communication channel used for this entity. This channel can gather context, push updates, or be used for paging, depending on the selected entity type or usage context. The following entity types are available:
|
Label (Required) | A descriptive name for the communication entity. |
Hint Text | Additional information to help users understand the purpose of the communication entity. |
Different information needs to be populated depending on the type of communication entity you create. Follow the instructions for the entity type you selected:
Create a Meeting URL Communication Entity
To create a communication entity that uses a meeting URL, populate the following information:
Field | Description |
|---|---|
Usage Context | How the communication entity will be used. Select one of the following:
|
Required Entity | When enabled, Biggy will post and continuously update the incident banner message with the title, status, impact, and key findings. Note: Automatically created entities are always available and cannot be marked as required. |
How should this meeting be determined/created? | Choose how Biggy should create a meeting, or determine which meeting to use. The following options are available:
|
Create a Slack Channel, MS Teams Channel, or MS Teams Chat/Meeting Communication Entity
To create a communication entity that uses a Slack or MS Teams channel, populate the following information:
Field | Description |
|---|---|
Usage Context | How the communication entity will be used. Select one or both of the following:
|
Biggy Spotter Agent | The Biggy Spotter Agent actively listens to the channel, and when an intent to perform an action is detected, it identifies potential risks and suggests steps to complete the action. Select the Biggy Spotter Agent behavior:
|
Required Entity | When enabled, Biggy will post and continuously update the incident banner message with the title, status, impact, and key findings. Note: Automatically created entities are always available and cannot be marked as required. |
How should this channel be determined/created? | Choose when this channel should be selected. Select from the following options:
|
Optional Channel Lookback | This option only appears if you choose the Select an existing channel when executing the MIM, or Preset this channel now channel creation option. Enable this option to allow incident creators to include messages prior to MIM start as context for this entity. When the MIM starts, creators will see a lookback prompt for this entity. Select one or both of the following input modes:
|
Enable Teams Channel Meeting Creation | This option only appears if you selected MS Teams Channel as the entity type. Automatically create a Teams meeting inside this channel with transcription included. The meeting will appear as a Meet Now card in the channel, and responders can join directly from it. |
Create an Email Communication Entity
To create a communication entity that uses email, populate the following information:
Field | Description |
|---|---|
Usage Context | How the communication entity will be used. Emails can only be used as an Output Destination. |
Required Entity | When enabled, Biggy will post and continuously update the incident banner message with the title, status, impact, and key findings. Note: Automatically created entities are always available and cannot be marked as required. |
How should these email addresses be determined/created? | Choose how Biggy should determine which email addresses to use. The following options are available:
|
Create a ServiceNow Ticket Communication Entity
To create a communication entity that uses a ServiceNow ticket, populate the following information:
Field | Description |
|---|---|
Usage Context | How the communication entity will be used. Select one or both of the following:
|
Required Entity | When enabled, Biggy will post and continuously update the incident banner message with the title, status, impact, and key findings. Note: Automatically created entities are always available and cannot be marked as required. |
ServiceNow Tables | Add one or more ServiceNow table names. Users will input record numbers from the tables entered here when creating the incident. |
Mark as Primary Ticket | Designate this as the incident ticket of record. When it reaches Resolved or Closed in ServiceNow, the MIM auto-resolves. The sync is one-way: resolving the MIM does not close the ServiceNow ticket. |
How should this ServiceNow ticket be determined/created? | Choose how Biggy should create a ticket, or determine which ticket to use. The following options are available:
|
Create a Jira ticket communication entity
To create a communication entity that uses a Jira ticket, populate the following information:
Field | Description |
|---|---|
Usage Context | How the communication entity will be used. Select one or both of the following:
|
Required Entity | Enable this field to require users to provide a value for this entity when initializing the MIM. |
How should this Jira ticket be determined/created? | Choose how Biggy should create a ticket, or determine which ticket to use. The following options are available:
|
Create an On-Call Paging Communication Entity
To create a communication entity that uses a paging service, populate the following information:
Field | Description |
|---|---|
Paging Service | Select the on-call service used to page responders. Only tools you have integrated are selectable. |
Paging Mode | Select how users will pick the paging targets during a major incident. The following options are available:
|
Custom Message Template (Optional) | Optionally enter a custom description used when paging. Default is blank. |
Default Paging Targets | This option only appears if you selected Paging Directory or Static as the Paging Mode. Select the targets that will be selected by default when creating the major incident. Paging targets will only appear as a selectable option if they have been configured in the integration. See the On-Call Integrations documentation for more information. |
Actions Timeline
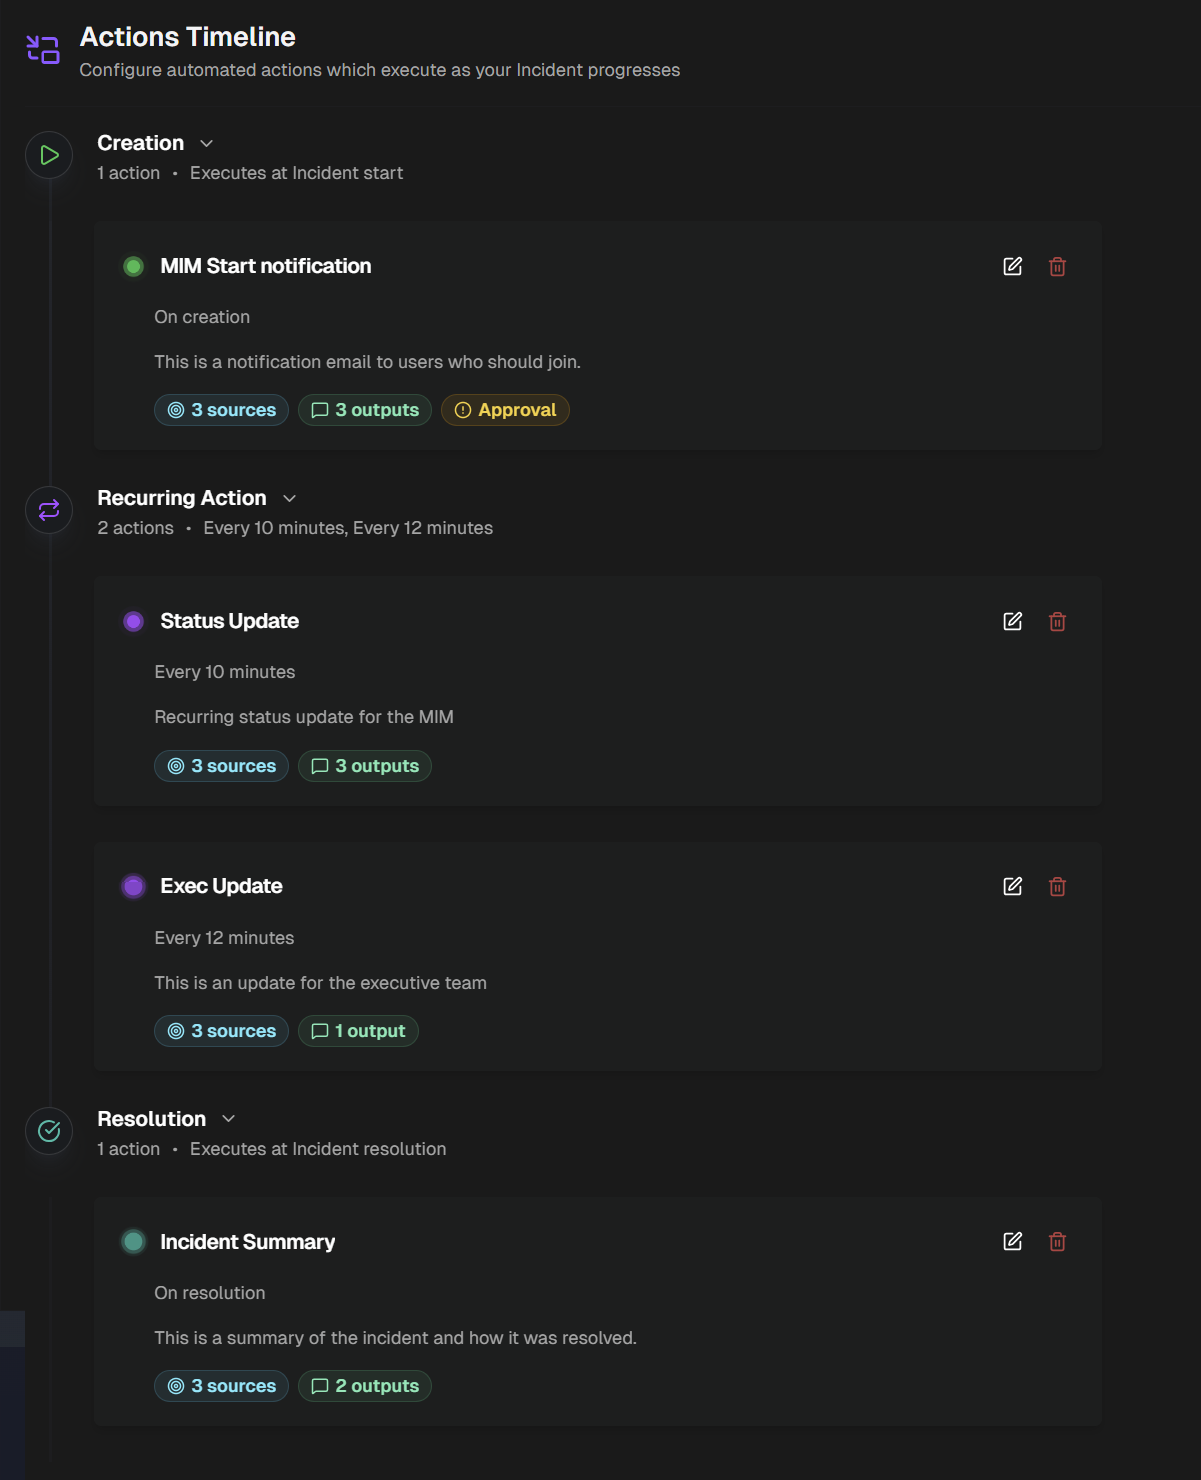
In the Actions Timeline section, define automated actions. Use automated actions to automatically update stakeholders, or invoke capabilities, workflows, or custom prompts.
If actions have already been configured for this template, a timeline of when each configured action occurs during a major incident is provided. For each action, basic information about what occurs during execution is displayed.
Output destination
There must be at least one communication entity configured as an output destination to add an action.
Click the + button to open the Add Action page.
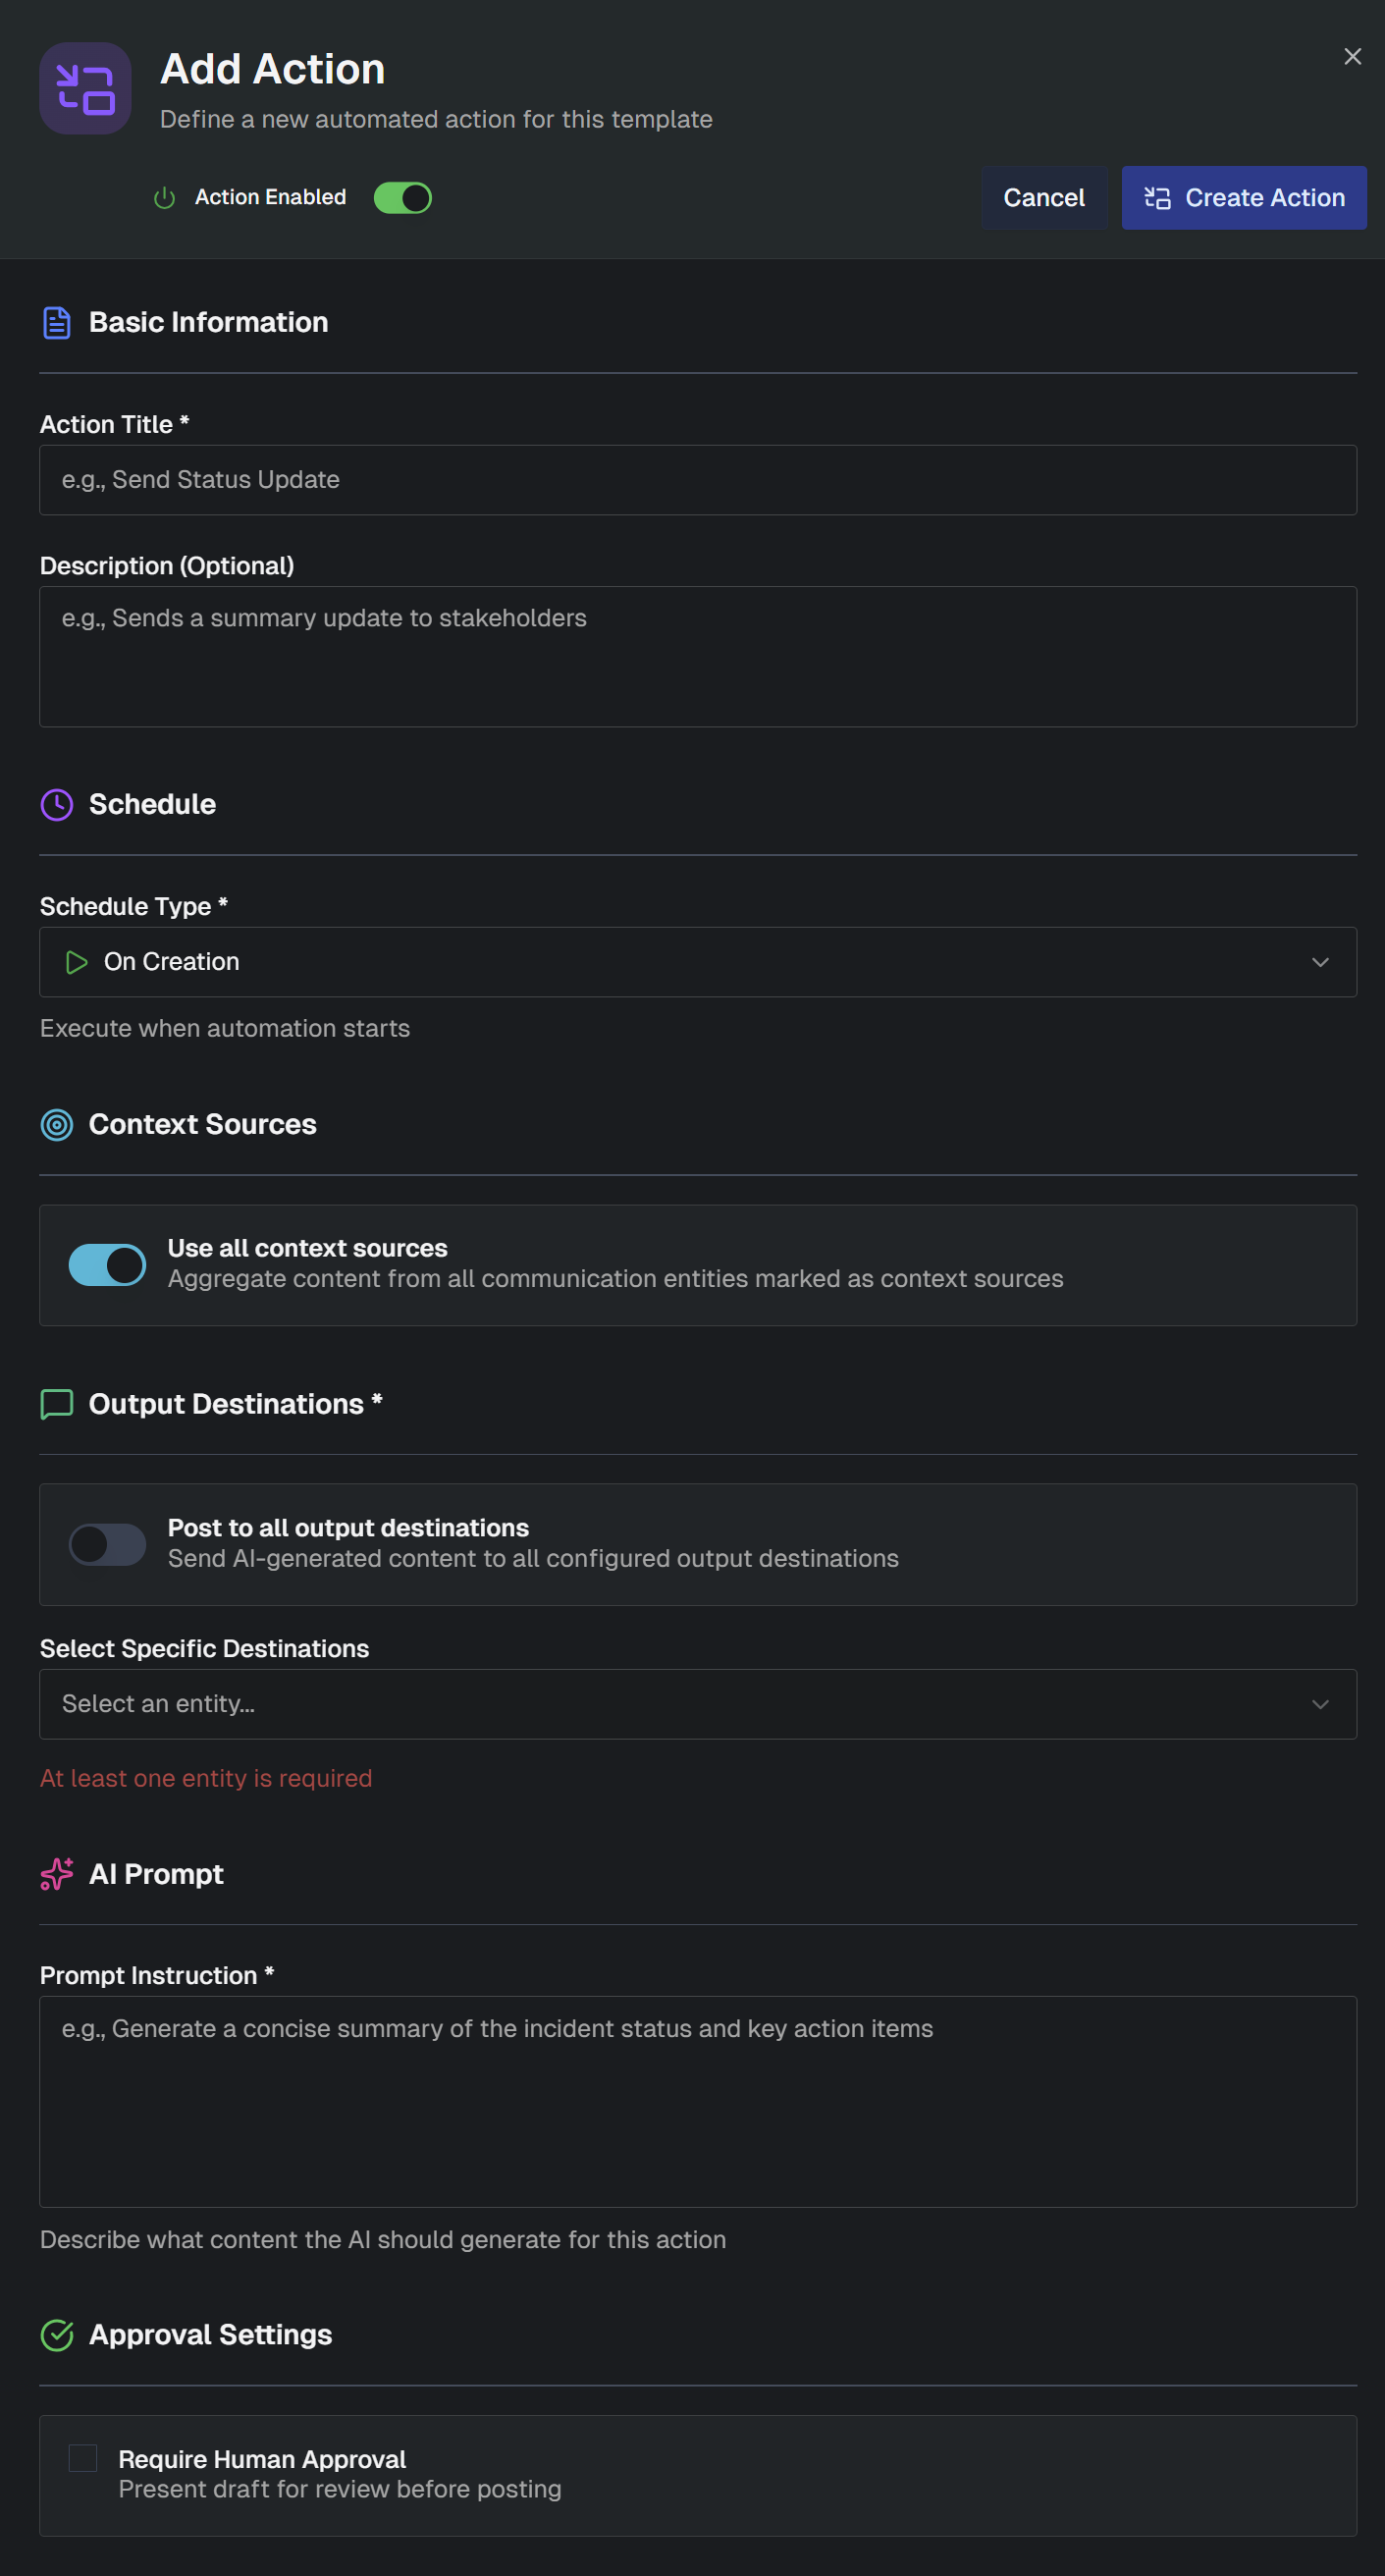
Populate information in the following sections:
Section | Description |
|---|---|
Basic Information | Contains descriptive information about the action that helps other users understand its purpose. Populate the following fields:
|
Schedule | Determine what type of schedule the action should follow. In the Schedule Type field, select from the following options:
|
Per-priority schedules | This option only appears if you selected Recurring as the priority type. Override the interval while the incident holds specific priorities (for example, every 30 minutes at P1). The first matching override takes precedence, otherwise the default interval above applies. When a priority change selects a different interval, the timer resets from the change. |
Run only for priorities | The action runs only while the incident's current priority matches; otherwise it is skipped with a visible reason. Leave empty to run for every priority. |
Only when changing from | This option only appears if you selected On Priority Change as the schedule type. Optional source scope: the change must come from one of the selected priorities. A first-time priority has no previous value and never matches a source scope. |
Context Sources | Determine which context sources defined in the Communication Entities should be used to aggregate information and content. |
Context Lookback Period | Choose whether Biggy will evaluate context from the start of the incident or only since the last action occurred. Select From Incident Start to always analyze the full context from incident creation to now. Select From Last Execution to only analyze the new context available since the last action occurred. |
Skip when no meaningful updates | This option only appears if you selected One-Time, Recurring, or On Resolution as the Schedule Type. When this option is enabled, actions will not be posted if nothing substantive has happened in the context sources since the last action. A record of the action will still be logged in the timeline. |
Output Destinations | Choose where the content generated by Biggy will be posted. In the Post to all output destinations field, toggle on to send the content to all configured output destinations. Toggle off and the Select Specific Destinations field will appear, where you can choose a communication entity. |
Execution & Action Instructions | In the Execution section, choose what type of execution you'd like to take place when this action occurs. You can choose from the follow execution types:
|
Approval Settings | Choose whether you would like to require approval prior to posting the AI-generated content. Click the Require Human Approval box to require a review of the draft before posting. If this option is selected, the user who starts the major incident will receive a direct message from Biggy requesting approval prior to posting actions. If this option is enabled, select the Approval Destination. |
Click Create Action to save the action.
You can edit or delete any existing action. In the actions timeline, click the Pencil icon to edit an action, or the Trash Can icon to delete it.