Integrate with AI Incident Assistant
You can set up integrations so that AI Incident Assistant can access information from your tools in real-time. Integrations enable you to retrieve on-call schedules, create Jira artifacts or Zoom rooms, and more.
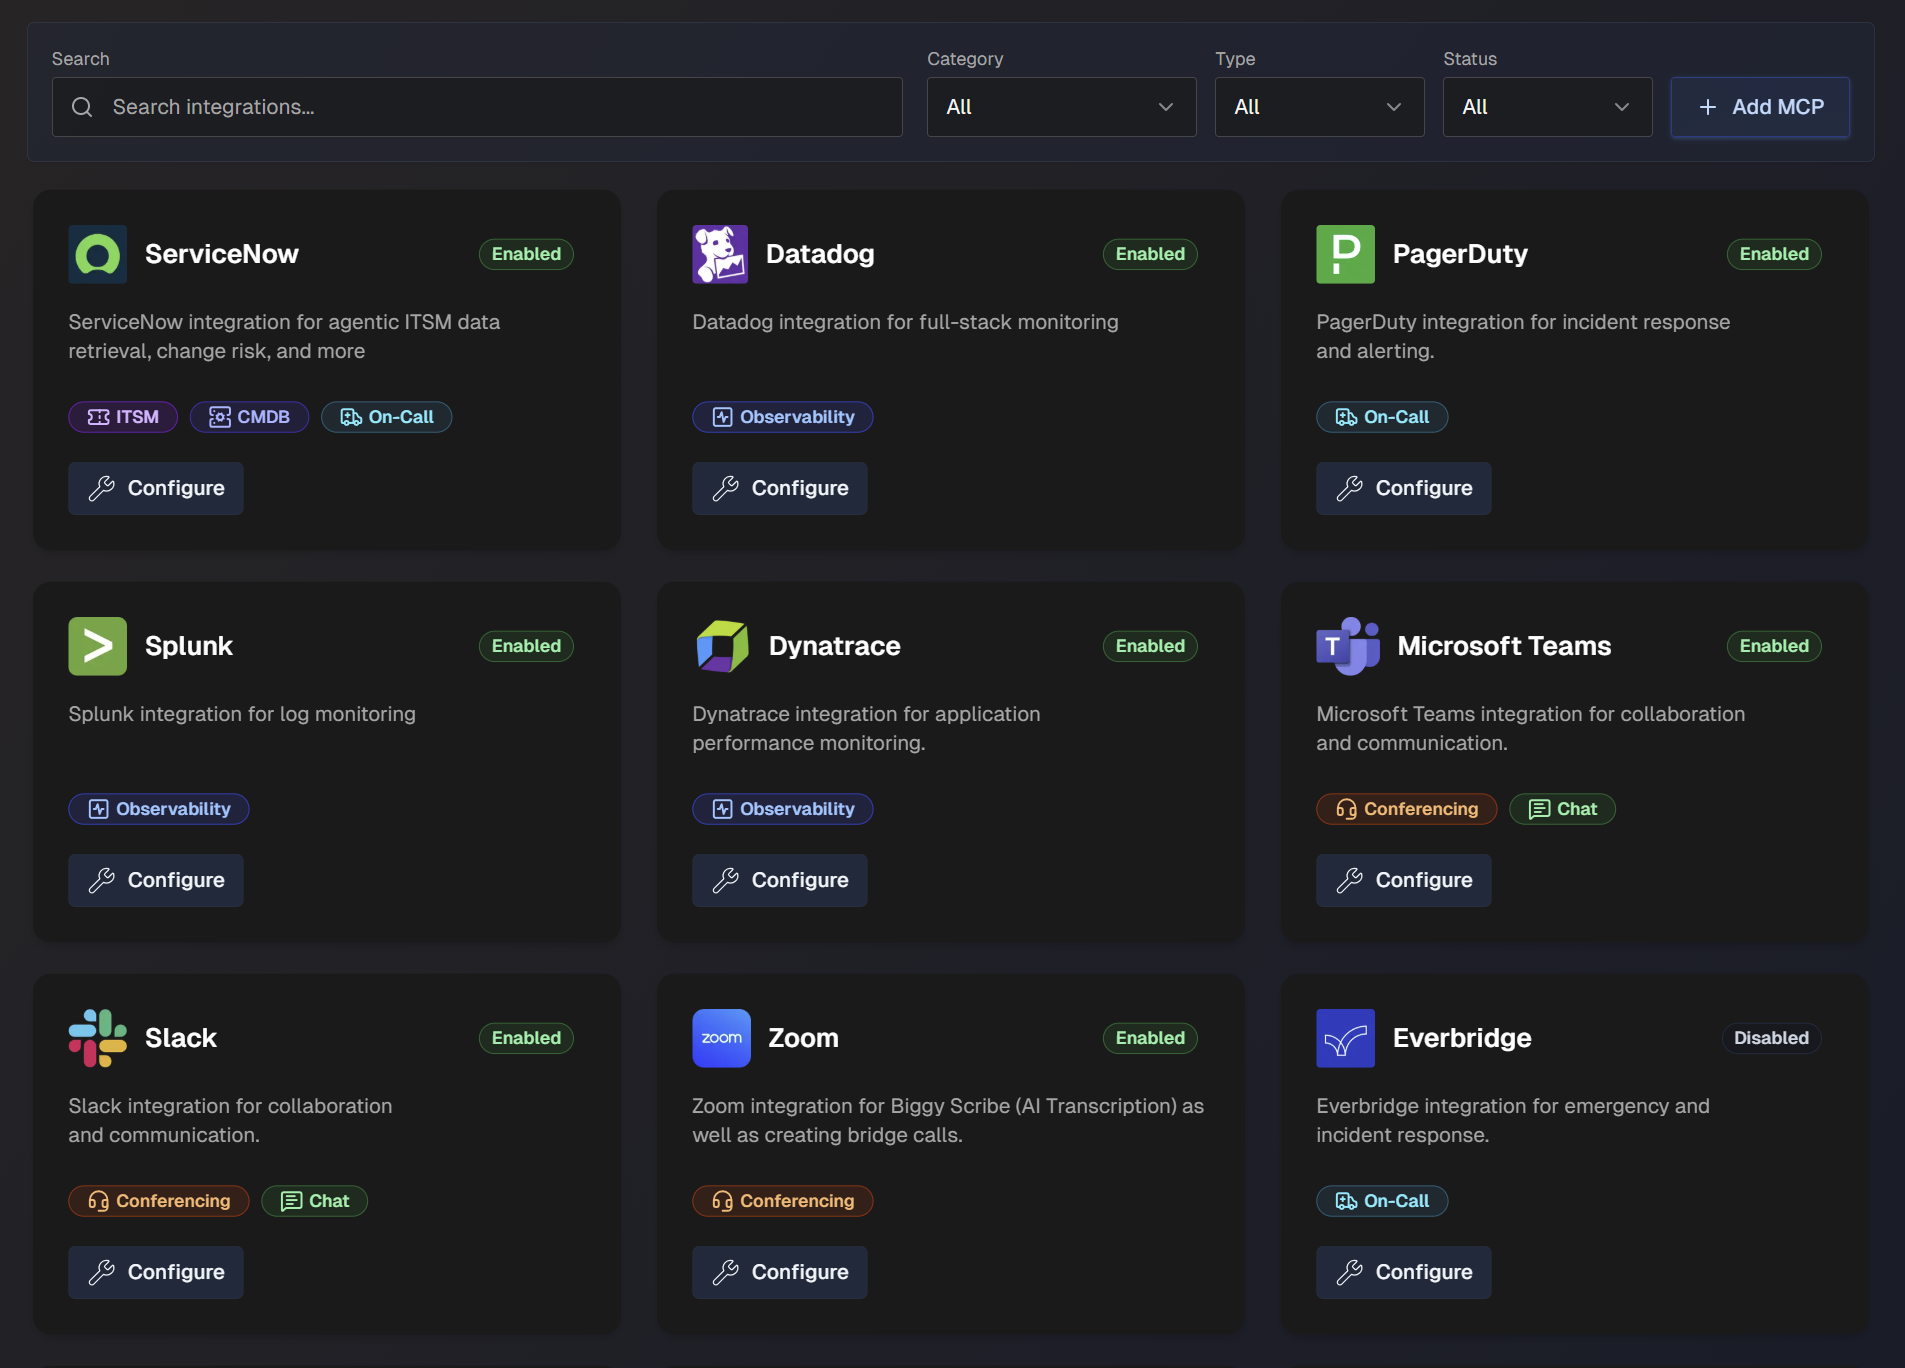
On the Integrations page, you can see the full list of available integrations and details about each integration.
Use the search bar to find a specific integration, or filter the list of action plans by Category, Type (Standard or Custom), or Status (Enabled or Disabled).
Manage AI Incident Assistant Integrations
You can enable and manage integrations from the AI Incident Assistant Settings page at Configuration > Integrations.
To integrate with AI Incident Assistant:
Navigate to Configuration > Integrations.
Select an integration from the list and click Configure.
In the configuration screen, populate the required fields for your integration. See the Standard Integrations section for more information about specific configuration requirements.
Select the Enable toggle.
Click Save.
Once an integration has been set up, it will appear in the list with a green Enabled icon.
To edit or disable an integration, you can click the Configure button and make any desired changes.
Core BigPanda Integration
Use the Core BigPanda section to integrate AI Incident Assistant with the BigPanda platform, allowing you to access BigPanda data in real-time. This enables AI Incident Assistant to notify you when an incident occurs, helping to speed up incident management and resolution.
The Core BigPanda settings are located in the web app at Configuration > Core BigPanda.
See the Core BigPanda documentation for more information.
Model Context Protocol (MCP) Integration
Model Context Protocol (MCP) is an open-source standard for connecting AI applications to external systems. MCP integrations are used for custom-built tools that do not have a standard integration with AI Incident Assistant.
MCP integrations can be used with the Observability Agent action plan, or as an ITSM tool.
To create an MCP integration:
On the web app integrations page, click + Add MCP.
Select the Service Type. You can choose from Observability, ITSM, or Context Retrieval.
Enter a descriptive Name for the MCP.
In the configuration page, populate the following information:
Field
Description
MCP Server URL
Base URL of your MCP server. Include the port if needed.
Bearer Token
Bearer token that AI Incident Assistant should use when calling the server.
Custom Headers (Optional)
Add custom HTTP headers to include with all API requests. For each header, include the Header Name and Header Value. To add additional headers, click the + sign.
Agent Notes
List any notes or guidelines to help AI Incident Assistant understand your MCP instance. For example, if your logs or alerts contain a specific field used to identify the type of application or service, provide that information here.
We highly recommend configuring this field, as it lets you enter organization-specific information that helps AI Incident Assistant provide more accurate and consistent results.
Allowed Tools
Choose which MCP tools AI Incident Assistant can use for this instance.
In the Mode drop-down menu, select whether you'd like to allow Any (allow all) tools, or if you'd like to Select tools.
If you choose to select tools, choose the specific Tools from the drop-down menu that AI Incident Assistant is allowed to call.
The tools you selected appear in the Configured Tools section of the page.
Click Save Tools.
Standard AI Incident Assistant Integrations
AI Incident Assistant has standard integrations available with the following tool categories:
Integration release statuses
The release status of each AI Incident Assistant integration is marked on the integration configuration page. The following are possible release statuses:
Production - Fully released and available for all customers.
Development - Not yet ready for general use. Integration can be viewed, but not enabled without assistance from BigPanda.
Beta - Integration is still being tested, but can be enabled by any customer. Core connectivity is stable, but the integration may receive updates based on user feedback.
Experimental - Emerging integration capability. While functional, the integration is subject to significant changes and optimizations. Best used in controlled testing environments.
Tool categories
Some AI Incident Assistant integrations may fall into multiple categories.
Chat
Chat tools enable direct user interaction, automated notifications, and contextual assistance within team communication channels.
The following AI Incident Assistant chat integrations are available:
Microsoft Teams
The AI Incident Assistant Microsoft Teams integration is used for collaboration and communication.
Integration categories
The Microsoft Teams integration is part of both the Chat and Conferencing integration categories.
Enable Online Meeting Creation for MS Teams
To allow AI Incident Assistant to create meetings as part of the Managed Incident Channel action plan, you need to grant the necessary permissions by authorizing a designated user.
Before you start, you will need:
A PowerShell instance with the
MicrosoftTeamsmoduleInstall using this command:
Install-Module -Name MicrosoftTeams -Force -AllowClobber
Your AI Incident Assistant app ID. This is available in the web app MS Teams Integration page.
Your Microsoft tenant ID. This is available in the Azure AD or Microsoft Entra admin center.
The GUID of a user in your tenant that you'd like to use for meeting creation.
To enable online meeting creation:
In a PowerShell window, run the following command:
Connect-MicrosoftTeamsThis will allow your PowerShell instance to run these management commands.
Run the following command to create the new application access policy. Replace
<Your App ID>with your AI Incident Assistant app ID:New-CsApplicationAccessPolicy -Identity Biggy-Teams-Meeting-Policy -AppIds "<Your App ID>" -Description "Used for Biggy to create meetings"You can customize the
IdentityandDescription.Run the following command to grant a user the permission. Replace the
<user GUID>with the GUID of the user you'd like to use for meeting creation:Grant-CsApplicationAccessPolicy -PolicyName Biggy-Teams-Meeting-Policy -Identity "<user GUID>"Within the AI Incident Assistant Web App, go to Configuration > Integrations and navigate to Microsoft Teams. Click Configure.
Enter your Tenant ID and the Default User ID (GUID) of the user added to the policy.
Click Save.
Slack
The AI Incident Assistant Slack integration is used for collaboration and communication.
Integration categories
The Slack integration is part of both the Chat and Conferencing integration categories.
Due to rate limitations of the Slack API, retrieving all channels is done through a channel sync mechanism. Once synced, all channels are then available for selection in relevant settings and action plan configuration screens of the web app.
Click the Sync Channels button to sync or resync your Slack channels. We recommend syncing periodically to ensure your channel selection stays up to date.
Private channels
If you'd like to sync private Slack channels, be sure to add AI Incident Assistant to those channels first.
Rate limitations
Syncing may take some time given the throttling required to stay within the Slack rate limitations.
Webex
Chat
The Webex integration is part of both the Chat and Conferencing integration categories.
The AI Incident Assistant Webex integration enables AI Incident Assistant to create bridge calls for Managed Incident Channels.
Prerequisites
The following is required to enable Webex meeting creation:
Webex Pro or Enterprise - a Webex Meetings subscription with Common Identity (CI).
Control Hub full admin - admin account required to authorize the Service App in your organization.
Licensed host email - a Webex user email with the
meeting:admin_schedule_writepermission to serve as the meeting host.
Enable Webex Meeting Creation
To enable AI Incident Assistant to create Webex bridge calls for managed incident channels, you will need to create a Webex Service App and authorize it in your organization so that it can function as a designated host user.
To configure meeting creation:
Go to the Webex Developer Portal and log in.
Click your avatar, select My Webex Apps, and then create a new Service App.
When configuring scopes, select
meeting:admin_schedule_write. This allows the app to create meetings on behalf of users in your organization.With a full admin account, log in to the Webex Control Hub.
Go to Apps > Service Apps and approve the new service app created in step 2.
After the app is authorized, return to the service app in the Developer Portal.
Under the Org Authorizations section, select your organization from the dropdown menu.
Enter your Client Secret, and click Generate tokens. Copy the Refresh Token from the result. AI Incident Assistant uses this to generate short-lived access tokens on demand.
Do not update refresh tokens and client secrets
AI Incident Assistant automatically rotates the refresh token. Do not update it manually after saving.
The client secret also should not be regenerated as it will invalidate the authorization. If it is regenerated, you'll need to re-authorize it in the Control Hub.
In the AI Incident Assistant web app on the Webex integration configuration page, enter the following information:
Field
Description
Client ID
Webex service app client ID.
Client Secret
Webex service app client secret.
Refresh Token
Refresh token from the Webex developer portal.
Host Email
Email address of the designated meeting host.
The address must belong to a licensed Webex user. All meetings will be scheduled by this user account, since the
meeting:admin_schedule_writescope operates on behalf of a real user, not a service identity.After entering the information above, click Verify Connection to ensure the Webex connection is established.
Click Save.
CMDB
CMDB tools enable automated system changes, compliance checks, and configuration analysis.
The following CMDB integrations are available:
OpsLevel
The AI Incident Assistant OpsLevel integration is used for service ownership and maturity tracking.
Populate the following fields to configure the OpsLevel integration:
Field | Description |
|---|---|
API Key | OpsLevel API Key |
Custom Headers | Add custom HTTP headers to include with all API requests. For each header, include the Header Name and Header Value. To add additional headers, click the + sign. |
Deployment Type | Select whether your Jira integration is Cloud or On-Prem. Certain integrations have endpoints that work only with one deployment type. Selecting the correct option automatically applies the right guardrails to the AI Incident Assistant agents. Note: On-prem integrations can connect via the Relay Client, enabling secure communication with infrastructure behind your firewall. |
Conferencing
Conferencing integrations enable automated meeting management, transcription analysis, and action item tracking.
Integration categories
The MS Teams, Slack, and Webex integrations are part of both the Chat and Conferencing integration categories.
The following Conferencing integrations are available:
Zoom
The AI Incident Assistant Zoom integration is used for AI Incident Assistant Scribe (AI Transcription) as well as creating bridge calls.
Zoom admin
To set up the Zoom integration, you must have administrator rights in the Zoom application.
To set up the AI Incident Assistant Zoom integration, click the Connect Zoom button and sign in with your administrator credentials.
Configuration requirements
To complete the integration for this app, do not populate the Account ID, Client ID, or Client Secret fields.
ITSM
ITSM tools are used for ticket management, SLA tracking, and workflow automation. These integrations enhance service desk efficiency and incident handling.
The following ITSM integrations are available:
BMC Remedy
Development integration
This integration is currently in development status. It is not ready for general use and may have some incomplete features. If you're interested in early access to this integration, contact BigPanda support.
The AI Incident Assistant BMC Remedy integration is used for IT service management.
To configure the BMC Remedy integration, enter your BMC Remedy API Key and click Save.
Jira
The AI Incident Assistant Jira integration is used for issue tracking and project management.
To configure the Jira integration, populate the following fields:
Field | Description |
|---|---|
Jira URL | Jira endpoint URL. |
Username and Password | Username and Password of the Jira account that AI Incident Assistant should use for API interactions. The account used for the integration must have admin privileges in order to access the required endpoints. |
Custom Headers (Optional) | Add custom HTTP headers to include with all API requests. For each header, include the Header Name and Header Value. To add additional headers, click the + sign. |
Deployment Type | Select whether your Jira integration is Cloud or On-Prem. Certain integrations have endpoints that work only with one deployment type. Selecting the correct option automatically applies the right guardrails to the AI Incident Assistant agents. Note: On-prem integrations can connect via the Relay Client, enabling secure communication with infrastructure behind your firewall. |
System/Schema Nuances | List any special field mappings, naming conventions, custom tables/fields, or other knowledge that helps AI Incident Assistant more effectively interact with your tool. We highly recommend configuring this field, as it allows you to enter organization-specific information that enables AI Incident Assistant to provide more accurate and consistent results. For example, you can include explanations of any custom fields and when or how they should be used to handle certain types of user queries. |
ServiceNow
The AI Incident Assistant ServiceNow integration is used for managing incidents and requests.
CMDB and On-Call
The AI Incident Assistant ServiceNow integration is also part of the CMDB and On-Call integration categories.
AI Incident Assistant and Unified Data Connector
See the Unified Data Connector documentation for information about syncing data from ServiceNow to AI Incident Assistant.
AI Incident Assistant Required Tables and Endpoints
To enable the ServiceNow integration, AI Incident Assistant requires access to certain tables and endpoints.
Access to the following tables is required:
change_requestchange_taskcmdb_cicmdb_ci_business_appconflictdocumentincidentkb_knowledgenew_callproblemproblem_taskrm_defectrm_epicrm_featurerm_releaserm_storyrm_testsc_req_itemsc_requestsc_tasksn_customerservice_casesys_attachmentsys_attachment_docsys_choicesys_usersys_user_grouptasktask_citask_cmdb_ci_servicetask_outageticket
Indirect access
Indirect access via reference links is required for things such as cmdb_ci_*, but this depends on your ServiceNow tables.
For example, if you have a field on an incident table such as u_business_app that points to a particular table, AI Incident Assistant would need access to that table to effectively dot-walk that reference.
Access to additional tables
Users may ask AI Incident Assistant for information from tables not listed above. For AI Incident Assistant to be able to access that information, it would need to be given access to the additional tables where the information is stored.
Customer admins need to determine which tables these are, whether they want AI Incident Assistant to be able to answer questions about the data in those tables, and then include access to those tables in the provisioned AI Incident Assistant service account user.
Access to the following endpoints is required:
Endpoint | How it is used |
|---|---|
| OAuth token minting. Default when OAuth authentication is used, but not needed if using Basic authentication. |
| On call lookup. |
| Validating user references in queries and mapping names and emails to sys_ids for subsequent lookups. (For example, "How many incidents did John Smith resolve this year?") |
| Record lookup and queries. |
| Following a reference link from previous results. |
| Incident creation. |
| Add work notes or comments. |
| Counting and aggregation. |
| Retrieve table schema. |
| Retrieve all table definitions. |
AI Incident Prevention Required Tables
The following tables are required for AI Incident Prevention:
Read (query) access:
Table | Enum Value | Function |
|---|---|---|
|
| Fetch the main change record being assessed and query recent changes for CIs |
|
| Fetch change tasks associated with a change and recent tasks for CIs |
|
| Fetch incidents caused by related changes (track record analysis) |
|
| Resolve CI details by name or |
|
| Fetch affected CIs linked to a task (join table between tasks and CIs) |
|
| Fetch affected services linked to a change (join table between tasks and CMDB CI services) |
|
| Fetch outage records associated with a change (via |
|
| Fetch scheduling conflict records for a change |
Read via link-following (dot-walked reference fields):
Resolved Record Type | Function |
|---|---|
Business service record (typically | Follows the |
Primary CMDB CI record (typically | Follows the Note: If the CI resolves to a subclass table (for example |
Affected service detail records | Follows |
Affected CI detail records | Follows |
Write access:
Table | Enum Value | Function |
|---|---|---|
|
| Sync risk score/level fields back to the change record (field sync feature) |
|
| Post a work note with the risk assessment summary |
Configure the AI Incident Assistant ServiceNow Integration
To configure the AI Incident Assistant ServiceNow integration, populate the following fields:
Field | Description |
|---|---|
Authentication Method | Choose how you'd like to authenticate with this integration. The following methods are available:
|
ServiceNow URL | Base URL of your ServiceNow instance. (For example, |
Credentials | If you selected Basic Auth as your authentication method, enter the Username and Password of the ServiceNow account that AI Incident Assistant should use for API interactions. If you selected OAuth 2.0 as your authentication method, enter your OAuth Client ID and OAuth Client Secret, and optionally enter the Token URL Override. |
Custom Headers (Optional) | Add custom HTTP headers to include with all API requests. For each header, include the Header Name and Header Value. To add additional headers, click the + sign. |
Deployment Type | Select whether your ServiceNow instance is Cloud or On-Prem. Certain integrations have endpoints that work only with one deployment type. Selecting the correct option automatically applies the right guardrails to the AI Incident Assistant agents. Note: On-prem integrations can connect via the Relay Client, enabling secure communication with infrastructure behind your firewall. |
System Time Zone | Select the time zone configured in your ServiceNow instance. This ensures that ServiceNow correctly interprets dates and times to maintain consistency. |
Override Display Base URL (Optional) | If your ServiceNow base URL points to a reverse proxy endpoint, enter an override URL that AI Incident Assistant will use to display ServiceNow links when responding to user queries. For example, if your API endpoint is |
System/Schema Nuances | List any special field mappings, naming conventions, custom tables/fields, or other knowledge that helps AI Incident Assistant more effectively interact with your tool. We highly recommend configuring this field, as it allows you to enter organization-specific information that enables AI Incident Assistant to provide more accurate and consistent results. For example, you can include explanations of any custom fields and when or how they should be used to handle certain types of user queries. |
ITSM Ticket Configuration Settings
Configure the mandatory or allowed fields and values for ServiceNow tickets.
For certain interactions, like creating a ticket upon creation of an AI Incident Assistant-managed incident channel, these settings control which fields or values are displayed to users during auto-population.
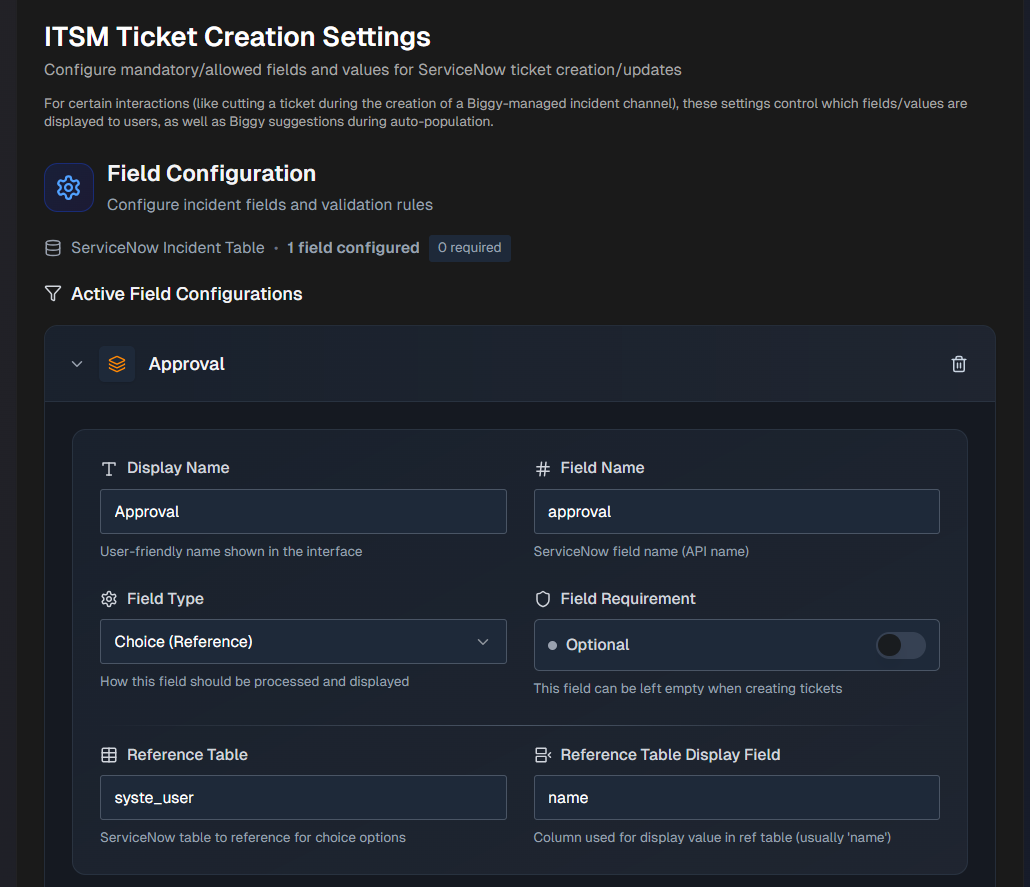
Configure the following sections:
Field Configuration
Add ServiceNow fields in the Field Configuration section:
Click + Add ServiceNow Field .
Select a field from the drop-down menu and click + Add.
Enter or edit the following information for the field:
Field
Description
Display Name
A user-friendly name that will appear in the UI. This field is prepopulated, but can be edited.
Field Name
The ServiceNow field name, also known as the API name. This field is prepopulated, but can be edited.
Field Type
Select how this field should be processed and displayed. Options include:
Text - plain text field extracted by AI Incident Assistant based on prompt instructions.
Choice - a choice field in ServiceNow that has defined values in this table.
Choice (Reference) - a choice field in ServiceNow where the choices are referenced from a different table.
Constant - the value configured for this field will always be used, and cannot be updated by users when creating a ticket.
Field Requirement
Determine whether or not the field must be filled out when creating tickets.
Select Optional to allow the field to be left blank when creating tickets.
Select Mandatory if the field must be filled out when creating tickets.
Reference Table
This field will appear if you select Choice (Reference) for the Field Type.
Select the ServiceNow table to reference for choice options.
Reference Table Display Field
This field will appear if you select Choice (Reference) for the Field Type.
Select the ServiceNow column used for display value in reference table. The column used is typically
name.For Text fields, configure AI Extraction Guidance.
For Choice or Choice (Reference) fields, configure Choice Configuration.
For Constant fields, configure Constant Values.
Click Save Mappings.
All Active Field Configurations appear at the top of the section. Click any field to expand the configuration. You can click the Pencil icon to edit the configuration, or the Trash icon to delete it.
AI Extraction Guidance
The AI Extraction Guidance section will appear if you select Text for the Field Type. Use the Suggestion Prompt to help AI Incident Assistant understand how to extract and populate the field.
The following is an example of a Suggestion Prompt:
Extract the affected service name from the incident description. Look for keywords like system, service, application, or proper names of services.
Default Value
The Default Value section appears if you select Text for the Field Type.
You can optionally enter a Default Text Value to pre-populate the field with a default value. This value will be used when no specific value can be extracted or determined.
Choice Configuration
The Choice Configuration section will appear if you select Choice or Choice (Reference) for the Field Type. In this section, configure available options for the field.
Use the Search Query box to find values within the reference table.
Select an option within the Add to Configuration field. Your selection appears in the Configured Choices section below.
(Optional) In the Configured Choices section, click + Add Manual Choice to manually add a value.
Default Value
The Default Value section will appear if you select Choice or Choice (Reference) for the Field Type.
(Optional) In the Default Value section, you can configure a pre-selected option for new tickets.
In the drop-down menu, select a value. If this field is left blank, manual selection will be required for each ticket.
AI Auto Population
The AI Auto Population section will appear if you select Choice or Choice (Reference) for the Field Type.
(Optional) Guide AI Incident Assistant on how to automatically select values in the AI Auto-Population section.
In the Suggestion Prompt field, provide clear instructions for when and how to auto-select different options.
For example, you can instruct AI Incident Assistant to select High for urgent incidents, Medium for standard issues, and Low for minor problems based on the incident description and urgency keywords.
Constant Value
The Constant Value section will appear if you select Constant for the Field Type.
Enter a Fixed Value that will always be used for the field. This value will be used for every ticket created, regardless of the incident details.
Observability
Observability tools provide real-time system insights, metric analysis, and automated troubleshooting capabilities.
Integrated observability tools can be utilized as part of an agent team using the Observability Agent action plan.
Multi-integration configuration
You can configure multiple instances of the same type of observability integration.
To add an additional integration, click + Add Instance on the integration configuration page.
The following observability integrations are available:
AppDynamics
The AI Incident Assistant AppDynamics integration is used for full-stack/APM monitoring.
To configure the AI Incident Assistant AppDynamics integration, populate the following fields:
Field | Description |
|---|---|
AppD Controller URL | Enter the controller URL for your AppDynamics instance. (For example, |
Client ID | Your AppDynamics Client ID is a combination of the client name and account name in this format: |
Client Secret | Auto-generated AppDynamics client secret. |
Custom Headers (Optional) | Add custom HTTP headers to include with all API requests. For each header, include the Header Name and Header Value. To add additional headers, click the + sign. |
Deployment Type | Select whether your AppDynamics integration is Cloud or On-Prem. Certain integrations have endpoints that work only with one deployment type. Selecting the correct option automatically applies the right guardrails to the AI Incident Assistant agents. Note: On-prem integrations can connect via the Relay Client, enabling secure communication with infrastructure behind your firewall. |
Agent Notes | Add notes to help AI Incident Assistant understand your AppDynamics environment. We highly recommend configuring this field, as it allows you to enter organization-specific information that enables AI Incident Assistant to provide more accurate and consistent results. For example, if your logs contain a specific field that is used to identify the type of application or service, provide that information here. |
Datadog
The AI Incident Assistant Datadog integration is used for full-stack monitoring.
Beta integration
The AI Incident Assistant Datadog integration is currently in Beta release status.
In Datadog, ensure the following permissions/scopes have been enabled:
apm_api_catalog_read
apm_read
apm_remote_configuration_read
apm_retention_filter_read
apm_service_catalog_read
apm_service_ingest_read
audience_management_read
continuous_profiler_pgo_read
continuous_profiler_read
debugger_read
error_tracking_read
events_read
incident_read
logs_read_data
logs_read_index_data
metrics_read
monitors_read
reference_tables_read
rum_apps_read
rum_retention_filters_read
rum_session_replay_read
synthetics_global_variable_read
synthetics_private_location_read
synthetics_read
timeseries_query
To configure the Datadog integration, populate the following fields:
Field | Description |
|---|---|
Datadog Region | The region of your Datadog instance. If you access Datadog via datadoghq.eu, select EU. If not, choose your US region. Select from US, US3, or US5. |
API Key | Your Datadog API key. |
Application Key | Your Datadog application key with required read-only scopes. |
Agent Notes | Add notes to help AI Incident Assistant understand your Datadog environment. We highly recommend configuring this field, as it allows you to enter organization-specific information that enables AI Incident Assistant to provide more accurate and consistent results. For example, if your logs contain a specific field that is used to identify the type of application or service, provide that information here. |
Dynatrace
The AI Incident Assistant Dynatrace integration is used for application performance monitoring.
Ensure the following Dynatrace scopes/permissions have been enabled:
API v1 Scopes
DataExport
ReadConfig
ExternalSyntheticIntegration
ReadSyntheticData
API v2 Scopes
entities.read
events.read
metrics.read
problems.read
settings.read
logs.read
syntheticLocations.read
syntheticExecutions.read
To configure the Dynatrace integration, populate the following fields:
Field | Description |
|---|---|
Dynatrace URL | The URL of your Dynatrace instance. |
API Key | Your Dynatrace API key. |
Custom Headers (Optional) | Add custom HTTP headers to include with all API requests. For each header, include the Header Name and Header Value. To add additional headers, click the + sign. |
Deployment Type | Select whether your Dynatrace integration is Cloud or On-Prem. Certain integrations have endpoints that work only with one deployment type. Selecting the correct option automatically applies the right guardrails to the AI Incident Assistant agents. Note: On-prem integrations can connect via the Relay Client, enabling secure communication with infrastructure behind your firewall. |
Agent Notes | Add notes to help AI Incident Assistant understand your Dynatrace environment. We highly recommend configuring this field, as it allows you to enter organization-specific information that enables AI Incident Assistant to provide more accurate and consistent results. For example, if your logs contain a specific field that is used to identify the type of application or service, provide that information here. |
Elasticsearch
The AI Incident Assistant Elasticsearch integration is used for metrics monitoring.
Beta integration
This integration is currently in beta release status.
Beta integrations are still being tested, but can be enabled by any customer. Core connectivity is stable, but the integration may receive updates based on user feedback.
Populate the following fields to set up the integration:
Field | Description |
|---|---|
Authentication Method | Choose how you'd like to authenticate with this integration. The following methods are available:
|
Elasticsearch Instance URL | Enter the base URL of the inbound Elasticsearch instance. Include the port if applicable. (For example, |
Credentials | Enter the credentials that allow the integration to authenticate. If you selected the Basic Authentication method, enter your Elasticsearch username and password. If you selected API Key Authentication, enter an Elasticsearch API key. If you selected Bearer Token Authentication, enter an Elasticsearch bearer token. |
Custom Headers (Optional) | Add custom HTTP headers to include with all API requests. For each header, include the Header Name and Header Value. To add additional headers, click the + sign. |
Deployment | Select whether your Elasticsearch integration is Cloud or On-Prem. Certain integrations have endpoints that work only with one deployment type. Selecting the correct option automatically applies the right guardrails to the AI Incident Assistant agents. Note: On-prem integrations can connect via the Relay Client, enabling secure communication with infrastructure behind your firewall. |
Elasticsearch Agent Notes | Add notes to help AI Incident Assistant understand your Elasticsearch environment. We highly recommend configuring this field, as it allows you to enter organization-specific information that enables AI Incident Assistant to provide more accurate and consistent results. For example, if your logs contain a specific field that is used to identify the type of application or service, provide that information here. |
Grafana
Use the AI Incident Assistant Grafana integration for metrics monitoring. Use this integration for action plans, such as the Observability Agent.
Beta integration
This integration is currently in beta release status.
Beta integrations are still being tested, but can be enabled by any customer. Core connectivity is stable, but the integration may receive updates based on user feedback.
Populate the following fields to set up the integration:
Field | Description |
|---|---|
Authentication Method | Choose how you'd like to authenticate with this integration. The following methods are available:
|
Grafana Instance URL | Enter the base URL of the inbound Grafana instance. Include the port if applicable. (For example, |
Credentials | Enter the credentials that allow the integration to authenticate. If you selected the Basic Authentication method, enter your Grafana username and password. If you selected Bearer Token Authentication, enter a Grafana bearer token. |
Custom Headers (Optional) | Add custom HTTP headers to include with all API requests. For each header, include the Header Name and Header Value. To add additional headers, click the + sign. |
Deployment Type | Select whether your Grafana integration is Cloud or On-Prem. Certain integrations have endpoints that work only with one deployment type. Selecting the correct option automatically applies the right guardrails to the AI Incident Assistant agents. Note: On-prem integrations can connect via the Relay Client, enabling secure communication with infrastructure behind your firewall. |
Connectivity | After entering the authentication method, instance URL, and credentials, click Verify Connection to ensure that the connection to Grafana is established. Click Update Data Schema to allow AI Incident Assistant to retrieve and store relevant schema information for this integration. This helps AI Incident Assistant understand how your data is structured, allowing for more accurate and efficient information retrieval. |
Grafana Agent Notes | Add notes to help AI Incident Assistant understand your Grafana environment. We highly recommend configuring this field, as it allows you to enter organization-specific information that enables AI Incident Assistant to provide more accurate and consistent results. For example, if your logs contain a specific field that is used to identify the type of application or service, define the purpose and function of that field here. |
LogicMonitor
The LogicMonitor integration is used for infrastructure monitoring and observability.
Beta integration
This integration is currently in beta release status.
Beta integrations are still being tested, but can be enabled by any customer. Core connectivity is stable, but the integration may receive updates based on user feedback.
To configure the LogicMonitor integration, populate the following fields:
Field | Description |
|---|---|
Authentication Method | Choose how you'd like to authenticate with this integration. The following methods are available:
|
LogicMonitor URL | URL of your LogicMonitor instance. (for example |
Credentials | If you selected LMv1 (Access Key) as your authentication method, enter the Access ID and Access Key of the LogicMonitor account that AI Incident Assistant should use for API interactions. If you selected Bearer Token as your authentication method, enter your LogicMonitor Bearer Token. |
Deployment Type | Select whether your LogicMonitor integration is Cloud or On-Prem. Certain integrations have endpoints that work only with one deployment type. Selecting the correct option automatically applies the right guardrails to the AI Incident Assistant agents. Note: On-prem integrations can connect via the Relay Client, enabling secure communication with infrastructure behind your firewall. |
LogicMonitor Agent Notes | Add notes to help AI Incident Assistant understand your LogicMonitor environment. We highly recommend configuring this field, as it allows you to enter organization-specific information that enables AI Incident Assistant to provide more accurate and consistent results. For example, enter explanations of custom fields and when or how they should be used to handle user queries. |
New Relic
The New Relic - AI Incident Assistant integration is used to retrieve data from application performance monitoring (APM), metrics, logs, and infrastructure telemetry.
Beta integration
This integration is currently in beta release status.
Beta integrations are still being tested, but can be enabled by any customer. Core connectivity is stable, but the integration may receive updates based on user feedback.
Required Permissions
To ensure AI Incident Assistant has the access it needs to perform necessary functions, either the New Relic Read Only role must be granted, or a custom role containing the following permissions:
NRQL query executionEntity read (APM, Infrastructure, Browser, Mobile, Synthetics, Workloads, Dashboards)Alert policies readAlert issues and incidents readSynthetics monitor readTopology read
To configure the New Relic integration:
In New Relic, create or choose a dedicated integration user with access to the account that the AI Incident Assistant should query.
In the New Relic API Keys page, generate a user API key for the user selected in step 1 and copy it.
API key restrictions
Do not use License, Browser, Mobile, or retired REST API keys
In New Relic Account Settings, copy the target New Relic account ID.
Populate the following fields in the web app New Relic integration page:
Field
Description
New Relic API Base URL
Base URL for your New Relic region. (For example,
https://api.newrelic.comfor US orhttps://api.eu.newrelic.comfor EU)New Relic Account ID
New Relic account ID copied in step 3.
New Relic User Key
User API key copied in step 2.
Custom Headers (optional)
Add custom HTTP headers to include with all API requests. For each header, include the Header Name and Header Value. To add additional headers, click the + sign.
Deployment Type
Select whether your New Relic integration is Cloud or On-Prem.
Certain integrations have endpoints that work only with one deployment type. Selecting the correct option automatically applies the right guardrails to the AI Incident Assistant agents.
Note: On-prem integrations can connect via the Relay Client, enabling secure communication with infrastructure behind your firewall.
New Relic Agent Notes
Add notes to help AI Incident Assistant understand your New Relic environment.
We highly recommend configuring this field, as it allows you to enter organization-specific information that enables AI Incident Assistant to provide more accurate and consistent results.
For example, enter explanations of custom fields and when or how they should be used to handle user queries.
OpsRamp
The OpsRamp integration is used for hybrid IT infrastructure monitoring, alerting, and resource management.
Beta integration
This integration is currently in beta release status.
Beta integrations are still being tested, but can be enabled by any customer. Core connectivity is stable, but the integration may receive updates based on user feedback.
Required permissions
The following OpsRamp permissions must be enabled to use the integration:
Alerts: View, Search
Resources: View, Search
Metrics: View, Query
Incidents/Tickets: View, Search
Service Maps: View
Topology: View
To configure the integration:
In OpsRamp, go to Setup > Integrations and install a custom integration. Be sure to copy your Key, Secret, and API Endpoint.
Go to Setup > Accounts and copy your Tenant ID.
In the web app, configure the following fields:
Field
Description
OpsRamp API Endpoint
The API endpoint from your custom integration, copied from the integration setup page in step 1. (for example,
https://api.opsramp.com)Integration Key
OpsRamp integration key, copied from the integration setup page in step 1.
Integration Secret
OpsRamp integration secret, copied from the integration setup page in step 1.
Tenant ID
OpsRamp tenant ID, copied from the OpsRamp Accounts page in step 2.
Custom Headers
Add custom HTTP headers to include with all API requests. For each header, include the Header Name and Header Value. To add additional headers, click the + sign.
Deployment Type
Select whether your OpsRamp integration is Cloud or On-Prem.
Certain integrations have endpoints that work only with one deployment type. Selecting the correct option automatically applies the right guardrails to the AI Incident Assistant agents.
Note: On-prem integrations can connect via the Relay Client, enabling secure communication with infrastructure behind your firewall.
OpsRamp System/Schema Nuances
Add notes to help AI Incident Assistant understand your OpsRamp environment.
We highly recommend configuring this field, as it allows you to enter organization-specific information that enables AI Incident Assistant to provide more accurate and consistent results.
For example, enter explanations of custom fields and when or how they should be used to handle user queries.
Prometheus
The AI Incident Assistant Prometheus integration is used for metrics monitoring.
Beta integration
This integration is currently in beta release status.
Beta integrations are still being tested, but can be enabled by any customer. Core connectivity is stable, but the integration may receive updates based on user feedback.
Configure the following fields to set up the integration:
Field | Description |
|---|---|
Prometheus Instance URL | Enter the base URL of the inbound Prometheus instance. Include the port, if applicable. (For example, |
Username and Password | Add credentials of the Prometheus account that AI Incident Assistant should use for API interactions. |
Custom Headers (Optional) | Add custom HTTP headers to include with all API requests. For each header, include the Header Name and Header Value. To add additional headers, click the + sign. |
Deployment Type | Select whether your Prometheus integration is Cloud or On-Prem. Certain integrations have endpoints that work only with one deployment type. Selecting the correct option automatically applies the right guardrails to the AI Incident Assistant agents. Note: On-prem integrations can connect via the Relay Client, enabling secure communication with infrastructure behind your firewall. |
Connectivity | After entering the instance URL, credentials, and deployment type, click Verify Connection to ensure that the connection to Prometheus is established. Click Update Data Schema to allow AI Incident Assistant to retrieve and store relevant schema information for this integration. This helps AI Incident Assistant understand how your data is structured, allowing for more accurate and efficient information retrieval. |
Prometheus Agent Notes | Add notes to help AI Incident Assistant understand your Prometheus environment. We highly recommend configuring this field, as it allows you to enter organization-specific information that enables AI Incident Assistant to provide more accurate and consistent results. For example, if your logs contain a specific field that is used to identify the type of application or service, define the purpose and function of that field here. |
SolarWinds
The SolarWinds - AI Incident Assistant integration is used for observability and monitoring.
Beta integration
This integration is currently in beta release status.
Beta integrations are still being tested, but can be enabled by any customer. Core connectivity is stable, but the integration may receive updates based on user feedback.
To configure the SolarWinds integration, populate the following fields:
Field | Description |
|---|---|
SolarWinds Query Endpoint | Enter a SolarWinds Information Service (SWIS) URL and port. (for example, |
Username | Username of the SolarWinds account AI Incident Assistant should use for API interactions. |
Password | Password of the SolarWinds account AI Incident Assistant should use for API interactions. |
Trusted CA Certificate (optional) | If your SolarWinds instance uses a private or self-signed certificate, provide a trusted CA certificate. If not, TLS verification should be disabled. |
Deployment Type | Select whether your SolarWinds integration is Cloud or On-Prem. Certain integrations have endpoints that work only with one deployment type. Selecting the correct option automatically applies the right guardrails to the AI Incident Assistant agents. Note: On-prem integrations can connect via the Relay Client, enabling secure communication with infrastructure behind your firewall. |
SolarWinds Agent Notes | Add notes to help AI Incident Assistant understand your SolarWinds environment. We highly recommend configuring this field, as it allows you to enter organization-specific information that enables AI Incident Assistant to provide more accurate and consistent results. For example, enter explanations of custom fields and when or how they should be used to handle user queries. |
Splunk
The AI Incident Assistant Splunk integration is used for log monitoring.
Beta integration
This integration is currently in beta release status.
Beta integrations are still being tested, but can be enabled by any customer. Core connectivity is stable, but the integration may receive updates based on user feedback.
Configure the following fields to set up the integration:
Field | Description |
|---|---|
Authentication Method | Choose how you'd like to authenticate with this integration. The following methods are available: Basic Authentication - authenticate using a Splunk username and password. Bearer Token Authentication - authenticate using a Splunk bearer token. |
Splunk Instance URL | Enter the Base URL and Port of the inbound Splunk instance. Note: When configuring Splunk Enterprise (on-prem), you must include port |
Credentials | Enter the credentials that allow the integration to authenticate. If you selected the Basic Authentication method, enter the Username and Password of the Splunk account that AI Incident Assistant should use for API interactions. If you selected the Bearer Token Authentication method, enter a Splunk Bearer Token. |
Custom Headers (Optional) | Add custom HTTP headers to include with all API requests. For each header, include the Header Name and Header Value. To add additional headers, click the + sign. |
Deployment Type | Select whether your Splunk integration is Cloud or On-Prem. Certain integrations have endpoints that work only with one deployment type. Selecting the correct option automatically applies the right guardrails to the AI Incident Assistant agents. Note: On-prem integrations can connect via the Relay Client, enabling secure communication with infrastructure behind your firewall. |
Splunk Agent Notes | Add notes to help AI Incident Assistant understand your Splunk environment. We highly recommend configuring this field, as it allows you to enter organization-specific information that enables AI Incident Assistant to provide more accurate and consistent results. For example, if your logs contain a specific field that is used to identify the type of application or service, provide that information here. |
ThousandEyes
Configure the ThousandEyes integration for network monitoring, application availability, BGP analysis, and endpoint metrics.
Beta integration
This integration is currently in beta release status.
Beta integrations are still being tested, but can be enabled by any customer. Core connectivity is stable, but the integration may receive updates based on user feedback.
Required permissions
To ensure AI Incident Assistant has the access it needs to perform necessary functions, either the ThousandEyes Regular User role must be granted, or a custom role containing the following permissions:
API accessInternet Insights - Catalog settingsView agents in account groupView alert rulesView alert suppression windowsView BGP monitorsView connectors and operationsView dashboardsView endpoint agent dataView endpoint agent settingsView endpoint testsView labelsView tests
ThousandEyes GenAI required
To use the integration, your organization must not have opted out of ThousandEyes GenAI features.
To check your organization's status, log in to the ThousandEyes dashboard and go to Manage > Account Settings > Organization Settings > AI Features.
See the ThousandEyes documentation for more information.
To configure the ThousandEyes integration:
Log in to the ThousandEyes dashboard.
Navigate to Account Settings > Users and Roles > Profile > User API Tokens.
Create a new bearer token and copy it.
In the web app ThousandEyes integration page, populate the following:
Field | Description |
|---|---|
ThousandEyes MCP URL (optional override) | Optionally, enter a ThousandEyes MCP URL to use as an override. |
ThousandEyes API Bearer Token | ThousandEyes bearer token copied in step 3. |
Custom Headers (Optional) | Add custom HTTP headers to include with all API requests. For each header, include the Header Name and Header Value. To add additional headers, click the + sign. |
Deployment Type | Select whether your ThousandEyes integration is Cloud or On-Prem. Certain integrations have endpoints that work only with one deployment type. Selecting the correct option automatically applies the right guardrails to the AI Incident Assistant agents. Note: On-prem integrations can connect via the Relay Client, enabling secure communication with infrastructure behind your firewall. |
ThousandEyes Agent Notes | Add notes to help AI Incident Assistant understand your ThousandEyes environment. We highly recommend configuring this field, as it allows you to enter organization-specific information that enables AI Incident Assistant to provide more accurate and consistent results. For example, if your logs contain a specific field that is used to identify the type of application or service, provide that information here. |
On-Call
On-call tools are incident response and on-call management platforms. These integrations enable automated paging, escalations, notifications, and coordination during critical incidents.
Integrated on-call tools can be selected for use with the On-Call Realtime Retrieval action plan.
You can integrate AI Incident Assistant with the following on-call tools:
Everbridge
Use the Everbridge integration for paging and on-call schedule retrieval.
Beta integration
This integration is currently in beta release status.
Beta integrations are still being tested, but can be enabled by any customer. Core connectivity is stable, but the integration may receive updates based on user feedback.
Populate the following fields to set up the integration:
Field | Description |
|---|---|
Authentication Method | Choose how you'd like to authenticate with this integration. The following methods are available:
Note: OAuth client credentials only support Notifications and Contacts endpoints. On-call scheduling and group lookup requires basic authentication. |
Region (Optional) | Select the region of your Everbridge instance. |
Credentials | If you selected Basic Auth as your authentication method, enter the Username and Password of the Everbridge account that AI Incident Assistant should use for API interactions. If you selected OAuth 2.0 as your authentication method, enter your OAuth Client ID, Oauth Client Secret, and (Optional) Token URL Override. |
Everbridge Organization ID | Numeric Everbridge organization ID. |
Everbridge Paging Targets
You can set up paging targets in Managed Incident Channels escalation workflows. These paging targets will receive a notification during an incident.
To add a paging target, go to the Search Query box and type the name of a group. Matching groups will appear in the menu to the right. Select a group to add it to the configuration.
You can also click + Add Manual Target to manually add a target without searching for it.
After selecting the group, populate the following information in the Configured Targets section:
Group ID - the ID of the targeted group in Everbridge
Display Name - the display name that will appear in the managed incident channel.
Description - description of the Everbridge target.
Click Save Targets to add it to your configuration.
Grafana OnCall
Configure the Grafana OnCall integration for on-call management and paging.
Beta integration
This integration is currently in beta release status.
Beta integrations are still being tested, but can be enabled by any customer. Core connectivity is stable, but the integration may receive updates based on user feedback.
Populate the following fields to set up this integration:
Field | Description |
|---|---|
Authentication Method | Choose how you'd like to authenticate with this integration. The following methods are available:
|
OnCall API Endpoint URL | Enter the OnCall API Endpoint URL from your Grafana instance's OnCall settings. |
Credentials | Enter the credentials that allow the integration to authenticate. If you selected OnCall API Key, enter the OnCall API Key. If you selected Service Account Token, enter the Service Account Token and Grafana Stack URL. (for example, |
Custom Headers | Add custom HTTP headers to include with all API requests. For each header, include the Header Name and Header Value. To add additional headers, click the + sign. |
Deployment Type | Select whether your Grafana OnCall integration is Cloud or On-Prem. Certain integrations have endpoints that work only with one deployment type. Selecting the correct option automatically applies the right guardrails to the AI Incident Assistant agents. Note: On-prem integrations can connect via the Relay Client, enabling secure communication with infrastructure behind your firewall. |
Grafana OnCall System/Schema Nuances | Add notes to help AI Incident Assistant understand your Grafana OnCall environment. We highly recommend configuring this field, as it allows you to enter organization-specific information that enables AI Incident Assistant to provide more accurate and consistent results. For example, enter explanations of custom fields and when or how they should be used to handle user queries. |
Jira Service Management
Use the AI Incident Assistant Jira Service Management (JSM) integration to retrieve on-call schedules, rotations, and contacts.
The following JSM operations permissions must be enabled to use the integration:
read:ops-config:jira-service-managementread:jira-userread:meoffline_access
To set up the integration, click Connect JSM. You'll be redirected to the Atlassian page where you will need to grant AI Incident Assistant access to your Atlassian account. Click Accept to enable the integration.
In the web app Jira Service Management integration page, select whether your JSM Deployment Type is Cloud or On-Prem.
Certain integrations have endpoints that work only with one deployment type. Selecting the correct option automatically applies the right guardrails to the AI Incident Assistant agents.
Relay client
On-prem integrations can connect via the Relay Client, enabling secure communication with infrastructure behind your firewall.
Jira Service Management Paging Targets
You can set up paging targets in Managed Incident Channels escalation workflows. These paging targets will receive a notification during an incident.
To add a paging target, go to the Search Query box and type the name of a team. Matching teams will appear in the menu to the right. Select a team to add it to the configuration.
You can also click + Add Manual Target to manually add a target without searching for it.
After selecting the team, populate the following information in the Configured Targets section:
Team ID - unique ID of the JSM team.
Display Name - the display name that will appear in the managed incident channel.
Description - description of the paging target.
MIR3
The MIR3 integration is used for on-call notifications and schedule management.
Beta integration
This integration is currently in beta release status.
Beta integrations are still being tested, but can be enabled by any customer. Core connectivity is stable, but the integration may receive updates based on user feedback.
To configure the MIR3 integration, populate the following fields:
Field | Description |
|---|---|
Authentication Method | Choose how you'd like to authenticate with this integration. The following methods are available:
|
Regional Endpoint | Select the region of your MIR3 environment to automatically populate the endpoint. Or, you can enter a custom URL in the text box. |
Credentials | If you selected Username & Password as your authentication method, enter the Username and Password of the MIR3 account that AI Incident Assistant should use for API interactions. If you selected API Key authentication, enter a MIR3 API Key. |
Deployment Type | Select whether your MIR3 integration is Cloud or On-Prem. Certain integrations have endpoints that work only with one deployment type. Selecting the correct option automatically applies the right guardrails to the AI Incident Assistant agents. Note: On-prem integrations can connect via the Relay Client, enabling secure communication with infrastructure behind your firewall. |
System/Schema Nuances | Add notes to help AI Incident Assistant understand your MIR3 environment. We highly recommend configuring this field, as it allows you to enter organization-specific information that enables AI Incident Assistant to provide more accurate and consistent results. For example, enter explanations of custom fields and when or how they should be used to handle user queries. |
MIR3 Paging Targets
You can set up paging targets in Managed Incident Channels escalation workflows. These paging targets will receive a notification during an incident.
To add a paging target, go to the Search Query box and type the name of a recipient schedule. Matching recipient schedules will appear in the menu to the right. Select a recipient schedule to add it to the configuration.
You can also click + Add Manual Target to manually add a target without searching for it.
After selecting the recipient schedule, populate the following information in the Configured Targets section:
Recipient Schedule ID - the recipient paging target's schedule ID in MIR3.
Display Name - the display name that will appear in the managed incident channel.
Description - description of the paging target.
OpsGenie
The AI Incident Assistant OpsGenie integration is used for alerting and on-call management.
To configure the OpsGenie integration, enter your OpsGenie API Key.
You can also optionally add Custom Headers. Custom HTTP headers can be included with all API requests. For each header, include the Header Name and Header Value. To add additional headers, click the + sign.
OpsGenie Paging Targets
You can set up paging targets in Managed Incident Channels escalation workflows. These paging targets will receive a notification during an incident.
To add a paging target, go to the Search Query box and type the name of a schedule. Matching schedules will appear in the menu to the right. Select a schedule to add it to the configuration.
You can also click + Add Manual Target to manually add a target without searching for it.
After selecting the schedule, populate the following information in the Configured Targets section:
Schedule ID - OpsGenie ID of the targeted schedule.
Display Name - the display name that will appear in the managed incident channel.
Description - description of the OpsGenie target.
PagerDuty
The AI Incident Assistant PagerDuty integration is used for incident response and alerting.
In PagerDuty, generate a user token API key with the following permissions granted:
schedules.readservices.readusers.readusers.contact_methods.readincidents.writeincidents.read
To configure the PagerDuty integration, enter your PagerDuty Email address and a user token API Key.
PagerDuty Paging Targets
You can set up paging targets in Managed Incident Channels escalation workflows. These paging targets will receive a notification during an incident.
To add a paging target, go to the Search Query box and type the name of a service. Matching services will appear in the menu to the right. Select a service to add it to the configuration.
You can also click + Add Manual Target to manually add a target without searching for it.
After selecting the service, populate the following information in the Configured Targets section:
Service ID - the ID of the targeted service in PagerDuty.
Display Name - the display name that will appear in the managed incident channel.
Description - description of the PagerDuty target.
Click Save Targets to add it to your configuration.
xMatters
Beta integration
The AI Incident Assistant xMatters integration is currently in Beta release status.
The AI Incident Assistant xMatters integration is used for alerting and incident management.
Configure the following fields to set up the integration:
Field | Description |
|---|---|
xMatters Instance URL | Unique URL of your xMatters instance. |
Username | Username of the xMatters account that AI Incident Assistant should use for API interactions. |
Password | Password of the xMatters account that AI Incident Assistant should use for API interactions. |
Workflow Trigger URL | Workflow trigger URL that will be used for on-call paging. |
Custom Headers | You can also optionally add Custom Headers. Custom HTTP headers can be included with all API requests. For each header, include the Header Name and Header Value. To add additional headers, click the + sign. |
xMatters Paging Targets
You can set up paging targets in Managed Incident Channels escalation workflows. These paging targets will receive a notification during an incident.
To add a paging target, go to the Search Query box and type the name of a group. Matching groups will appear in the menu to the right. Select a group to add it to the configuration.
You can also click + Add Manual Target to manually add a target without searching for it.
After selecting the group, populate the following information in the Configured Targets section:
Group ID - unique ID of the targeted group.
Display Name - the display name that will appear in the managed incident channel.
Description - description of the xMatters target.
Source Control
Source control integrations enable code repository management, version control, and collaboration.
The following source control integrations are available:
GitHub
Experimental integration
This integration is currently in Experimental release status. The connection may be subject to significant changes and optimizations. We recommend using the integration in controlled testing environments.
Use the AI Incident Assistant GitHub integration to add code context or investigate recent code changes, pull requests, commits, and diffs.
Required Permissions
In GitHub, ensure the following personal access token (PAT) repository permissions are enabled:
MetadataCommit statusesContentsIssuesPull requestsChecks
Configure the GitHub Integration
To configure the integration, populate the following fields:
Field | Description |
|---|---|
Authentication Method | Choose how you'd like to authenticate with this integration. The following methods are available:
|
GitHub API Base URL | Enter the base URL of your GitHub instance. (for example, |
Credentials | If you selected Token (PAT) as your authentication method, enter your Access Token. If you selected OAuth Access Token as your authentication method, enter your OAuth Access Token. If you selected GitHub App (Installation token) as your authentication method, enter your GitHub App ID, GitHub App Installation ID, and GitHub App Private Key (PEM). |
Custom Headers (Optional) | Add custom HTTP headers to include with all API requests. For each header, include the Header Name and Header Value. To add additional headers, click the + sign. |
Deployment Type | Select whether your GitHub integration is Cloud or On-Prem. Certain integrations have endpoints that work only with one deployment type. Selecting the correct option automatically applies the right guardrails to the AI Incident Assistant agents. Note: On-prem integrations can connect via the Relay Client, enabling secure communication with infrastructure behind your firewall. |
GitHub System/Schema Nuances | List any special repo nuances, naming conventions, or other knowledge that helps AI Incident Assistant more effectively interact with your tool. We highly recommend configuring this field, as it lets you enter organization-specific information that helps AI Incident Assistant provide more accurate and consistent results. For example, you can enter key repos to prioritize, repo naming conventions, default branches, CI nuances, monorepo layout notes, deployment information, and any investigation playbooks that AI Incident Assistant should follow. |