Jira Software
Automatically create new Jira issues from BigPanda incidents.
Supported Versions | Type | Authentication Type |
|---|---|---|
Jira Cloud | Connect App | API Key and Bearer Token |
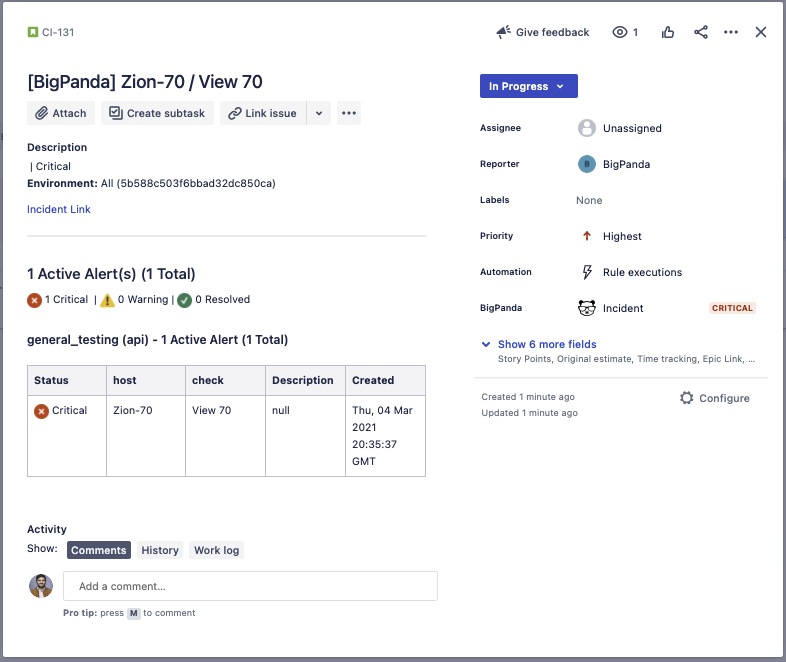
When an incident is shared through the Jira integration, an issue is created in Jira with details of the correlated alerts and a link to the BigPanda incident.
Compatible versions
This integration is not compatible with Jira Service Management.
Backend migration required
To improve the speed and stability of your Jira integrations and comply with Atlassian’s deprecation of the Connect dev platform, BigPanda will start processing Jira callbacks through Atlassian’s Forge platform. In 2026, we will be deprecating Connect webhooks entirely. We recommend migrating to Forge as soon as possible to enjoy the benefits of the new Forge infrastructure.
The migration process is automated and can be completed with just a few clicks. See our documentation on migrating webhooks to the Forge platform for instructions. Note that even if this is your first time setting up a Jira integration, you will need to complete the migration steps.
Key features
Field mapping. Map BigPanda alert tags to custom and system fields in Jira.
Direct linking. Generate links to both the BigPanda incident and corresponding Jira issue. The incident link will appear in the Jira issue description, and the issue link will appear in the BigPanda incident details.
Multiple integrations. Create a unique integration for each of your Jira projects.
Priority mapping. Sync priority levels between BigPanda incidents and Jira issues.
Incident synchronization. Sync resolution between BigPanda and Jira, allowing an incident resolution in BigPanda to close the related Jira issue and vice versa.
BigPanda integrations are limited to a single Jira instance
Once you have installed and authorized the BigPanda app in Jira, your BigPanda instance is linked to that Jira instance. You will only be able to create BigPanda integrations within that Jira instance. If you want to integrate BigPanda with another Jira instance, you have two options:
Use a second BigPanda instance to integrate with Jira instance B.
Fully remove BigPanda from Jira instance A so that you can integrate it with Jira instance B. To do this, follow the instructions for uninstalling the Jira integration.
Install the BigPanda app in Jira
Before you can create individual Jira integrations, you must install the BigPanda application.
This app installation will be used for all Jira integrations
You only need to install and authenticate the BigPanda app once per Jira site, regardless of whether you are creating integrations with Jira Cloud or configuring a Jira Changes integration.
Add the BigPanda app from the Atlassian Marketplace using the instructions in Jira's documentation for installing a new app.
Go to the BigPanda console, then navigate to Settings > API Keys to create a new API key. You will need this for authorizing and configuring the integration, so once you generate the API key, be sure to copy and save it. This key will only be visible once.
Authenticate the BigPanda app in Jira by navigating to Apps > BigPanda in the sidebar menu. Fill in the Access Token and API Key fields in the Authentication tab with the following details:
Access Token:
<Your Org Bearer Token>API Key: Enter the unique API key you created for Jira integrations.
Click Save. Note that this authorization step is only required when installing the BigPanda app. You will not need to authenticate every time you create an integration.
Once you've saved your authentication details, click Install Forge Backend to complete the required backend migration from Atlassian's Connect platform to its Forge platform. (See our Forge migration section for more details.) This button will take you to the private installation page for an app titled BigPanda Jira Forge Backend. Click Get App and select the Jira instance where you use BigPanda from the dropdown. Then, click Install. All your Jira callbacks will now be processed through Forge moving forward.
You can now access the BigPanda app in Jira by navigating to Apps > BigPanda in the side menu.
Create a new Jira integration
Once the BigPanda app is installed in Jira, you can create individual integrations. Each integration corresponds to a single Jira project, which is configured through the BigPanda app in Jira.
Create a new integration in the BigPanda console
To get started, create a new Jira integration in BigPanda to generate an app key and configure the webhook.
Navigate to the Integrations tab in the BigPanda console.
Click New Integration and search for the Jira integration or click the Collaboration tab and select from there.
Give your integration a distinct, descriptive name, then click Generate App Key to create the integration in BigPanda.
Configure the integration webhook by setting the value of the
x-bp-api-keyheader to the API key you created for this integration, then clicking Configure Webhook. (Note that this custom header is required for Jira integrations.)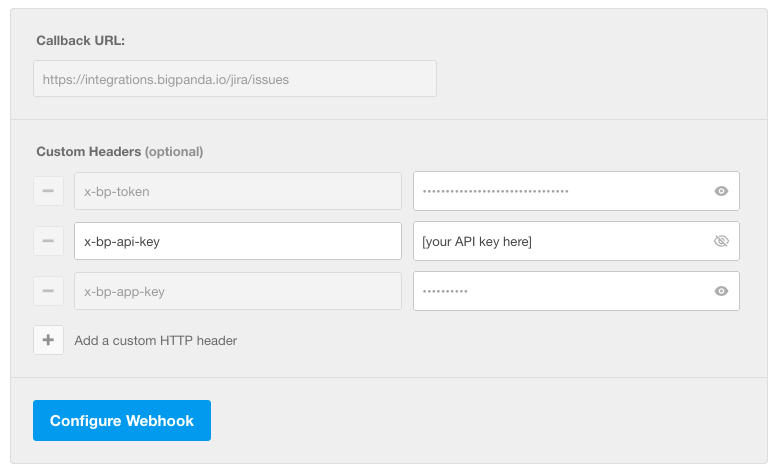
Your integration is now configured on the BigPanda side. Configure the rest of the integration in Jira by navigating to Apps > BigPanda > Projects.
Configure the integration in Jira
In Jira, navigate to Apps > BigPanda and click the Projects tab.
Click Add Project to connect the integration to a specific Jira project.
Fill in the App Key field with the unique key for this integration.
Do not reuse an app key for multiple Jira projects
Each Jira project requires a unique app key. You must create a new integration in BigPanda for each Jira project you want to connect.
Select the Jira Project you want to integrate with BigPanda.
Select the Jira Issue Type you wish to use for issues created by this integration.
Issue type must include all mapped fields
The selected issue type must include every field that is mapped in this BigPanda integration.
PriorityandStatusare required fields, but your issue type should also include any optional fields you configure. If you want to use an issue type that does not currently have these fields, follow these steps to add new fields to your issue type.Configure Incident Synchronization to define bi-directional behavior for resolved and re-opened incidents.
Auto-Resolve BigPanda Incident: When this setting is enabled, resolving an issue in Jira will also resolve the connected incident in BigPanda.
Auto-Resolve Jira Issues: When this setting is enabled, resolving an incident in BigPanda will also resolve the connected Jira issue.
Auto Re-Open Jira Issues: Define what Jira should do when resolved incidents are automatically reopened in BigPanda. When enabled, the connected Jira issue will reopen. When disabled, a new Jira issue will be created for the reopened BigPanda incident.
(If Auto Re-Open is enabled) Re-Open Window (min): Define the maximum amount of time allowed for Jira issues to be reopened by BigPanda. This time window starts when the Jira issue is closed. If a BigPanda incident is reopened after this window ends, a new issue will be created instead.
Configure Status Mapping to define which Jira status to use when issues are created, resolved, and re-opened.
Configure Priority Mapping to set the default priority for new Jira issues and to define the relationship between BigPanda priorities and Jira priorities.
(Optional) Configure Field Mapping to map BigPanda Incident Tags to existing fields in Jira. To do this, copy and paste the desired incident tag name from BigPanda, then select the Jira field you want to auto-populate with that tag. (You will also need to specify the data type of the Jira field:
Boolean,Integer,String,Array of Strings, orArray of Integers.)(Optional) Customize the Issue Summary.
Click Save to finalize. Any BigPanda incident that is manually or automatically shared via this integration will now create a corresponding issue in Jira.
(Optional) Customize the Jira issue description
The Issue Summary is the template that determines what incident data is included in in the issue's description field and how it is formatted. The default template includes information on priority, status, environment, and alerts:
h2. {{priority}} | {{status}}
*Environment:* {{env_name}} {{env_id}}

[Incident Link|{{incident_link}}]

----

h2. {{active_alert_count}} Active Alert(s) ({{alert_count}} Total)
(x) {{critical_count}} Critical | (!) {{warning_count}} Warning | (/) {{ok_count}} Resolved

{{alerts_table}}
If you want to include more detail, use the following list of available fields to add dynamic incident data to issue descriptions. You can customize the format of the description using Jira Markup Syntax.
Available fields
Use the following parameters to add dynamic incident data to issue descriptions.
Field | Description |
|---|---|
| The incident priority tag in BigPanda. |
| The current status of the incident in BigPanda ( |
| The time when the earliest correlated alert was received, in Unix epochs. |
| A direct link to the incident in the BigPanda console. |
| The name of the incident's environment in BigPanda. (See Environments for more details.) |
| The system ID of the incident's environment in BigPanda. (This ID is found in the URL when you open the environment in the BigPanda console.) |
| Any incident tag that is unique to your organization can be added using double bracket formatting around the name of the incident tag. (Note that system metadata tags that are not listed in this table will not work.) |
| The timeline and context of alert events. Describes how these alert events might be related. (Requires Advanced Insight Module.) |
| The explanation of the logical path the AI traveled to suggest the root cause. (Requires Advanced Insight Module.) |
| The full alert data for the incident and summarizes key impact and situation changes for the incident. (Requires Advanced Insight Module.) |
| A high level description of the incident. (Requires Advanced Insight Module.) |
| The total number of alerts correlated to the incident. |
| The number of active alerts (alerts with a status of |
| The number of alerts with a |
| The number of alerts with a |
| The number of alerts with a |
| The number of alerts with an |
| The number of alerts with an |
| The first 5 alerts correlated to the incident, sorted by timestamp. This table includes the alert's status, primary and secondary properties, description, and the time it was created. |
Migrate webhooks to Atlassian’s Forge platform
To improve the speed and stability of your Jira integrations and comply with Atlassian’s deprecation of the Connect dev platform, BigPanda will start processing Jira callbacks through Atlassian’s Forge platform. In 2026, we will be deprecating Connect webhooks entirely. We recommend migrating to Forge as soon as possible to enjoy the benefits of the new Forge infrastructure.c
Follow these simple steps to migrate your Jira integrations to Forge.
Install the Forge Backend app
In your Jira instance, navigate to Apps > BigPanda.
Click the Install Forge Backend button. This will take you to the private installation page for an app titled BigPanda Jira Forge Backend.
Click Get App and select the Jira instance where you use BigPanda from the dropdown. Then, click Install.
Users with existing integrations must follow the steps in the next section to delete their Connect webhooks. New users who are setting up the BigPanda Jira app for the first time don't need to take any further action.
Delete Connect webhooks
After installing the Forge Backend app, return to Apps > BigPanda. It may take a few minutes for the update to reflect. At this point, you will see two new buttons: Delete Connect Webhooks and Revert to Connect Backend.
When the Forge Backend app is installed, the integration will start using Forge as the default for Jira events. Duplicate events from Connect webhooks will be filtered out by BigPanda.
We recommend running your integrations for a week before deleting Connect webhooks to ensure that comments, resolve events, and changes are all showing up in BigPanda as expected. Talk to your BigPanda account team if you have any questions or run into any issues.
Once you’re confident everything is working properly, go to Apps > BigPanda and click Delete Connect Webhooks to clear the old webhooks from your instance. All webhooks will now run through Forge.
Troubleshooting
If you wish to revert to Connect or reinstall Forge, go to Apps > BigPanda and click Revert to Connect Backend. This will recreate the Connect webhooks for your existing configurations and tell BigPanda to ignore duplicate events sent via Forge. You should also notify your BigPanda account team so they can review your configuration and help you solve any issues with the migration.
To fully remove the Forge Backend app, go to Connected Apps > View App Details > Uninstall App in your admin site. The Install Forge Backend button will then reappear in the BigPanda app and you can repeat the process to reinstall.
Uninstall the integration
BigPanda must be fully uninstalled before being integrated with a new Jira instance
A BigPanda instance can only be integrated with one Jira instance at a time. If you want to integrate BigPanda with another Jira instance, you must follow all of these steps to fully delete the integration from both BigPanda and Jira.
Deleting an integration requires that you remove the integration in both the integrated system and BigPanda. We recommend that you first uninstall the integration on the integrated system to prevent traffic from being sent and rejected by BigPanda, since the app_key will not exist once you delete the integration in BigPanda.
Uninstall the BigPanda app in Jira
Before deleting the integration in BigPanda, uninstall the BigPanda app in Jira. To do this, navigate to Apps > Manage. Select the BigPanda app, then choose Uninstall.
Stop sending data from BigPanda
In BigPanda, disable any settings that send data to the integrated system. This includes modifying or removing AutoShare rules or Environments that are tied to the integration.
Delete the integration in BigPanda
Take the following steps to delete the integration from BigPanda:
In BigPanda, navigate to the Integrations tab and select the desired integration from the list.
In the integration details on the right of the page, click the trash icon, then confirm you want to delete the integration. The integration will be removed immediately.
Data will not be automatically removed
This procedure does not remove any data from BigPanda or the integrated system. As needed, remove data from each system before deleting the integration.