ITSM Integrations
ITSM tools are used for ticket management, SLA tracking, and workflow automation. These integrations enhance service desk efficiency and incident handling.
The following ITSM integrations are available:
Azure Support
Connect Biggy to Azure Support to track Microsoft Azure support requests. Biggy can list and read support requests, including their status, severity, support plan, and assigned engineer, and include relevant requests in its investigations and recommendations. With write access, Biggy can also open, update, and close support requests after each is approved.
Each instance signs in as a Microsoft Entra app registration and tracks the Microsoft support requests on exactly one Azure subscription. To track multiple subscriptions, add one instance per subscription.
For more information about the API this integration uses, see the Azure Support REST API documentation.
Read access by default
Biggy always reads support requests from a connected instance. Biggy opens, updates, or closes a support request only when you turn on write access, enable the specific operation, and a person approves the request. Biggy never grants Microsoft diagnostic-collection consent and never attaches files.
Required permissions
In Azure, ensure the following are in place before you configure the integration:
Microsoft Entra app registration: A single-tenant app registration with a client secret. Biggy signs in to Azure as this app.
Readerrole: The built-inReaderrole on the subscription, assigned to the app.Readeris enough to list and read support requests, including their status, severity, support plan, and assigned engineer. It also lets Biggy read the subscription, services, and problem classifications. Nothing granted by this role can change anything.Support Request Contributorrole (Optional): TheSupport Request Contributorrole on the subscription, assigned to the app. This role is required only for a write-enabled connection and allows the app to open, update, and close support requests. A read-only connection never needs it.
Client secret expiration
Azure client secrets expire. When a secret lapses, Verify Connection reports a credential failure until you paste a new secret into the instance. Rotate the secret in the app registration before it expires to prevent active work blockers.
Prepare Azure
Complete the following steps in Azure before you create the instance:
Go to Microsoft Entra ID > App registrations > New registration and create a single-tenant app. You don't need a redirect URI. For more information, see the Microsoft Register an application documentation.
On the Overview page of the app registration, copy the Directory (tenant) ID and the Application (client) ID.
In the app registration, open Certificates & secrets > New client secret. Pick an expiry that your rotation policy allows.
Copy the secret Value. Azure shows the value only once.
Open the subscription's Access control (IAM) page, then select Add role assignment. Assign the
Readerrole to the app. For more information, see the Microsoft Assign Azure roles documentation.If Biggy should open, update, or close support requests on this subscription, also assign the Support Request Contributor role to the app.
Copy the ID of the subscription, and note whether the subscription is in Azure (public), Azure Government, or Azure China.
To assign the roles with the Azure CLI instead, run the following commands:
# Sign in, then grant the app registration read access to the subscription
az login
APP_ID=<application_client_id>
SUBSCRIPTION_ID=<subscription_id>
az role assignment create --assignee "$APP_ID" --role "Reader" --scope "/subscriptions/$SUBSCRIPTION_ID"

# Only if Biggy may open, update or close support requests on this subscription
az role assignment create --assignee "$APP_ID" --role "Support Request Contributor" --scope "/subscriptions/$SUBSCRIPTION_ID"
Configure the Azure Support integration
Go to Integrations > Manage Integrations > Azure Support.
Click New instance.
In the General section, populate the following fields:
Field
Description
Instance Name
Enter a name for the instance. For example, Production Azure Support.
Routing Instructions (Optional)
Describe what this instance covers so Biggy can route queries to it. For example, EU production accounts. This field is recommended, and is required for multiple instances.
Agent Notes (Optional)
Enter notes that help the Azure Support agent work with your system.
For example, which teams own this subscription, your Azure support plan, how support requests are usually titled, or which services matter most.
In the Connection section, populate the following fields:
Field
Description
Directory (tenant) ID
Enter the Directory (tenant) ID from the Overview page of the app registration in Microsoft Entra ID.
Application (client) ID
Enter the Application (client) ID of the app registration. This GUID is also on the Overview page.
Client Secret
Paste the secret Value you copied when you created the client secret. Biggy stores the secret encrypted at rest. To show or hide the secret, click the eye icon. Client secrets expire, so rotate them in the app registration before they do.
Subscription ID
Enter the ID of the one subscription this instance tracks support requests for. To track another subscription, connect another instance.
Azure Cloud
Select the Azure cloud that hosts the subscription. This setting selects the Microsoft Entra and Azure Resource Manager endpoints that Biggy uses.
The default is Azure (public, default). Change it only if the subscription is in a sovereign cloud, such as Azure Government or Azure China.
On-premises instance
Turn on this toggle if the Azure Support instance is reachable only from inside your network. Requests route through a relay client, which you assign on the Relay Clients page.
For more information, see Relay Clients.
Click Verify Connection to confirm the configuration.
(Optional) To let Biggy open, update, or close support requests, enable Allow Biggy to write to Azure Support and populate the following fields:
Field
Description
Operation Policy
This table allows you to enable or disable each Microsoft.Support write Biggy can perform.
Reads are always on for a connected instance; every write is off until you switch it on and the ceiling above is enabled. Human approval is required for each write operation.
The following write operations are available:
Create support requests (
createTicket): Open a new Microsoft support request for this subscription.Update contact details on a support request (
updateContacts): Change the primary contact, phone, or additional email addresses on an open request.Close support requests (closeTicket): Close a support request Biggy or a person opened.
The operation policy table also lists operations marked Not yet available. These cannot be enabled.
Highest severity Biggy may propose
Select the severity ceiling. The following options are available:
Severity A - Critical Impact: Recommended. Biggy may propose critical impact. Azure requires a contact phone number for critical requests.
Severity A - Highest Critical Impact: Azure accepts this severity only on Unified or Premier support plans; on other plans the request is rejected. The default contact needs a phone number.
Severity B - Moderate Impact: Biggy may propose minimal and moderate-impact requests; critical ones are refused.
Severity C - Minimal Impact: Biggy may only propose minimal-impact requests. Every higher severity is refused before it reaches Azure.
Default Contact
All fields are optional, unless a Severity A impact level was selected, in which case, phone number is required.
Azure requires a contact on every support request. Biggy attaches this one to the requests it proposes unless the approver names another. Leave every field blank to set no default.
Populate the following fields to add a default contact:
First Name
Last Name
Email
Phone Number
Country
Preferred Time Zone
Preferred Support Language
Preferred Contact Method
Additional Email Addresses (One address per line or comma-separated, up to 10)
Click Create Instance.
BMC Remedy
The Biggy BMC Remedy integration connects Biggy to BMC Helix ITSM and BMC Remedy. Biggy uses the integration to work with incidents, changes, problems, and approved work notes.
Biggy connects to your BMC Remedy instance through the AR System REST API, using the credentials of a service account that your team provisions for Biggy.
To configure the integration:
In BMC Remedy, create a dedicated service account for Biggy.
Assign the correct permissions to the account. The account must have an AR System license and API access, with read permission on the ITSM forms Biggy queries (
HPD:Help Desk,CHG:Infrastructure Change, PBM:Problem Investigation,PBM:Known Error,WOI:WorkOrder,TMS:Taskand their work-log forms). Add write permission onHPD:IncidentInterface/CHG:ChangeInterfaceand the work-log forms if you want Biggy to apply human-approved updates. The account must have row-level access to the records Biggy should see.In the Biggy web app BMC Remedy integration page, populate the following fields:
Field
Description
Instance Name
A name for this BMC Remedy instance. The name controls how the instance appears and routes across Biggy. The default value is
Default.AR System REST API URL
Base URL of your AR System REST API.
BMC Helix tenants use the REST host (
https://<tenant>-restapi.onbmc.com); on-prem Remedy uses the host that serves/api/jwt/loginon your AR server.Agent Notes (Optional)
Add notes to help Biggy understand your BMC Remedy environment.
We highly recommend configuring this field, as it allows you to enter organization-specific information that enables Biggy to provide more accurate and consistent results.
For example, if your logs contain a specific field that is used to identify the type of application or service, provide that information here.
Username
Username of the BMC Remedy account that Biggy should use for API interactions. For example,
biggy-integration.Password
Password of the BMC Remedy account. To show or hide the password, click the eye icon.
Authentication String (AREA/SSO) (Optional)
The authentication string for your AR System server. Enter a value only if your AR server requires it for AREA or SSO authentication.
System Time Zone
Select the system time zone configured in your BMC Remedy instance. This ensures that Biggy correctly interprets dates and times. The default value is Coordinated Universal Time (UTC).
Smart IT Base URL (for record links) (Optional)
If the REST API URL differs from where users open records, enter the user-facing base URL here. Biggy uses this URL so that record links in its responses resolve correctly. For example,
https://<tenant>-smartit.onbmc.com.On-Premises Instance
Enable when this BMC Remedy instance is only reachable from inside your network. Requests route through a Relay Client.
Click Verify Connection to confirm that the connection to BMC Remedy is established.
Click Save Preferences.
Cherwell
Beta integration
This integration is currently in Beta. Ivanti ends Cherwell Service Management support on 2026-12-31, so this integration remains in beta.
The Biggy Cherwell integration gives Biggy access to Cherwell Service Management incidents, change requests, problems, and journals during an investigation.
Biggy can look up related Cherwell records, compare change request timing against incident start times, and include relevant records in its recommendations.
Read-only access
Biggy only reads from Cherwell. It never creates, updates, or closes a Cherwell record.
Required Permissions
In Cherwell, ensure the following are in place before you configure the integration:
Business object read rights: A CSM user whose security group has read rights on the
Incident,Change Request,Problem, andJournalbusiness objects.REST API client key: A REST API client key from CSM Administrator. You need the client secret only if you created the REST API client as a native client.
CSM license
A REST login consumes a CSM license for the user you choose.
Prepare Cherwell
Complete the following steps in Cherwell before you create the integration in the web app:
In CSM Administrator, open Security, then select Edit REST API client settings.
Create a client for Biggy and copy its Client Key. Token and refresh-token lifespans are set on the same client.
Choose a CSM user that can read Incidents, Change Requests, Problems, and Journals. Confirm the security group of the user has read rights on those business objects.
Choose how the user signs in:
Internal: Signs in a CSM user.
LDAP: Signs in a directory user through your LDAP authentication source.
Windows and SAML logins are not supported.
Note the time zone of your CSM server and the date format your Cherwell server displays. You enter both values when you configure the integration.
Configure the Cherwell Integration
In the web app, go to Integrations > Manage Integrations > Cherwell.
Click New instance.
In the New Cherwell Integration page, populate both General and Connection fields.
Click Verify Connection to confirm the configuration. It signs in, then checks that the user can read the Incident business object. A successful test means the server URL, the client key, and the user all work.
Click Create Instance.
General
Field | Description |
|---|---|
Instance Name | Enter a name for the instance. For example, |
Routing Instructions (Optional) | Describe what this instance covers so Biggy can route queries to it. For example, |
Agent Notes (Optional) | Enter notes that help the Cherwell agent work with your system. For example, which teams own which services, which custom fields matter, or how priorities map to severity. |
Connection
Field | Description |
|---|---|
Server URL | Enter the URL of your Cherwell server. For example, |
REST API Client Key | Enter the Client Key you copied from CSM Administrator. |
Client Secret (Optional) | Enter the client secret. This field is required only if you created the REST API client as a native client. |
Authentication Mode | Select how the integration signs in. Internal signs in a CSM user. LDAP signs in a directory user. |
Username | Enter the username of the CSM or directory user. For example, |
Password | Enter the password for the user. |
Custom CA Certificate (PEM) (Optional) | Paste the CA certificate chain in PEM format. This field is required only if the server uses a private or self-signed certificate. |
System Time Zone | Select the system time zone configured in your Cherwell instance. Match the time zone of your CSM server so dates and times are interpreted correctly. The default is Coordinated Universal Time (UTC). |
Server Date Format | Select the date format your Cherwell server shows. Cherwell returns dates without a time zone offset, written in its server culture. For example, |
On-premises instance | Turn on this toggle if the Cherwell instance is reachable only from inside your network. Requests route through a relay client, which you assign on the Relay Clients page. For more information, see [Remote Connections]. |
Private certificates or no internet access
For private or self-signed certificates, paste the issuing CA certificate chain into Custom CA Certificate (PEM). If Cherwell is not publicly reachable, enable On-premises instance, then configure a relay and assign the Cherwell integration under Integrations → Relay Clients; the relay needs network access to Cherwell and outbound internet connectivity to Biggy.

Verify the Integration
After you click Verify Connection, the integration signs in and checks that the user can read the Incident business object. If the test succeeds, the server URL, the client key, and the user all work.
If the test fails, check the following:
The Server URL is reachable and includes the correct path.
The REST API Client Key matches the client in CSM Administrator.
The user has read rights on the Incident business object.
The Authentication Mode matches the type of user you entered.
A private certificate is pasted in Custom CA Certificate (PEM), if your server uses one.
Freshservice
The Biggy Freshservice integration gives the agent read-only access to Freshservice incidents, changes, and problems during investigations. Biggy can look up related records and use them to inform its findings and recommendations.
The agent can look up related Freshservice records and include relevant records in its recommendations.
Read-only access
Biggy only reads from Freshservice. It never creates or changes records in Freshservice.
Required Permissions
In Freshservice, ensure the following are in place before you configure the integration:
API key: An API key from the profile settings of a Freshservice agent. The key carries the role and workspace access of that agent.
View permissions: An agent whose role can view tickets, changes, and problems. No write permissions are needed.
Prepare Freshservice
Complete the following steps in Freshservice before you create the instance:
Choose an agent whose role can view tickets, changes, and problems. The API key inherits the role and workspace access of the agent.
Open the Profile Settings of the agent in Freshservice and copy the API key shown there.
Configure the Freshservice Integration
Go to Integrations > Manage Integrations > Freshservice.
Click New instance.
In the New Freshservice Integration page, populate the fields described in the following tables.
Click Verify Connection to confirm the configuration.
Click Create Instance.
General
Field | Description |
|---|---|
Instance Name | Enter a name for the instance. For example, |
Routing Instructions (Optional) | Describe what this instance covers so Biggy can route queries to it. For example, |
Agent Notes (Optional) | Enter notes that help the Freshservice agent work with your system. For example, which groups own which services, workspace names, or ticket naming conventions. |
Connection
Field | Description |
|---|---|
Account URL | Enter your Freshservice address with no path after it. For example, |
API key | Paste the API key from your Freshservice profile settings. Biggy stores the key encrypted at rest. |
Multiple workspaces
Incident searches and change lists default to the primary workspace. You can request all workspaces accessible to the connected Freshservice agent, or a specific workspace by its numeric ID; Biggy cannot resolve workspace names. Individual incidents and problems retrieved by number are not restricted to the primary workspace, but remain subject to the connected agent’s
Verify the Integration
After you click Verify Connection, Biggy tests the connection to Freshservice with the credentials you entered. [VERIFY: confirm what the connection test checks for Freshservice.]
If the test fails, check the following:
The Account URL is your Freshservice address with no path after it.
The API key matches the key shown in the profile settings of the agent.
The role of the agent can view tickets, changes, and problems.
The agent has access to the workspaces you want to search.
Jira
The Biggy Jira integration is used for issue tracking and project management.
To configure the Jira integration, populate the following fields:
Field | Description |
|---|---|
Jira URL | Jira endpoint URL. |
Username and Password | Username and Password of the Jira account that Biggy should use for API interactions. The account used for the integration must have admin privileges in order to access the required endpoints. |
Custom Headers (Optional) | Add custom HTTP headers to include with all API requests. For each header, include the Header Name and Header Value. To add additional headers, click the + sign. |
Deployment Type | Select whether your Jira integration is Cloud or On-Prem. Certain integrations have endpoints that work only with one deployment type. Selecting the correct option automatically applies the right guardrails to the Biggy agents. Note: On-prem integrations can connect via the Relay Client, enabling secure communication with infrastructure behind your firewall. |
System/Schema Nuances | List any special field mappings, naming conventions, custom tables/fields, or other knowledge that helps Biggy more effectively interact with your tool. We highly recommend configuring this field, as it allows you to enter organization-specific information that enables Biggy to provide more accurate and consistent results. For example, you can include explanations of any custom fields and when or how they should be used to handle certain types of user queries. |
Salesforce
The Biggy Salesforce integration connects Biggy to Salesforce Service Cloud cases, accounts, and knowledge, or to BMC Helix Remedyforce incidents. Biggy uses the integration to look up and work with records, their comments, and the accounts and contacts they reference.
Biggy connects to your Salesforce org through the Salesforce REST API v68.0, using an external client app that your team creates specifically for this integration. The external client app runs as a dedicated integration user, so Biggy sees only the records that user can access.
Human approval for updates
Biggy is read-only in chat. Biggy never changes a Salesforce record without an approval in the conversation.
BMC Helix Remedyforce notes
Biggy does not add notes to Remedyforce incidents.
Biggy required scope and permissions
To enable the Salesforce integration, both the external client app and the integration user need the following access:
OAuth scope: Grant the
apiscope on the external client app. When you create the app, select the Manage user data via APIs (api) and Perform requests at any time (refresh_token, offline_access) scopes.API access: The integration user must have the API Enabled permission.
Read access: The integration user needs read access to the mapped object (
CaseorBMCServiceDesk__Incident__c), its comments, and the accounts and contacts it references.Write access: If you want Biggy to apply human-approved updates, the integration user also needs write access to the mapped object.
In its answers, Biggy references Salesforce records as SF-<CaseNumber>.
Prepare Salesforce
Before you configure the integration in Biggy, you need to find your My Domain URL.
In Salesforce Setup, open My Domain and copy the Current My Domain URL. For example, https://acme.my.salesforce.com.
A sandbox URL looks like https://acme--uat.sandbox.my.salesforce.com. When you enter a sandbox URL, Biggy selects Sandbox as the environment automatically. You can change the environment when you configure the integration.
Create an external client app in Salesforce. The external client app setup depends on the authentication method you plan to use:
Client credentials: Biggy requests short-lived access tokens that run as the app's
Run-Asuser. Follow the steps in Set up client credentials authentication.JWT bearer: Biggy signs tokens with a private key that matches a certificate you upload to the app. Follow the steps in Set up JWT bearer authentication.
Set up client credentials authentication
In Salesforce, go to Setup > App Manager > New External Client App.
Under API (Enable OAuth Settings), select Enable OAuth.
Enter any callback URL. The client credentials flow does not use the callback URL.
Select the Manage user data via APIs (api) and Perform requests at any time (refresh_token, offline_access) scopes.
Under Flow Enablement, select Enable Client Credentials Flow, then click Create.
On the Salesforce Policies tab, click Edit.
Under Client Credentials Flow, set Run As to the integration user. The user needs the permissions listed in Biggy required scope and permissions.
If Permitted Users is set to Admin approved users are pre-authorized, add the integration user's profile or permission set under App Policies.
On the Salesforce Settings tab, open OAuth Settings, then click Consumer Key and Secret. Salesforce may email you a verification code.
Copy the consumer key and consumer secret. You enter both values when you configure the Biggy Salesforce integration.
Set up JWT bearer authentication
In Salesforce, go to Setup > App Manager > New External Client App.
Under API (Enable OAuth Settings), select Enable OAuth.
Enter any callback URL. The JWT bearer flow does not use the callback URL.
Select the Manage user data via APIs (api) and Perform requests at any time (refresh_token, offline_access) scopes.
Under Flow Enablement, select Enable JWT Bearer Flow and upload
server.crt. On an older Connected App, this option is named Use digital signatures.Click Create.
On the app's Policies tab, click Edit, set Permitted Users to Admin approved users are pre-authorized, and save.
Click Edit again and add the integration user's profile or permission set under App Policies. The user needs the permissions listed in Biggy required scope and permissions.
On the app's Settings tab, open OAuth Settings, then click Consumer Key and Secret. Copy the consumer key. The JWT bearer flow does not use the consumer secret.
Configure the Biggy Salesforce integration
To configure the Biggy Salesforce integration:
In the Biggy web app, go to Integrations > Manage Integrations > Salesforce.
Click New instance.
In the General section, populate the following fields:
Field
Description
Instance Name
A name for this Salesforce instance. The name controls how the instance appears and routes across Biggy. For example,
Production Salesforce.Routing Instructions (Optional)
Describe what this instance covers so that Biggy can route queries to it. For example,
EU production accounts. Routing instructions are recommended, and required for multiple instances.Agent Notes (Optional)
Add notes to help Biggy understand your Salesforce environment. We highly recommend configuring this field, as it allows you to enter organization-specific information for more accurate and consistent results. For example, describe which record types or queues handle production incidents, how Priority maps to severity, or which accounts matter most.
In the Connection section, populate the following fields:
Field
Description
Authentication method
Choose how you'd like to authenticate with this integration. The following methods are available:
Client credentials: Authenticate using an External Client App with the client credentials flow enabled. Biggy requests short-lived access tokens that run as the app's Run-As user.
JWT bearer: Authenticate using an External Client App with the JWT bearer flow enabled and a certificate uploaded.
My Domain URL
The Current My Domain URL of your Salesforce org. Production URLs look like
https://acme.my.salesforce.com. Sandbox URLs look likehttps://acme--uat.sandbox.my.salesforce.com.Environment
Select Production or Sandbox. Sandbox orgs sign in through
test.salesforce.com. Biggy selects Sandbox automatically when the My Domain URL is a sandbox URL. If you change the selection, Biggy keeps your choice.Credential [VERIFY]
If you selected Client credentials as your authentication method, enter the Consumer Key and Consumer Secret from the External Client App. Biggy stores the consumer secret encrypted at rest.
If you selected JWT bearer as your authentication method, enter the Consumer Key from the External Client App, the integration user's Username, and the contents of
server.keyin Private Key. The private key must match the certificate uploaded to the External Client App. Biggy stores the private key encrypted at rest.Token audience (Optional)
Available for the JWT bearer authentication method. Advanced setting. Leave blank to use
login.salesforce.comfor Production andtest.salesforce.comfor Sandbox.In the Object section, select an Object preset. The preset sets the Salesforce object that Biggy reads and, with approval, updates. The following presets are available:
Service Cloud: Case: Service Cloud tracks cases on the standard
Caseobject.BMC Helix Remedyforce: BMCServiceDesk__Incident__c: Remedyforce tracks incidents on its managed-package object
BMCServiceDesk__Incident__c. Field names come from the Remedyforce managed package. Biggy checks them against your org when you verify the connection.
(Optional) If your org uses different field API names than the preset, expand Field overrides (advanced) and enter the API names to use. Leave a field blank to use the preset's API name. Biggy checks overrides against your org when you verify the connection.
The default API name for each field:
Field
Service Cloud: Case
BMC Helix Remedyforce
Record number
CaseNumberNameSubject
SubjectBMCServiceDesk__shortDescription__cDescription
DescriptionBMCServiceDesk__incidentDescription__cStatus
StatusBMCServiceDesk__FKStatus__r.NamePriority
PriorityBMCServiceDesk__FKPriority__r.NameOwner
OwnerIdOwnerIdIn the Connectivity section, click Verify Connection to confirm that the connection to Salesforce is established. A new External Client App can take a few minutes to become active.
Click Create Instance.
Serval
Connect Biggy to Serval to give the agent read-only access to users, teams, assets, workflows, access requests, SLA definitions, and tickets and their conversations for investigations.
The agent can look up related Serval tickets, review ticket conversations, and include relevant records in its recommendations.
Read-only access
Biggy only reads data from Serval. It never creates or changes tickets, workflows, access requests, or other Serval data.
Required Permissions
In Serval, create an organization-scoped API key. Have an Org Admin create an organization-scoped API key for Biggy’s organization-wide investigations.
Team-scoped keys
Team-scoped keys can search tickets when allowed team IDs are supplied, but cannot perform organization-level searches or user lookups. Biggy’s connection test searches without team IDs, so a team-scoped key will fail that test.
Configure the following permission bundles:
Level | Permission | Purpose |
|---|---|---|
Required |
| Read tickets, conversations, and ticket metadata |
Required |
| Look up requesters and assignees |
Recommended |
| Read assets |
Recommended |
| Read workflows and workflow runs |
Recommended |
| Read SLA definitions and access requests |
Optional |
| Add this permission to include team names and members |
Optional |
| Add this permission to include assignment groups |
Although the optional team and group permissions include management capabilities, Biggy uses them only for read operations.
Serval has no read-only bundle for teams or groups. Without teams:manage, Biggy derives teams from ticket keys (prefix and ID) and does not show team names. Without groups:manage, assignment groups are not listed.
Key expiration
Serval API keys have a maximum lifetime of one year. Rotate the key and update this integration’s credentials before the key expires.
Write-capable bundles
The optional teams:manage and groups:manage permission bundles grant write capabilities in Serval. Grant these bundles only if you need those lookups. Biggy uses them only to read team names and list assignment groups; it will reject attempts to modify either resource, however, the key will still have write permissions.
Prepare Serval
Before creating an integration instance:
Have a Serval Org Admin switch to the Organization workspace and open Settings > API Keys.
Create an organization-scoped API key with the permission bundles listed in Required Permissions. Include the optional
teams:manageandgroups:managebundles only if needed.Copy the key’s Client ID and Client Secret. You’ll enter these separately in Biggy.
Identify the API base URL for your Serval environment: leave the field empty for the default US endpoint, enter
https://public.eu1.serval.comfor EU, or obtain your tenant’s API endpoint for bring-your-own-cloud (BYOC) deployments.
Configure the Serval Integration
Go to Integrations > Manage Integrations > Serval.
Click New instance. In the New Serval Integration page, populate the fields described in the following tables.
Click Verify Connection to confirm the configuration.
Click Create Instance.
General
Field | Description |
|---|---|
Instance Name | Enter a name for the instance. For example, |
Routing Instructions (Optional) | Describe what this instance covers so Biggy can route queries to it. For example, |
Agent Notes (Optional) | Enter notes that help the Serval agent work with your system. For example, which teams own which services, ticket naming conventions, or which workflows matter most. |
Connection
Field | Description |
|---|---|
Connection Type | Select how Biggy reads from Serval. Both modes use the API key. REST API (recommended): Biggy calls the Serval v2 REST API with the read-only tools it maintains for tickets, conversations, users, assets, and workflows. MCP Server: Biggy uses the read-only tools of the hosted Serval MCP server. Serval documents its MCP server for per-user OAuth, so it may reject an API key. If Verify Connection reports that the MCP server rejected the key, select REST API. |
Client ID | Enter the Client ID of the Serval API key. |
Client Secret | Enter the Client Secret of the Serval API key. For example, |
Serval API base URL (Optional) | Enter the base URL of the Serval API. Leave this field empty for US tenants, which use |
Custom Headers (Optional) | Add custom HTTP headers to include with all API requests. For each header, include the Header Name and Header Value. To add additional headers, click the + sign. |
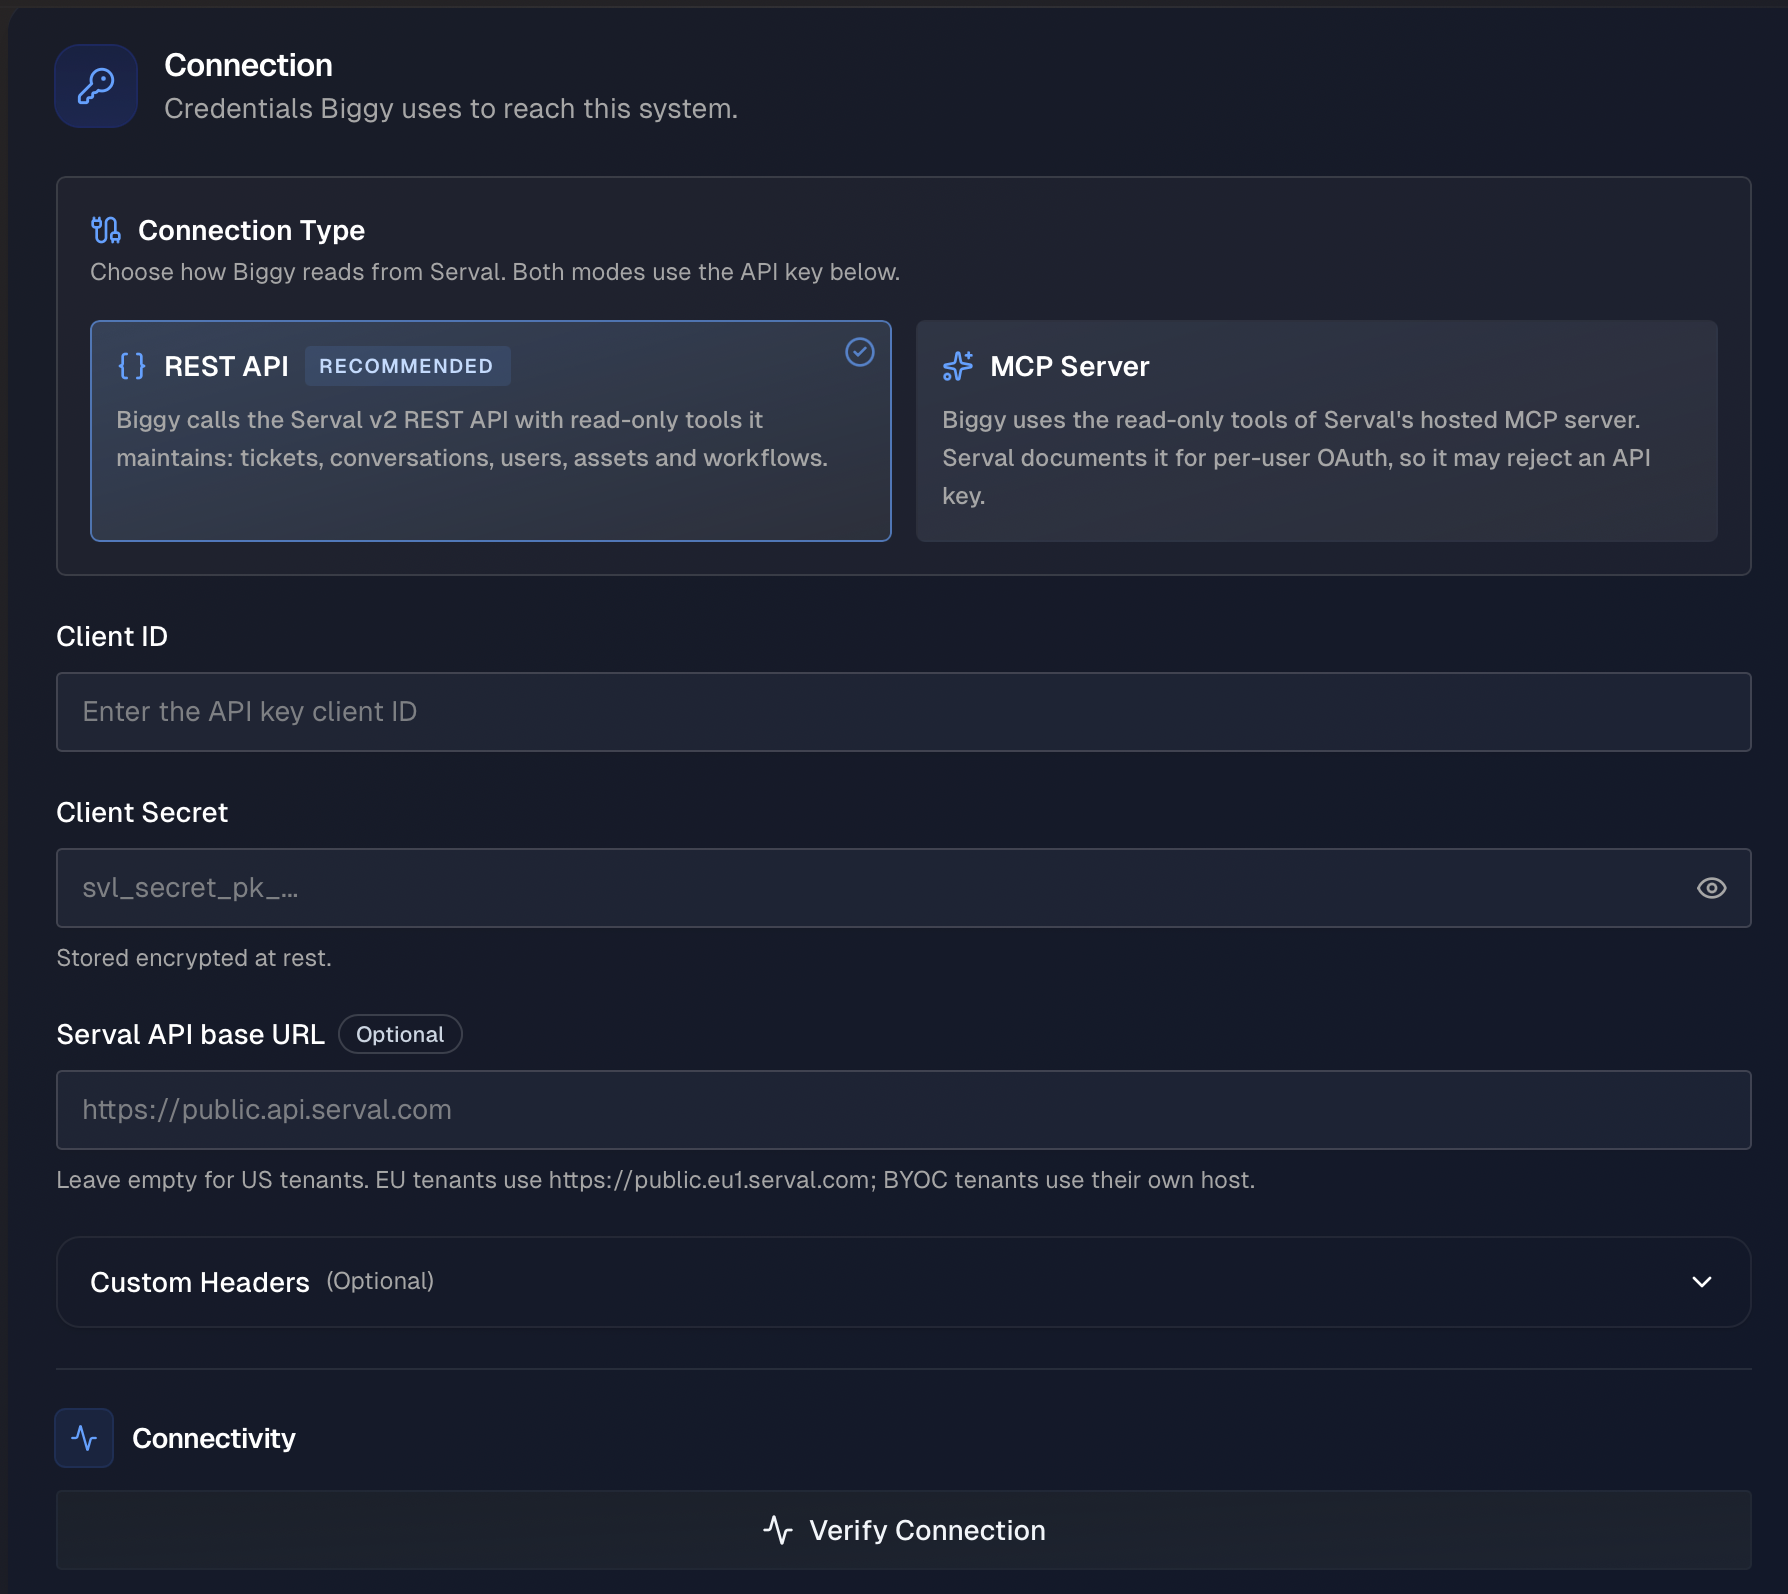
Serval configuration in Biggy Web App
Verify the Integration
After you click Verify Connection, Biggy tests the connection to Serval with the credentials you entered.
If the test fails, check the following:
The key is organization-scoped. Team-scoped keys cannot search tickets across teams or look up users.
The key has all five read permission bundles.
The key has not expired.
The Serval API base URL matches your tenant region. Leave the field empty for US tenants.
The Connection Type is REST API, if the MCP server rejected the key.
ServiceNow
The Biggy ServiceNow integration is used for managing incidents and requests.
CMDB and On-Call
The Biggy ServiceNow integration is also part of the CMDB and On-Call integration categories.
Biggy and Unified Data Connector
See the Unified Data Connector documentation for information about syncing data from ServiceNow to Biggy.
Biggy Required Tables and Endpoints
To enable the ServiceNow integration, Biggy requires access to certain tables and endpoints.
Access to the following tables is required:
change_requestchange_taskcmdb_cicmdb_ci_business_appconflictdocumentincidentkb_knowledgenew_callproblemproblem_taskrm_defectrm_epicrm_featurerm_releaserm_storyrm_testsc_req_itemsc_requestsc_tasksn_customerservice_casesys_attachmentsys_attachment_docsys_choicesys_usersys_user_grouptasktask_citask_cmdb_ci_servicetask_outageticket
Indirect access
Indirect access via reference links is required for things such as cmdb_ci_*, but this depends on your ServiceNow tables.
For example, if you have a field on an incident table such as u_business_app that points to a particular table, Biggy would need access to that table to effectively dot-walk that reference.
Access to additional tables
Users may ask Biggy for information from tables not listed above. For Biggy to be able to access that information, it would need to be given access to the additional tables where the information is stored.
Customer admins need to determine which tables these are, whether they want Biggy to be able to answer questions about the data in those tables, and then include access to those tables in the provisioned Biggy service account user.
Access to the following endpoints is required:
Endpoint | How it is used |
|---|---|
| OAuth token minting. Default when OAuth authentication is used, but not needed if using Basic authentication. |
| On call lookup. |
| Validating user references in queries and mapping names and emails to sys_ids for subsequent lookups. (For example, "How many incidents did John Smith resolve this year?") |
| Record lookup and queries. |
| Following a reference link from previous results. |
| Incident creation. |
| Add work notes or comments. |
| Counting and aggregation. |
| Retrieve table schema. |
| Retrieve all table definitions. |
AI Incident Prevention Required Tables
The following tables are required for AI Incident Prevention:
Read (query) access:
Table | Enum Value | Function |
|---|---|---|
|
| Fetch the main change record being assessed and query recent changes for CIs |
|
| Fetch change tasks associated with a change and recent tasks for CIs |
|
| Fetch incidents caused by related changes (track record analysis) |
|
| Resolve CI details by name or |
|
| Fetch affected CIs linked to a task (join table between tasks and CIs) |
|
| Fetch affected services linked to a change (join table between tasks and CMDB CI services) |
|
| Fetch outage records associated with a change (via |
|
| Fetch scheduling conflict records for a change |
Read via link-following (dot-walked reference fields):
Resolved Record Type | Function |
|---|---|
Business service record (typically | Follows the |
Primary CMDB CI record (typically | Follows the Note: If the CI resolves to a subclass table (for example |
Affected service detail records | Follows |
Affected CI detail records | Follows |
Write access:
The following write access is required only when AI Incident Prevention field sync or assessment work notes are enabled.
This access is separate from Biggy’s ITSM record-creation and update capabilities. When those capabilities are enabled, Biggy can create incidents using POST /api/now/table/incident and update supported records using PATCH /api/now/table/{table}/{sys_id}. The ServiceNow integration user must have the applicable create, read, and write ACLs for each enabled table and field.
Table | Enum Value | Function |
|---|---|---|
|
| Sync risk score/level fields back to the change record (field sync feature) |
|
| Post a work note with the risk assessment summary |
Configure the Biggy ServiceNow Integration
To configure the Biggy ServiceNow integration, populate the following fields:
Field | Description |
|---|---|
Authentication Method | Choose how you'd like to authenticate with this integration. The following methods are available:
|
ServiceNow URL | Base URL of your ServiceNow instance. (For example, |
Credentials | If you selected Basic Auth as your authentication method, enter the Username and Password of the ServiceNow account that Biggy should use for API interactions. If you selected OAuth 2.0 as your authentication method, enter your OAuth Client ID and OAuth Client Secret, and optionally enter the Token URL Override. |
Custom Headers (Optional) | Add custom HTTP headers to include with all API requests. For each header, include the Header Name and Header Value. To add additional headers, click the + sign. |
Deployment Type | Select whether your ServiceNow instance is Cloud or On-Prem. Certain integrations have endpoints that work only with one deployment type. Selecting the correct option automatically applies the right guardrails to the Biggy agents. Note: On-prem integrations can connect via the Relay Client, enabling secure communication with infrastructure behind your firewall. |
System Time Zone | Select the time zone configured in your ServiceNow instance. This ensures that ServiceNow correctly interprets dates and times to maintain consistency. |
Override Display Base URL (Optional) | If your ServiceNow base URL points to a reverse proxy endpoint, enter an override URL that Biggy will use to display ServiceNow links when responding to user queries. For example, if your API endpoint is |
System/Schema Nuances | List any special field mappings, naming conventions, custom tables/fields, or other knowledge that helps Biggy more effectively interact with your tool. We highly recommend configuring this field, as it allows you to enter organization-specific information that enables Biggy to provide more accurate and consistent results. For example, you can include explanations of any custom fields and when or how they should be used to handle certain types of user queries. |
ITSM Ticket Configuration Settings
Configure the mandatory or allowed fields and values for ServiceNow tickets.
For certain interactions, like creating a ticket upon creation of an Biggy-managed incident channel, these settings control which fields or values are displayed to users during auto-population.
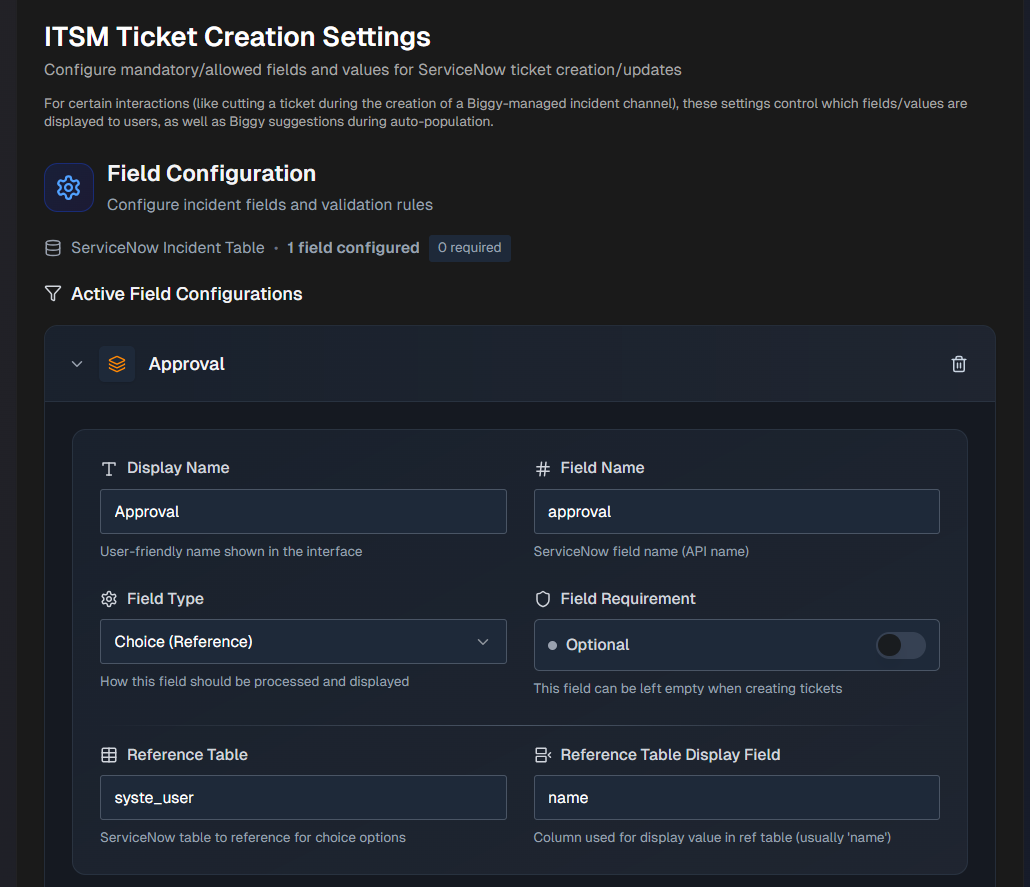
Configure the following sections:
Field Configuration
Add ServiceNow fields in the Field Configuration section:
Click + Add ServiceNow Field .
Select a field from the drop-down menu and click + Add.
Enter or edit the following information for the field:
Field
Description
Display Name
A user-friendly name that will appear in the UI. This field is prepopulated, but can be edited.
Field Name
The ServiceNow field name, also known as the API name. This field is prepopulated, but can be edited.
Field Type
Select how this field should be processed and displayed. Options include:
Text - plain text field extracted by Biggy based on prompt instructions.
Choice - a choice field in ServiceNow that has defined values in this table.
Choice (Reference) - a choice field in ServiceNow where the choices are referenced from a different table.
Constant - the value configured for this field will always be used, and cannot be updated by users when creating a ticket.
Field Requirement
Determine whether or not the field must be filled out when creating tickets.
Select Optional to allow the field to be left blank when creating tickets.
Select Mandatory if the field must be filled out when creating tickets.
Reference Table
This field will appear if you select Choice (Reference) for the Field Type.
Select the ServiceNow table to reference for choice options.
Reference Table Display Field
This field will appear if you select Choice (Reference) for the Field Type.
Select the ServiceNow column used for display value in reference table. The column used is typically
name.For Text fields, configure AI Extraction Guidance.
For Choice or Choice (Reference) fields, configure Choice Configuration.
For Constant fields, configure Constant Values.
Click Save Mappings.
All Active Field Configurations appear at the top of the section. Click any field to expand the configuration. You can click the Pencil icon to edit the configuration, or the Trash icon to delete it.
AI Extraction Guidance
The AI Extraction Guidance section will appear if you select Text for the Field Type. Use the Suggestion Prompt to help Biggy understand how to extract and populate the field.
The following is an example of a Suggestion Prompt:
Extract the affected service name from the incident description. Look for keywords like system, service, application, or proper names of services.
Default Value
The Default Value section appears if you select Text for the Field Type.
You can optionally enter a Default Text Value to pre-populate the field with a default value. This value will be used when no specific value can be extracted or determined.
Choice Configuration
The Choice Configuration section will appear if you select Choice or Choice (Reference) for the Field Type. In this section, configure available options for the field.
Use the Search Query box to find values within the reference table.
Select an option within the Add to Configuration field. Your selection appears in the Configured Choices section below.
(Optional) In the Configured Choices section, click + Add Manual Choice to manually add a value.
Default Value
The Default Value section will appear if you select Choice or Choice (Reference) for the Field Type.
(Optional) In the Default Value section, you can configure a pre-selected option for new tickets.
In the drop-down menu, select a value. If this field is left blank, manual selection will be required for each ticket.
AI Auto Population
The AI Auto Population section will appear if you select Choice or Choice (Reference) for the Field Type.
(Optional) Guide Biggy on how to automatically select values in the AI Auto-Population section.
In the Suggestion Prompt field, provide clear instructions for when and how to auto-select different options.
For example, you can instruct Biggy to select High for urgent incidents, Medium for standard issues, and Low for minor problems based on the incident description and urgency keywords.
Constant Value
The Constant Value section will appear if you select Constant for the Field Type.
Enter a Fixed Value that will always be used for the field. This value will be used for every ticket created, regardless of the incident details.
Zendesk
Use the Biggy Zendesk integration to give the agent read-only access to Zendesk support tickets, ticket comments, and problem-linked incidents during an investigation.
The agent can search and read related tickets, review public replies and internal notes, follow problem-to-incident links, and include relevant tickets in its recommendations.
Read-only access
Biggy only reads from Zendesk. It never creates, updates, or comments on Zendesk tickets.
Required Permissions
In Zendesk, ensure the following are in place before you configure the integration:
Confidential OAuth client: Create a Confidential OAuth client in Zendesk Admin Center. You need its identifier and secret. Biggy uses the client-credentials grant.
Read scope: Biggy requests only the
readscope when exchanging client credentials for an access token. Leave Allowed scopes blank, or set it toreadto restrict the client to read-only access.Agent or admin access: The Zendesk user associated with the credentials must have the agent or admin role. End-user credentials do not pass Biggy’s connection verification.
Why OAuth and not an API token
Zendesk is retiring API tokens. New API token creation is blocked starting October 27, 2026, and all remaining API tokens stop working on April 30, 2027. Accounts created on or after July 28, 2026, cannot create or use API tokens. Biggy uses OAuth rather than API tokens, so this integration is not affected by API token retirement. See Zendesk’s retirement announcement.
Configure Zendesk
Complete the following steps in Zendesk before you create the instance:
As a Zendesk admin, go to Admin Center > Apps and integrations > APIs > OAuth Clients
Add a client for Biggy and set the client kind to Confidential.
To restrict the client to read-only access, set Allowed scopes to
read. Biggy requests onlyread, including when Allowed scopes is blank.Click Save and copy the client identifier and client secret. Zendesk shows the secret only once, when you save the client. Copy it before leaving the page.
Configure the Zendesk Integration
In Biggy, go to Configuration > Manage Integrations > Zendesk > Configure.
Complete the fields in the General and Connection sections.
Click Verify Connection.
After verification succeeds, click Create Instance.
General
Field | Description |
|---|---|
Instance Name | Enter a name for the instance. For example, |
Routing Instructions (Optional) | Describe what this instance covers so Biggy can route queries to it. For example, |
Agent Notes (Optional) | Enter notes that help the Zendesk agent work with your system. For example, which groups or brands handle production incidents, ticket tagging conventions, or how problems are linked. |
Connection
Field | Description |
|---|---|
Zendesk URL | Enter your Zendesk Support address with no path. For example, |
Client ID | Enter the identifier of the OAuth client, as shown in Zendesk Admin Center. |
Client secret | Paste the client secret. Zendesk shows the secret only once, when you save the client. Biggy stores the secret encrypted at rest. |
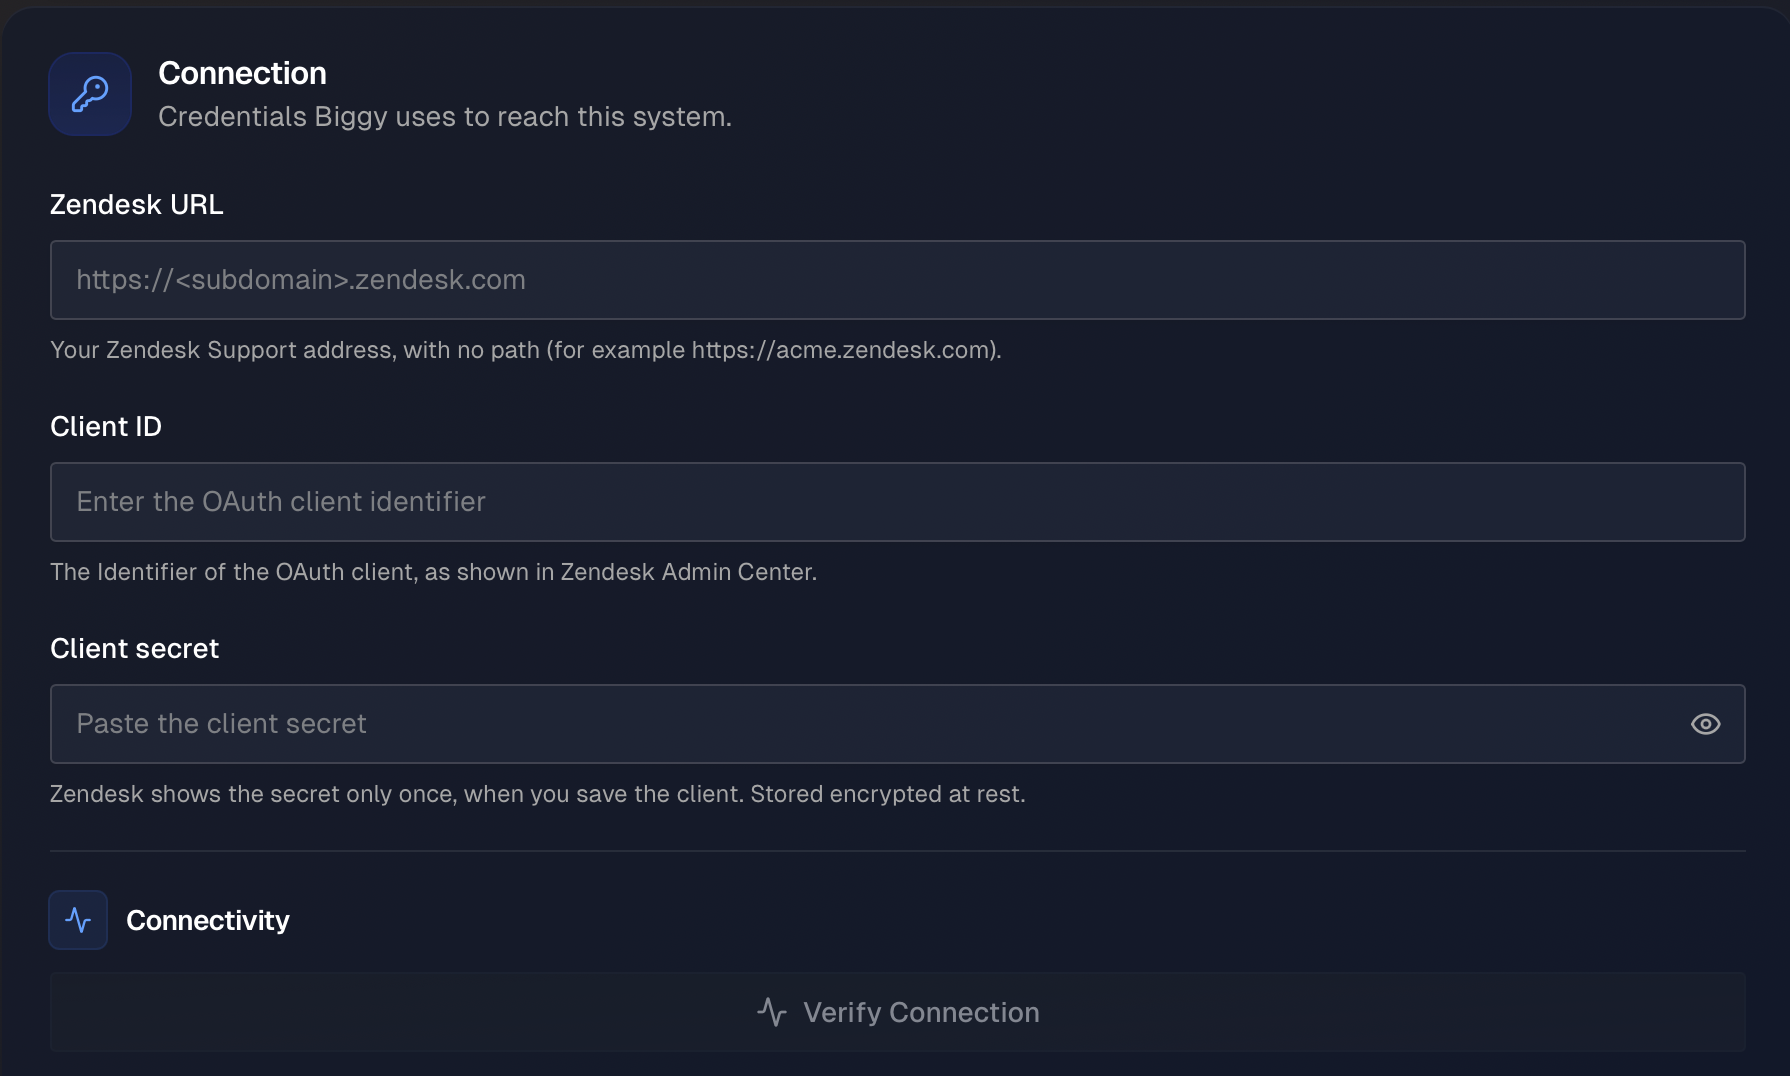
Verify the Integration
When you click Verify Connection, Biggy exchanges the client credentials for an OAuth access token with the read scope, then retrieves the current Zendesk user and checks that the user has the agent or admin role.
Verification does not search for or read a ticket. It validates authentication and the current user’s role
If the verification fails, check the following:
Zendesk URL: Use
https://<subdomain>.zendesk.comwithout a path, port, query string, or fragment.Client kind: Confirm that the OAuth client is Confidential.
Client ID and secret: Confirm that both values match the OAuth client in Zendesk Admin Center. If you did not retain the secret, create a replacement client and copy its credentials.
Allowed scopes: If configured, confirm that they include
read.User role: Confirm that the associated Zendesk user has the agent or admin role.