Custom Workflows (IA)
Custom Workflows let you create reusable, multi-step processes that run on the Orchestrator. You can attach triggers to control how and when each workflow runs. Instead of repeating the same actions manually, build the process once on a visual canvas. Biggy can then run the workflow on demand, from a trigger, or while answering a request. Biggy-managed workflows are available by default and update automatically.
Custom Workflows are available in the web app at Manage > Workflows > Custom Workflows.
Use Custom Workflows when you need Biggy to follow a repeatable process, such as triaging a reported app or service issue, creating an operational brief for a change, or summarizing an incident channel. A workflow can call agents and actions, transform their outputs with a prompt, branch on results, pause for approval or a timer, and format the final response.
Key features
AI-assisted workflow generation from a natural-language description.
A visual workflow builder with a step palette and a drag-to-connect canvas.
Reusable skill guidance that you can layer onto Prompt and Output steps.
Orchestrator availability, so Biggy can choose and run a workflow while answering a request.
Triggers that run a workflow on a channel message or a schedule.
Before you start
Identify the agents, actions, and integrations your workflow will call. The actions available in a step depend on the integrations your organization has connected.
Decide how the workflow should start: on demand, from a trigger, or through the Orchestrator.
The Custom Workflows page
The Custom Workflows page is available in the web app at Manage > Workflows > Custom Workflows. The page lists the workflows your organization has authored in the workflow builder.
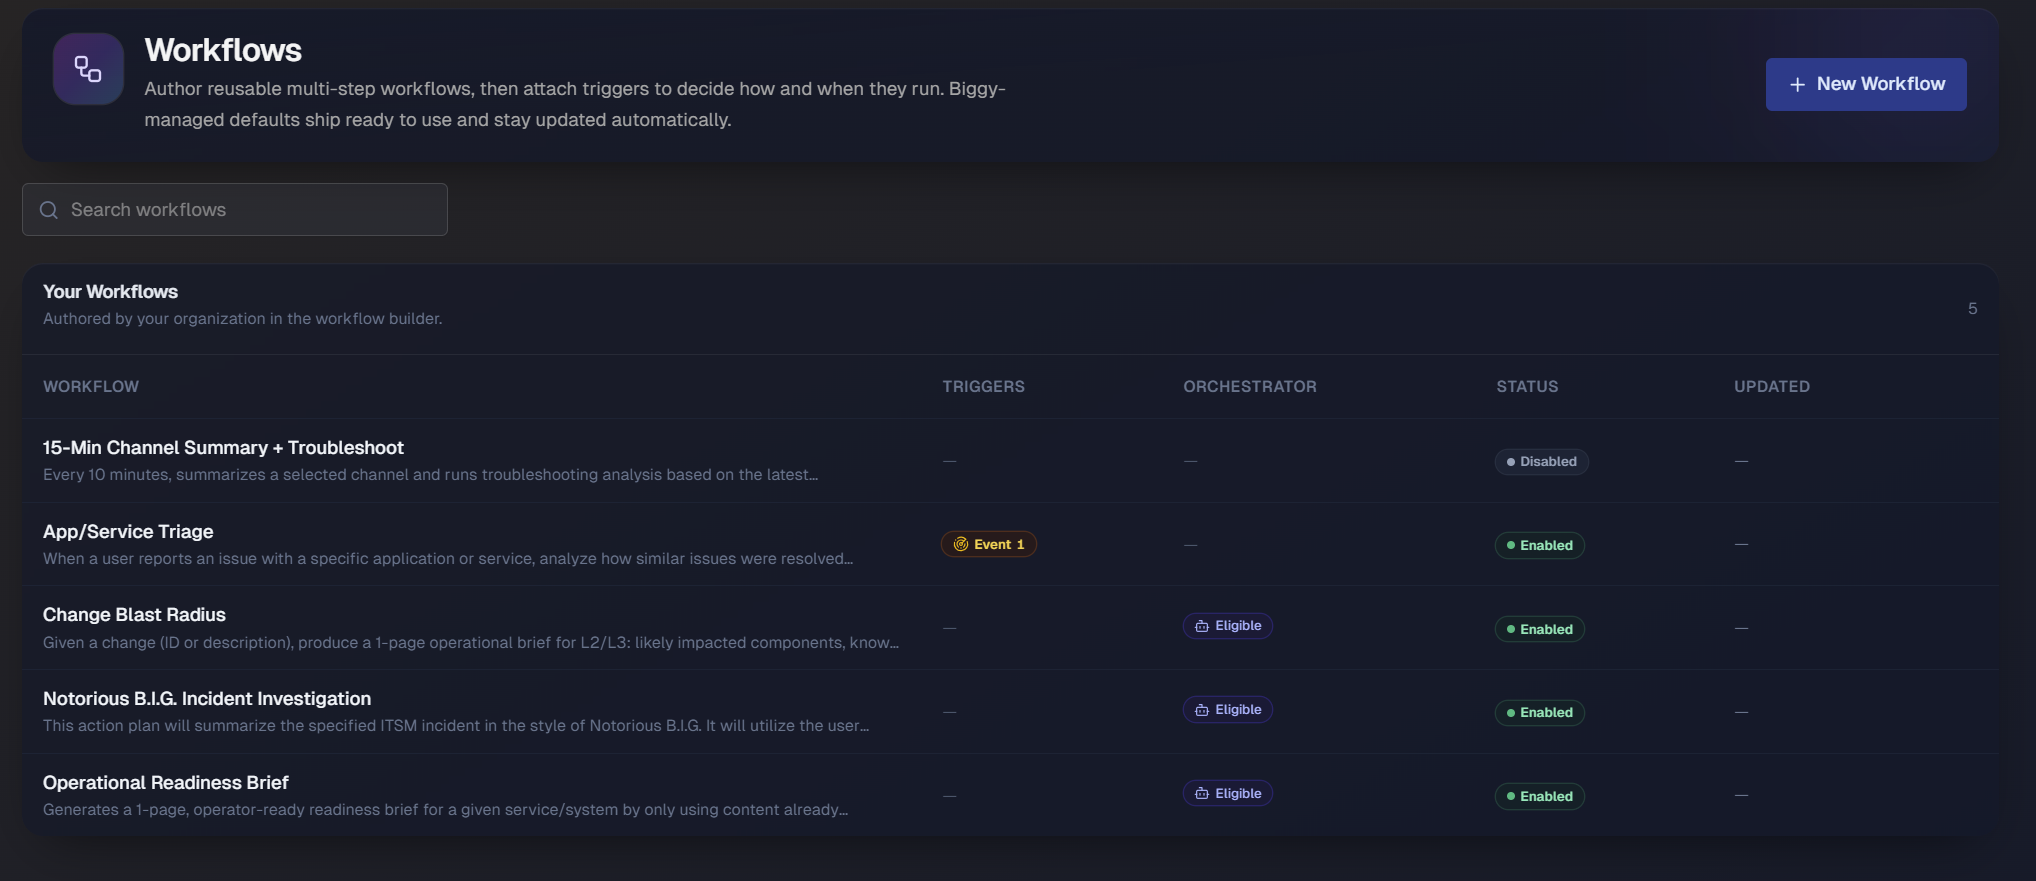
Use the Search workflows field to filter the list by name. Each row in the Your Workflows table shows:
Workflow: The workflow name and a short description of what it does.
Triggers: The number of triggers attached to the workflow, if any.
Orchestrator: Whether the workflow is eligible for the orchestrator to run on its own. Eligible workflows are labeled Eligible.
Status: Whether the workflow is Enabled or Disabled.
Updated: When the workflow was last changed.
To start a new workflow, in the upper-right corner, click New Workflow. To edit an existing workflow, select its row.
Create a workflow
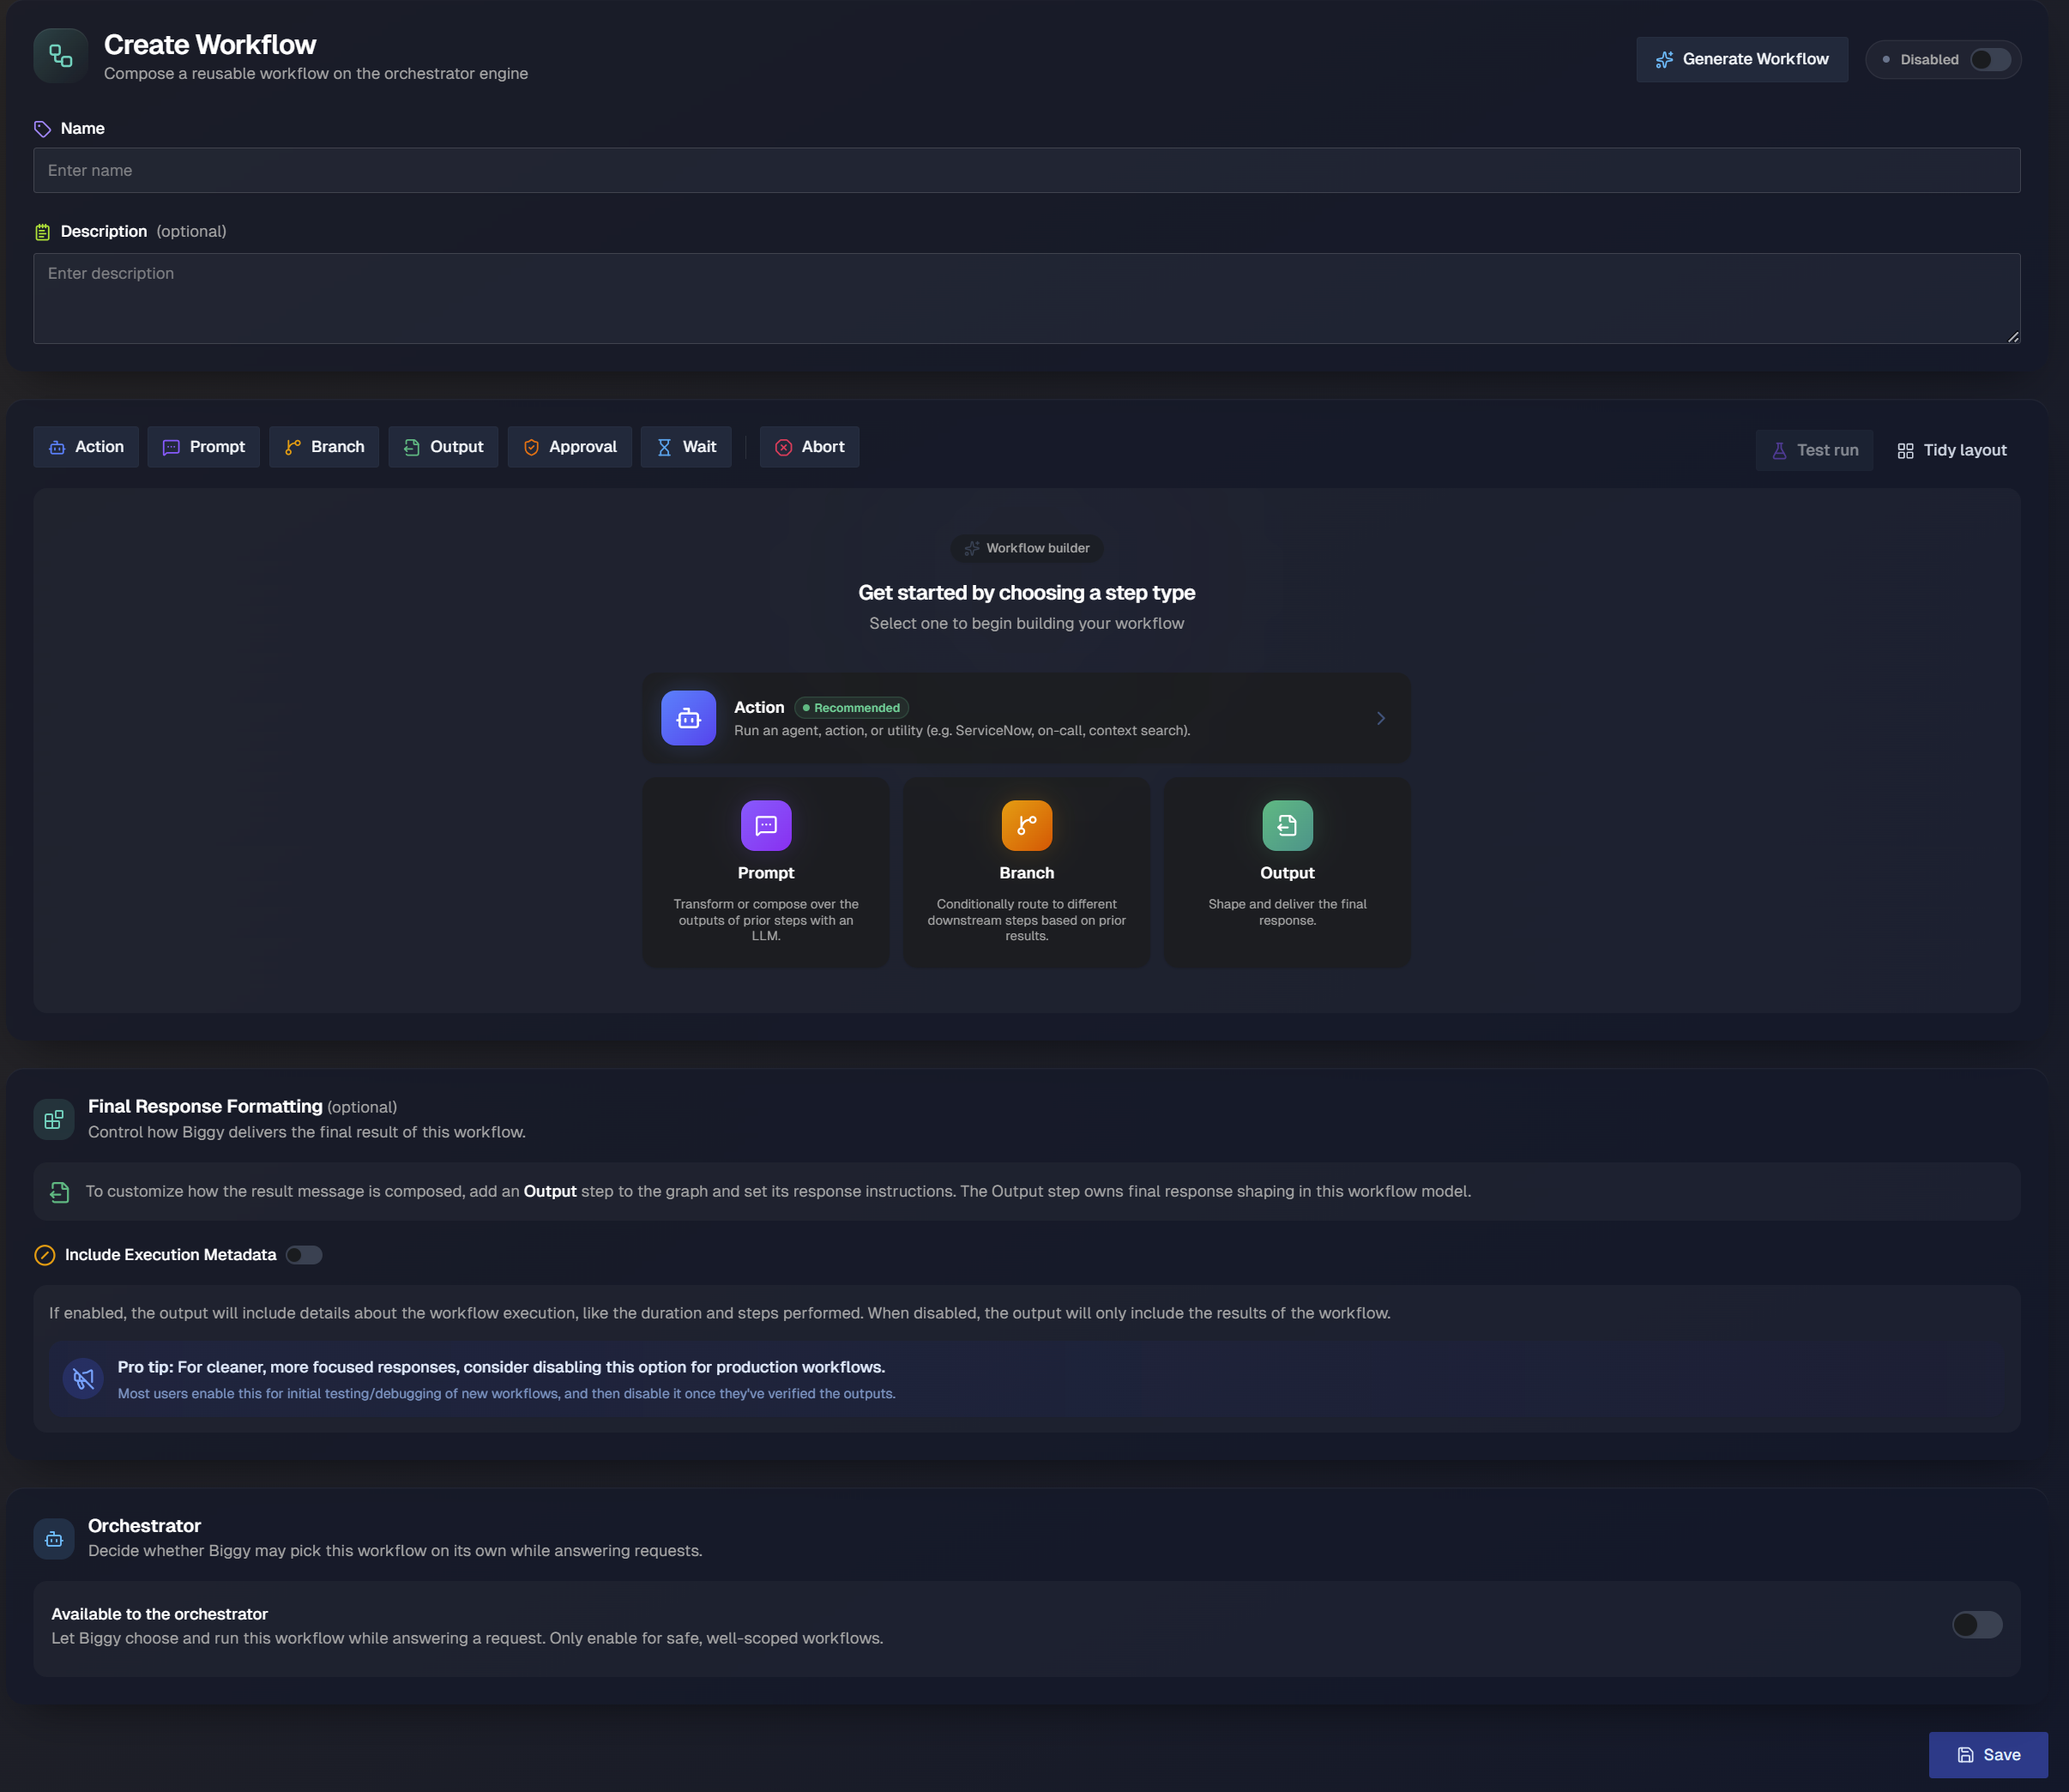
In the upper-right corner of the Custom Workflows page, click New Workflow. The Create Workflow page opens.
In the Name field, enter a name for the workflow.
In the Description field, enter an optional summary of what the workflow does. A clear description helps your team and, when the workflow is available to the orchestrator, helps Biggy decide when to run it.
Follow steps to Generate a workflow with a prompt, or Build the workflow using the workflow builder.
(Optional) In the Final Response Formatting section, choose how Biggy formats the workflow result. Use the Include Execution Metadata toggle to control how much detail the output includes:
Enabled: Includes workflow execution details, such as the duration and the completed steps.
Disabled: Includes only the workflow results.
In the Orchestrator section, decide whether Biggy may pick this workflow on its own while answering requests. Turn on Available to Orchestrator to let Biggy select and run the workflow while responding to a request. Enable this setting only for safe, well-scoped workflows.
Use the Enabled toggle at the top of the page to turn the workflow on or off. A disabled workflow is saved but does not run.
Click Save to store the workflow.
Generate a workflow with a prompt
Instead of building every step by hand, you can describe the workflow you want and let Biggy assemble it for you.
On the Create Workflow page, click Generate Workflow. The Workflow Generator opens.
In the text box, describe the workflow you want to create.
Click Generate Workflow. Biggy creates the workflow and adds its steps to the workflow builder for you to review and edit.
Be specific
The more specific your description, the closer the generated workflow will be to what you want. Mention the data sources to pull from, the tools to call, the logic to apply, and the kind of summary or output to produce.
For example, ask for a troubleshooting workflow that gathers observability data and ITSM data, then delivers a detailed summary of the findings.
When editing an existing workflow, the same capability appears as Refine Workflow, which updates the current workflow based on your instructions.
Build the workflow manually
The builder has a step palette across the top and a canvas below it. To assemble a workflow:
Click or drag a step from the palette onto the builder. See Step Types for more information.
Drag between the handles on two steps to connect them.
Click a step to open its configuration panel, set its options, and click Done.
Repeat until the steps and connections describe the process you want.
Two controls help you work on the canvas:
Test run: Runs the workflow so you can check its behavior and inspect each step's output before you enable it.
Tidy layout: Automatically arranges the steps on the canvas for readability.
Use the zoom and fit controls in the lower-left corner of the canvas to navigate larger workflows.
Step types
Custom Workflows can built using seven different step types. Each step you place on the canvas shows a label for what it does, such as RUN for an Action step, TRANSFORM for a Prompt step, and DELIVER for an Output step.
Action
Runs an agent, action, or utility. This is the recommended starting step for most workflows.
To configure an Action step, open it and set the following:
Step name: A name for the step.
Action: Select the agent, utility, or action that the step should run. The list is grouped into categories:
Agents, such as Biggy Agent, Datadog, SolarWinds, ServiceNow, Jira, Dynatrace, and OpsLevel.
Utilities, such as Web Search.
Actions, such as On-Call Retrieval, Change Risk Assessment, Biggy Handbook, Extract Record IDs, and Fetch ITSM Records.
Addendum: Optional instructions that control the step's behavior and output.
Declared Outputs: Optional. Declare typed outputs so later steps can branch on them or reuse them. Biggy extracts declared outputs from the step result unless the selected action provides them directly. Extracted outputs may not always be identical across runs. Enter the following for each declared output:
Output name: Descriptive name of the output (for example, severity)
Output type: Select the output type from the drop-down menu. Options include Text, List of Text, Number, Whole Number, Yes / No, or Choice.
Description: Optionally enter a description to help guide extraction.
By default, Biggy decides the step's inputs automatically from the request and from earlier steps. You do not need to map inputs by hand.
Prompt
A Prompt step uses a large language model (LLM) to analyze, transform, summarize, or combine outputs from earlier steps. Use it to prepare information for a later step or the final response.
To configure a Prompt step, set the following:
Step name: A name for the step.
Prompt instructions: The instructions that tell the model what to produce from the prior steps' outputs.
Declared outputs: Optional. Declare typed outputs so later steps can branch on them or reuse them. Outputs are produced by extraction unless the action provides them natively (not guaranteed deterministic). Enter the following for each declared output:
Output name: Descriptive name of the output (for example, severity)
Output type: Select the output type from the drop-down menu. Options include Text, List of Text, Number, Whole Number, Yes / No, or Choice.
Description: Optionally enter a description to help guide extraction.
Skill: Optional reusable guidance that layers onto this step's instructions to shape its behavior and output.
Branch
Conditionally routes the workflow to downstream steps based on results of earlier steps.
To configure a Branch step, set the following:
Step name: A name for the step.
Routing: The routing mode. Select from the following options:
Let Biggy decide: Describe the routing policy in plain language, such as routing to escalation when a ticket is a certain severity and aborting otherwise.
One LLM call evaluates this policy against the outputs of prior steps and selects which outgoing connections to follow. Connect this branch to the targets it chooses, and to the Abort terminal to halt the workflow.
Match conditions (exact rules): Define a condition for each outgoing connection. The workflow follows every connection whose condition matches. Leave one connection without a condition to use it as the default route, or connect the branch to Abort to stop the workflow.
Deterministic routing reads an earlier step's declared output. Add an output field to an upstream step first.
Connect this branch to its target steps on the canvas first, then set a condition for each connection here.
Output
The Output step formats and delivers the workflow's final response.
To configure an Output step, set the following:
Step name: A name for the step.
Response instructions: Optional instructions that control the content and format the final response.
Skill: Optional reusable skill guidance that layers onto this step's instructions.
Approval
Pauses the workflow so a person can approve or decline before it continues. The approval prompt is shown to the approver when the run pauses. Attended runs wait for a decision; unattended runs fail closed.
To configure an Approval step, set the following:
Step name: A name for the step.
What needs approval: The action or decision shown to the approver. (For example,
Restart the payments service)Instructions for the approver: Optional context to help the approver decide.
Risk: An optional risk level. Options include:
Not specified
Mutating - writes or changes state
Destructive - irreversible
Auto-decline after (minutes): An optional time limit after which the request is declined automatically. The default is no limit.
Unattended runs fail closed
If a run is unattended when it reaches an Approval step, the step declines automatically rather than proceeding. Plan approvals for workflows that always have an approver available, or set an appropriate auto-decline limit.
Wait
Pauses the workflow for a set duration, then resumes on its own.
To configure a Wait step, set the following:
Step name: A name for the step.
Wait duration: A number and a unit, such as 5 minutes.
The run pauses in the background and resumes itself when the timer is due, with no user action needed. The duration can be from a minimum of 1 second to a maximum of 7 days.
Abort
The Abort step stops the workflow without producing an output. Add Abort from the palette and connect a Branch step to it when the workflow should stop. To remove it, click Remove Abort in the palette.
Add a trigger
Triggers define how and when a workflow runs automatically. Open an existing workflow and select the Triggers tab to manage them. The tab lists the triggers attached to the workflow, each showing its name, its type, and whether it is enabled.
To add a trigger:
On the Triggers tab, click New Trigger.
In the Name field, enter a name for the trigger.
Choose a Trigger type. Options include:
On a channel message: Choose the Slack or Teams channel(s), when to run (optional), and select if you would like to Run on every message.
On a schedule : Define when the trigger runs.
In the What this runs section, define what happens when the trigger fires. By default, Ask Biggy follows your instructions and selects the right tools and skills each time the trigger runs. You can also pin a specific capability or workflow when you need a fixed action or pipeline.
To pin a target, click Add a target, then select Ask Biggy, a Capability, or a Workflow. For a pinned workflow, you can also set:
Reply in the triggering channel: Post the workflow result back to the channel that fired the trigger.
Post the result every time: Always post the result, rather than only when the workflow produces a meaningful outcome.
A response condition that limits when the target replies, such as replying only when the message describes a concrete issue and the workflow produces at least one useful result.
(Optional) In the Also send results to section, you can deliver the results beyond the triggering channel. Select one or more Channel(s) or Email recipients.
Use the Enabled toggle to turn the trigger on or off, then click Save Trigger.
Test and monitor runs
Open an existing workflow and select the Runs tab to see its run history and inspect previous runs.
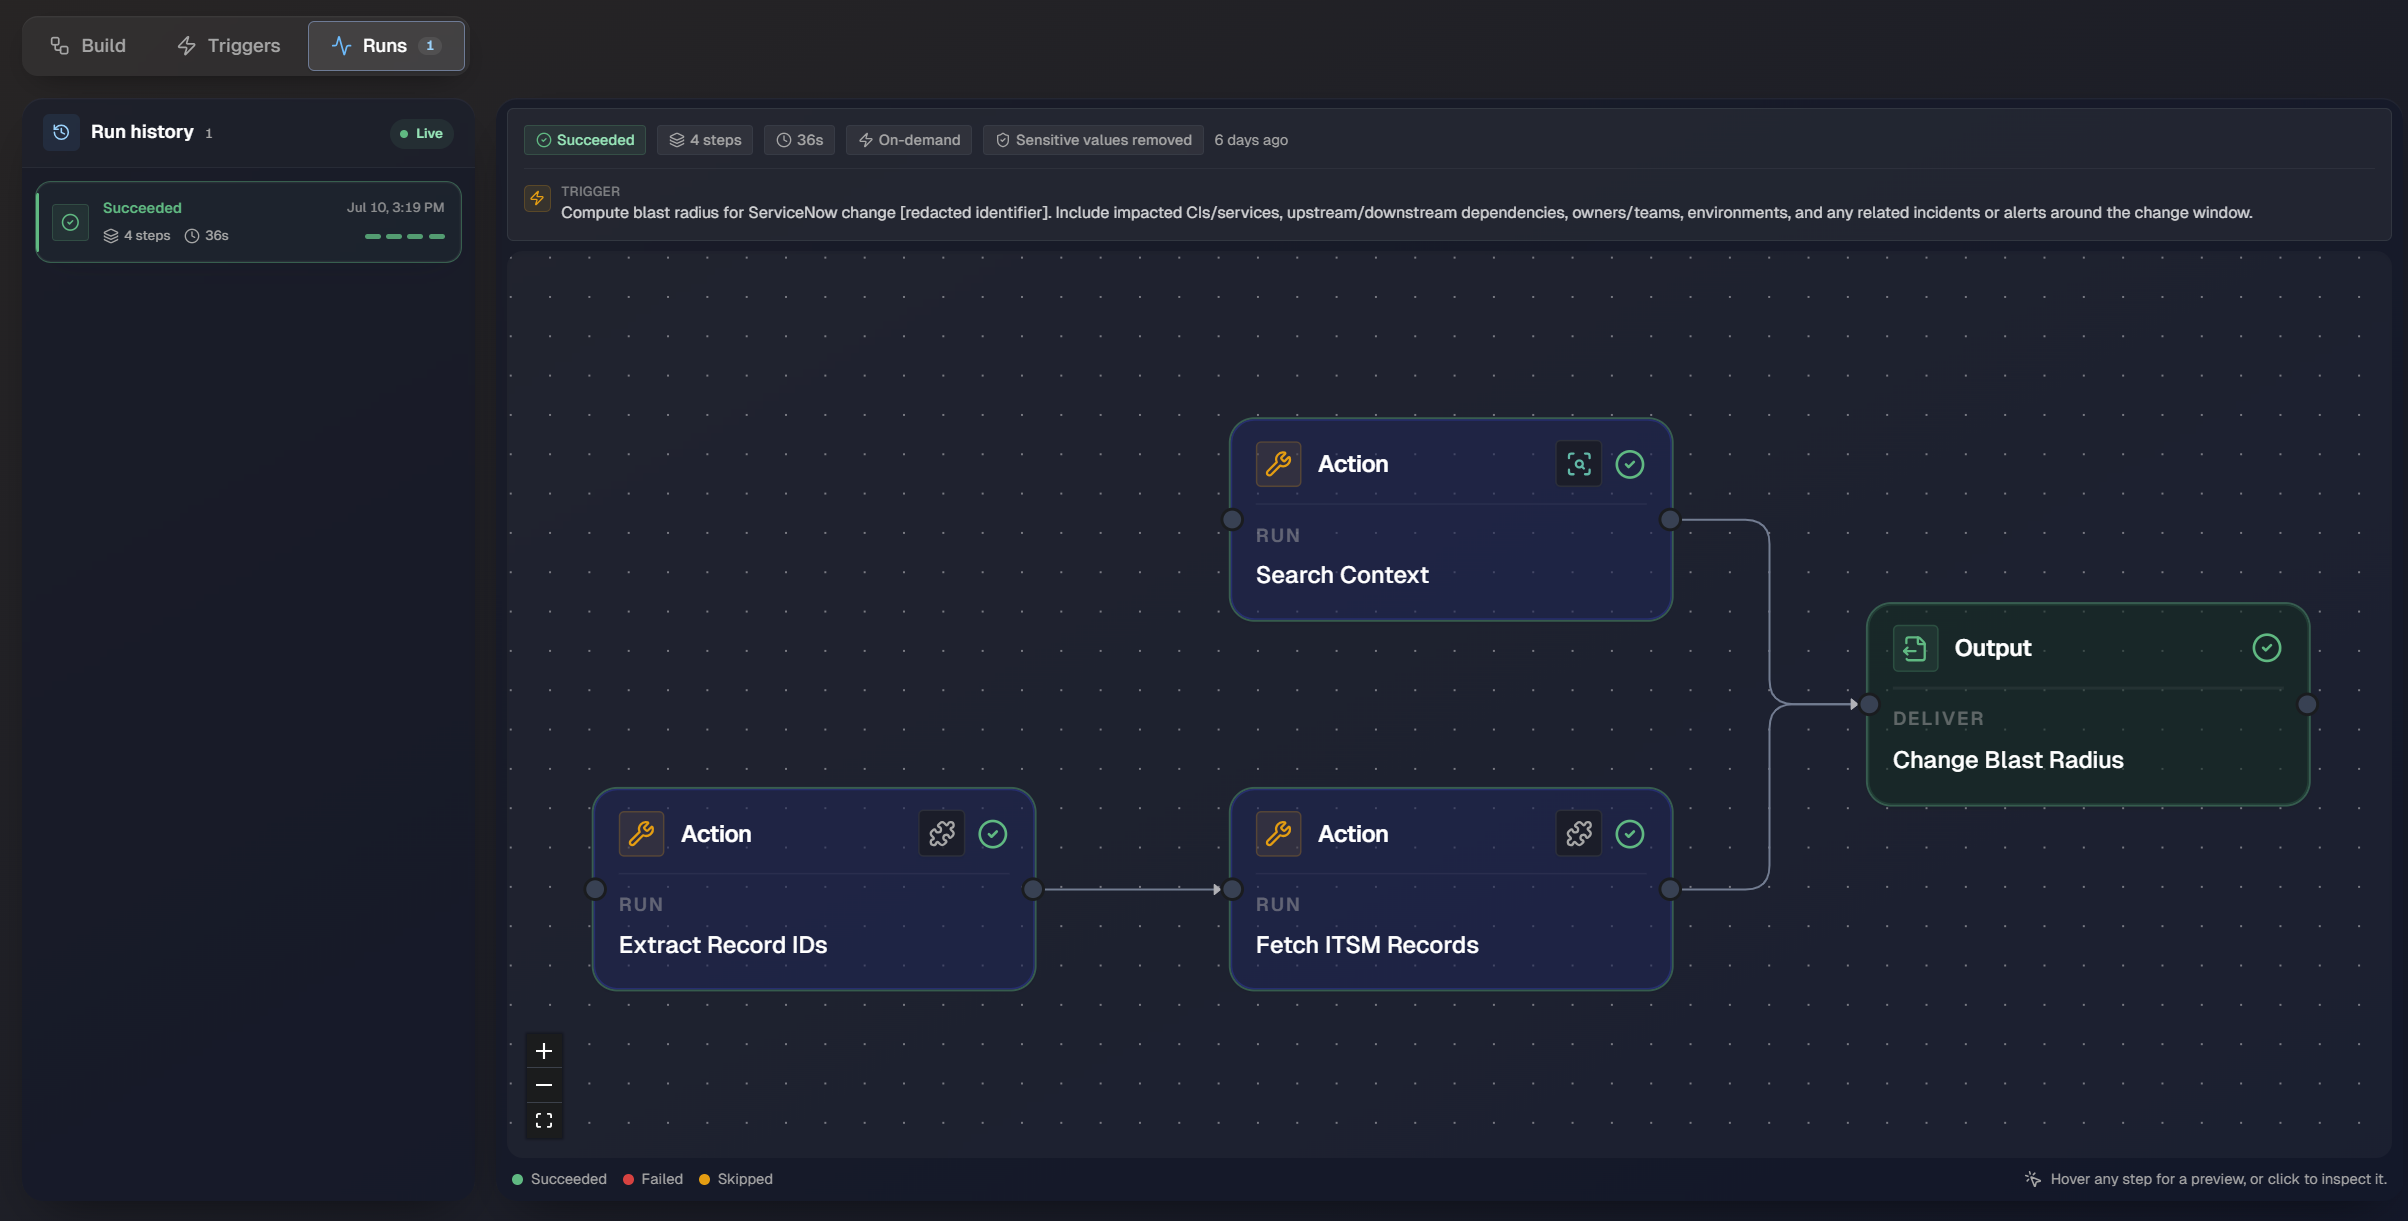
The Run history panel lists each run with its status, step count, and duration. Select a run to open its detail view, which shows:
A summary showing the run status, number of steps, duration, run type, and run time.
The Trigger that started the run, including the request or instruction that kicked it off.
The workflow canvas, with a status indicator on each step. Steps are marked Succeeded, Failed, or Skipped.
Hover over any step for a preview, or click it to inspect the step. The step inspector shows the step's status, duration, and timestamp, along with its Input and Output, so you can see exactly what each step received and produced.
Troubleshooting
Symptom | Likely cause | Solution |
|---|---|---|
The workflow does not run. | The workflow is disabled. | Open the workflow and turn on the Enabled toggle. |
A trigger never fires. | The trigger is disabled, no channels are selected, or the run condition is too narrow. | On the Triggers tab, confirm the trigger is enabled, select the channels that should fire it, and review the Only run when condition. |
The Orchestrator never selects the workflow. | The workflow is not available to the orchestrator, or its usage guidance is unclear. | Turn on Available to the Orchestrator and describe when to use the workflow in the When should Biggy use this? field. |
An Approval step declines on its own. | The run is unattended, or the auto-decline limit was reached. | Route approvals to runs that have an approver available, or adjust the Auto-decline after limit. |
A later step cannot use an earlier step's value. | The value was not declared as an output on the earlier step. | Open the earlier step, add a declared output with a clear name and description, and select or reference that declared output in the later step. |
The response includes unwanted execution details. | Include Execution Metadata is enabled. | Turn off Include Execution Metadata, or add an Output step and set its response instructions. |