Unified Data Connector Self-Service Configuration Tool
The Unified Data Connector (UDC) Configuration tool enables BigPanda employees to manage an organization’s connections to the Unified Data Connector and IT Knowledge Graph through backoffice.
This step-by-step wizard consists of three parts:
Organization setup - Select and provision the customer organization.
Connection settings - Create, authenticate, and test data source connections.
Pipeline configurations - Create and configure specific data pipelines.
Internal Only
Do not share this page outside of BigPanda. The UDC documentation pages that can be shared with customers are:
The UDC Self-Service configuration tool is available in backoffice, in the left navigation bar under UDC.
View Unified Data Connection pipelines
Once you’ve completed all the configuration steps covered in this document, pipelines will appear on the main Unified Data Connectors page in the Active Pipelines table. This table includes an overview of key information for each pipeline:
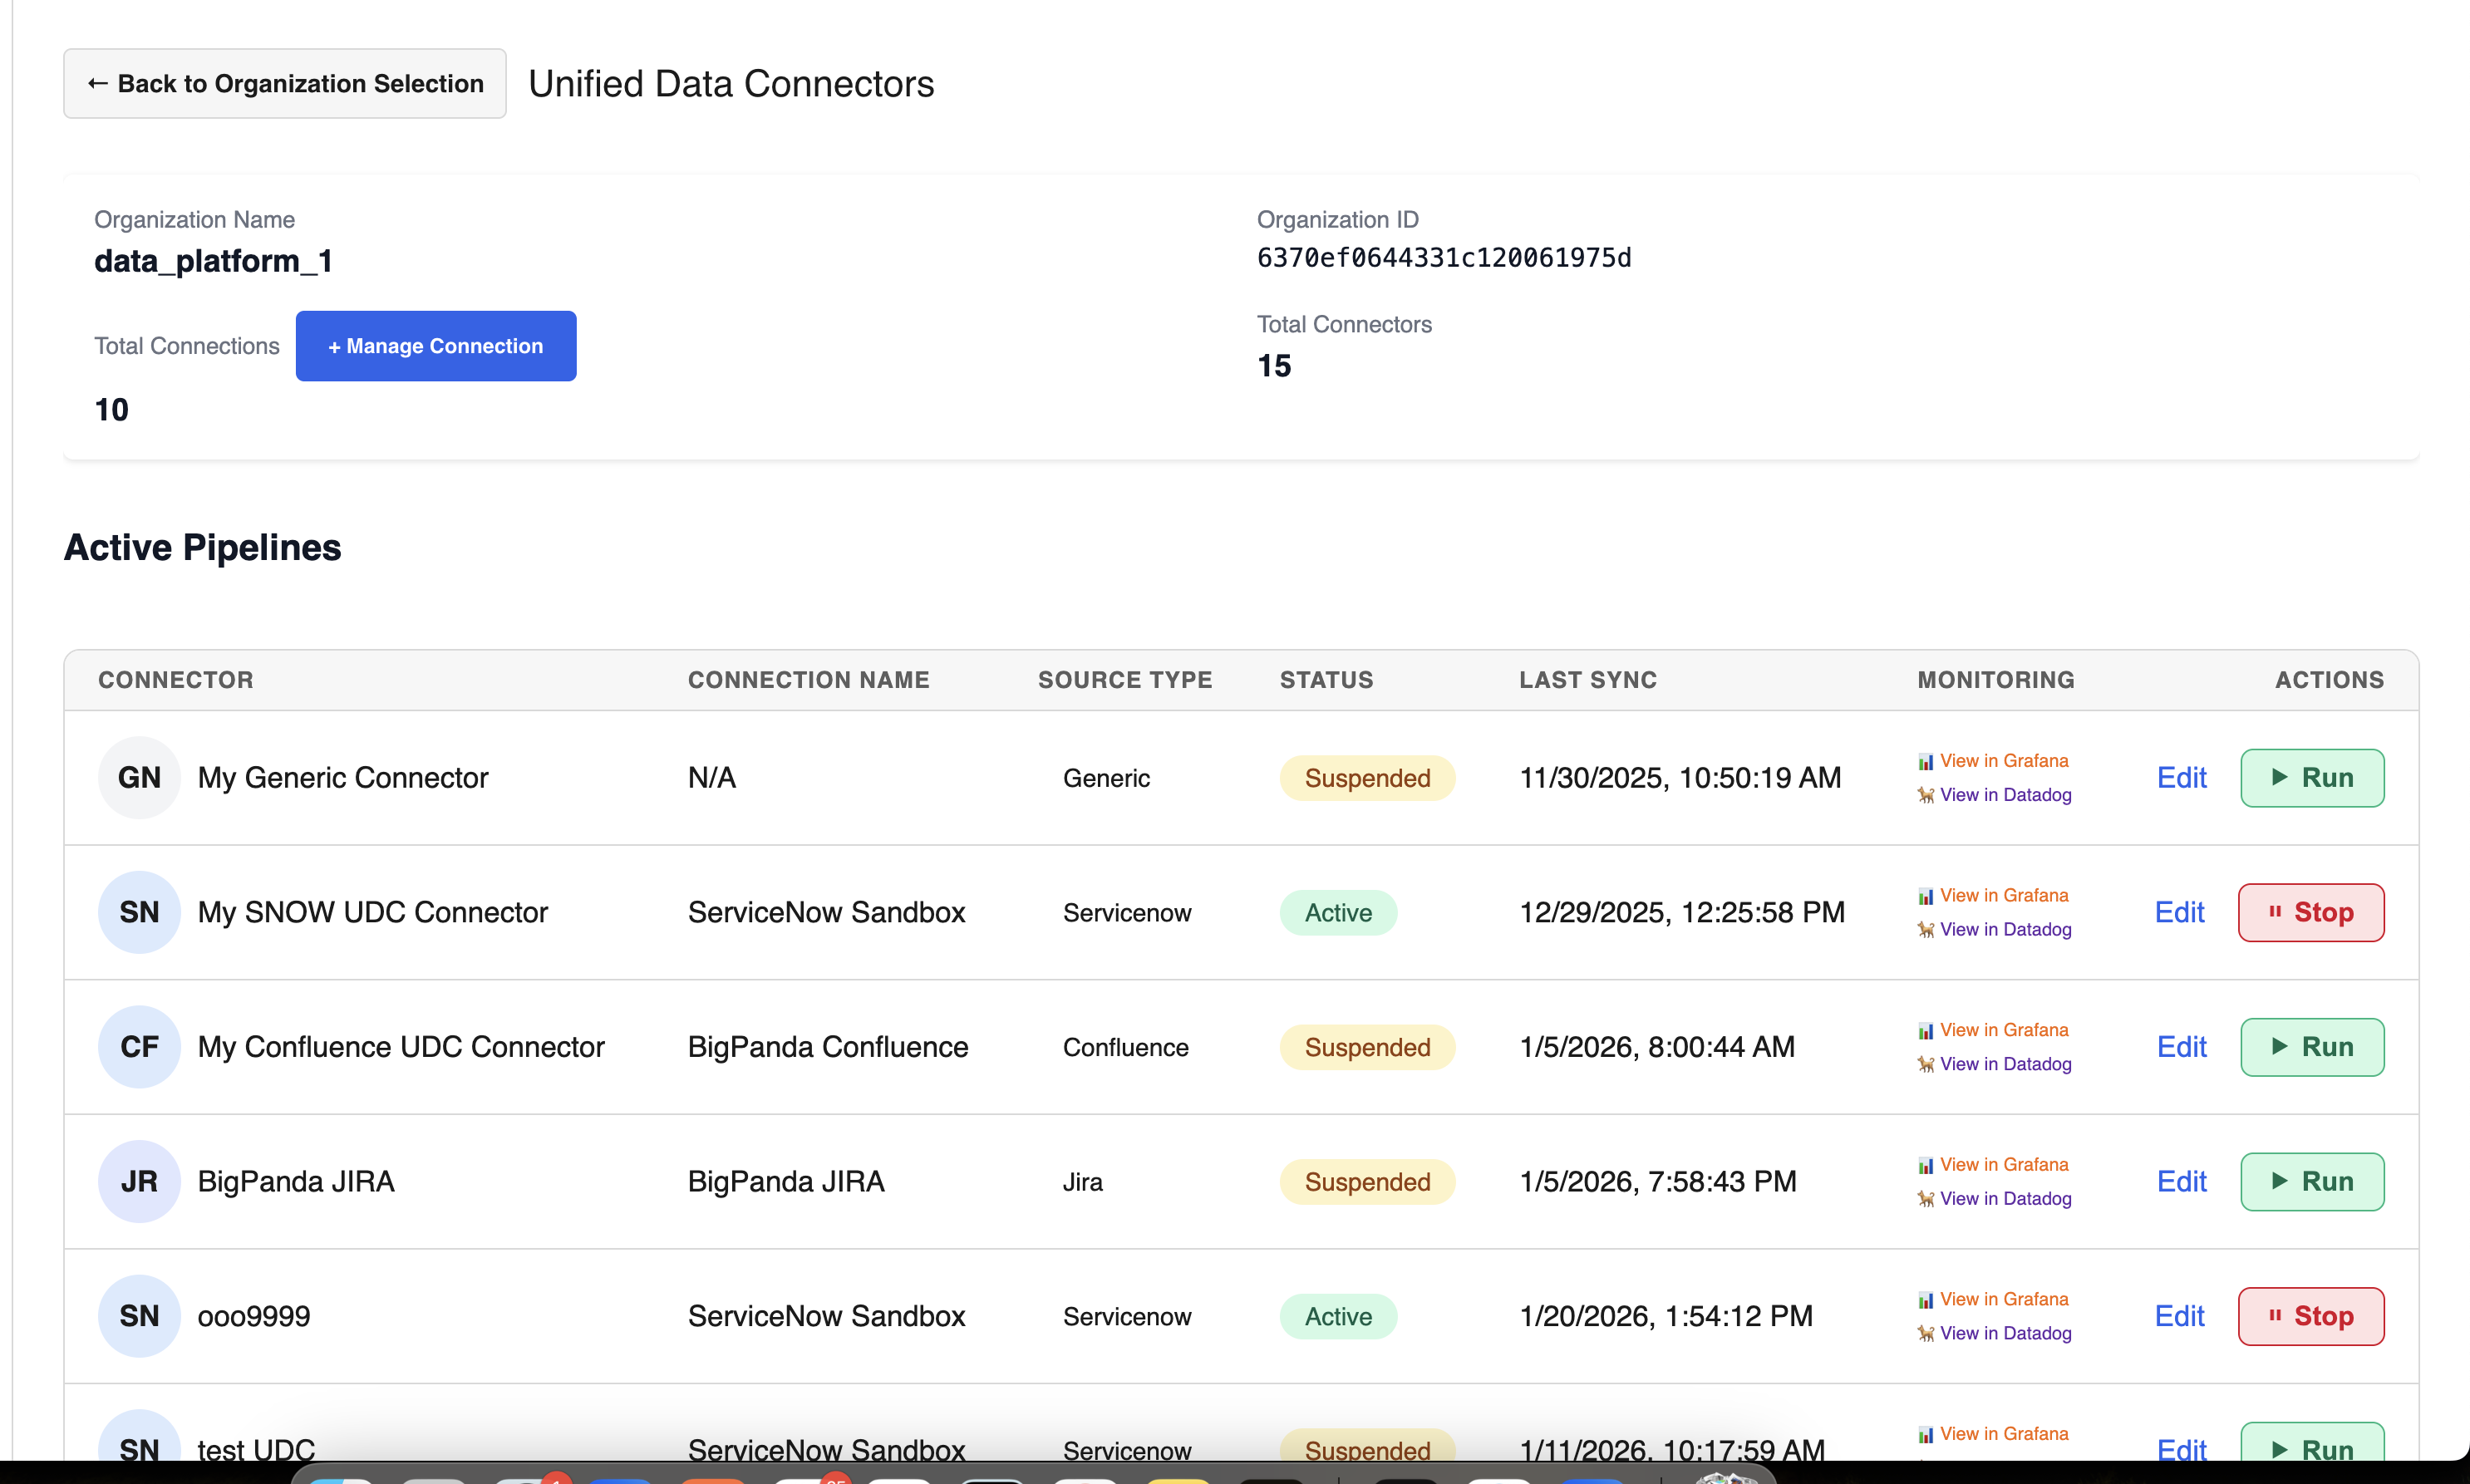
Connector - the name of the pipeline.
Connection Name - the name of the specific tool connection used in the pipeline.
Source Type - the tool the pipeline is connected to.
Status - whether the pipeline is Active or Suspended (not syncing)
Last sync - the last time BigPanda successfully synced with the source tool.
Monitoring - links to the Grafana and Datadog dashboards for this pipeline for deeper investigation and troubleshooting.
Actions - there are three actions you can take from the Active Pipelines table:
Edit - change the configuration settings, including tables and connections. Note that you must test the connection again if you change connection settings.
Run - Visible only for pipelines with a
Suspendedstatus. This will start the data sync.Stop - Visible only for pipelines with an
Activestatus. This will stop the data sync without affecting any configuration or connection settings.
Organization setup
Select the desired organization from the dropdown. To filter or search for an organization, open the dropdown and start typing.
After selecting an organization, the Infrastructure Details section will display the status of AWS resources.
When you first set up UDC for an organization, you must start by provisioning data assets. Click the Provision Infrastructurebutton at the bottom of the module to initiate the automated provisioning process.
When the process finishes, the status for all three AWS resources should automatically change to Ready. Please wait an additional 2-3 minutes after the status changes before you start setting up a connection, to ensure the infrastructure is fully established.
“Ready” status required for configuration
All three AWS resources must be in Ready status before you continue setup. If you get an Error status on one or more resources, contact the UDC team via the #udc-field-collab Slack channel.
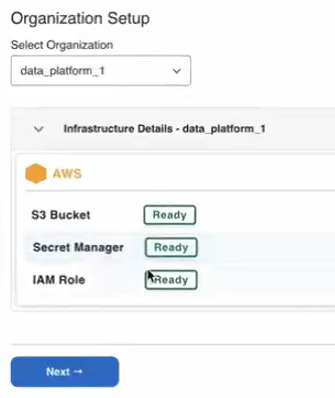
Infrastructure provisioning in the UDC Config tool
In future, when you open an organization you've already provisioned, the wizard will automatically advance to the main Unified Data Connector configuration page.
Connection settings
On the main Unified Data Connector landing page, you can create, configure, and view connections and pipelines.
Definitions for connections and pipelines
A connection defines access to a third party data source. You can have multiple connections for the same tool. (For example, if your customer uses two different Jira instances, you may have one connection for "Jira A" and another for "Jira B".)
A pipeline (also called a "connector" in the Active Pipelines table) is a specific data configuration within a connection. You can have multiple pipelines per connection.
Multiple connections per tool
Each connection includes specific access tied to permissions and authentication. Multiple connections can be added for individual external tool types to enable granular control of data and cross-instance connections.
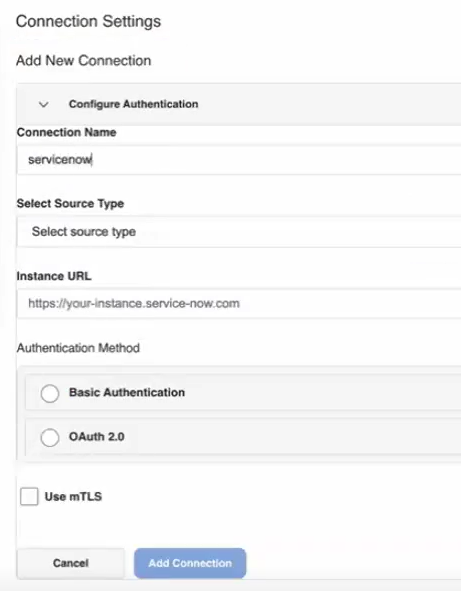
Connection settings
Create a new connection
To create a new connection, click the Manage Connections button to open the Connection Settings page, then click + Create New Connection.
First, fill in the basic connection information.
Enter a Connection Name. Connection names do not have to be unique, but we recommend making them descriptive.
Select a Source Type from the dropdown menu. (Note that currently the only sources available through the self-service UI are ServiceNow, Jira, and Confluence. Reach out to the UDC team in the #udc-field-collab Slack channel to discuss options for building a generic UDC connection.)
If you selected Jira or Confluence as the source type, the Cloud instance box will be checked by default. Uncheck for on-premises or data center instances.
Enter the full HTTPS Instance URL for the source you selected. (For example,
https://dev12345.service-now.com)
Authentication methods
After entering the basic details for your new connection, authenticate the connection. There are three authentication methods currently available: basic authentication, OAuth 2.0, and Atlassian's JSON Web Token (JWT). Read more about authentication for specific connectors in our main Unified Data Connector documentation.
mTLS certification option is still being tested
Under Authentication, you will see an optional checkbox for mTLS certification. This feature is still being tested and should not be configured without first talking with engineering. If you have a customer who wants to use mTLS, reach out to the UDC team via the #udc-field-collab Slack channel for assistance.
Basic authentication
To authenticate the connection with HTTP basic auth:
Select the Basic Authentication radio button
Fill in the required fields:
Username: Username for ServiceNow / Jira / Confluence
Password: The account password.
OAuth 2.0 authentication
To authenticate the connection with OAuth 2.0:
Select the OAuth 2.0 radio button.
Fill in the required fields:
Client ID: OAuth application client ID
Client Secret: OAuth application client secret
Auth URL: (Optional) Your OAuth token endpoint URL. Use the format
https://your-instance.com/oauth/token(Note that the Auth URL is required for if using a custom OAuth endpoint.)
Atlassian JWT authentication
If Jira or Confluence is selected as the source, you can also choose to authenticate the connection using Atlassian's JSON Web Token (JWT):
Select the Atlassian JWT radio button.
Fill in the required fields:
Key: JWT public key
Shared secret: JWT shared secret.
Testing and finalizing a new connection
Before you save the new connection, test it by clicking the green Test Connection button. If you change any field after testing, you must test again. The Add Connection button will be disabled until test connection returns success: true.
Testing ServiceNow tables
For ServiceNow connections, you will also need to test the connection to any data tables you want to ingest with your pipelines. Use the Additional Tables to Test field at the bottom of the page and input table names separated by a comma. When the test finishes, the results will show you which entity table tests were successful and which (if any) had errors.
Note that this step only tests the connection and doesn’t affect any data configuration. You will still need to add these tables to any ServiceNow pipelines you create.
Once you've tested your new connection and gotten a success result, click Add Connection to save. This connection can now be used to create pipelines.
Update an existing connection
To edit an existing connection:
Navigate to the Connection Settings section and locate the connection you want to edit in the connections table.
Click Edit next to the connection you want to update.
The connection form will populate with existing values. Update any fields you need to change.
Test the updated connection.
Click Update Connection to save changes.
Pipeline configuration
Pipelines are the individual rules for data retrieval between data resources and BigPanda. On the main UDC backoffice page, all existing UDC connectors will appear in the Active Pipelines section. This table includes details on the source, status, and last sync date.
Multiple pipelines per connection route
Each pipeline includes specific rules for retrieving content. Multiple pipelines can be added for each connection route.
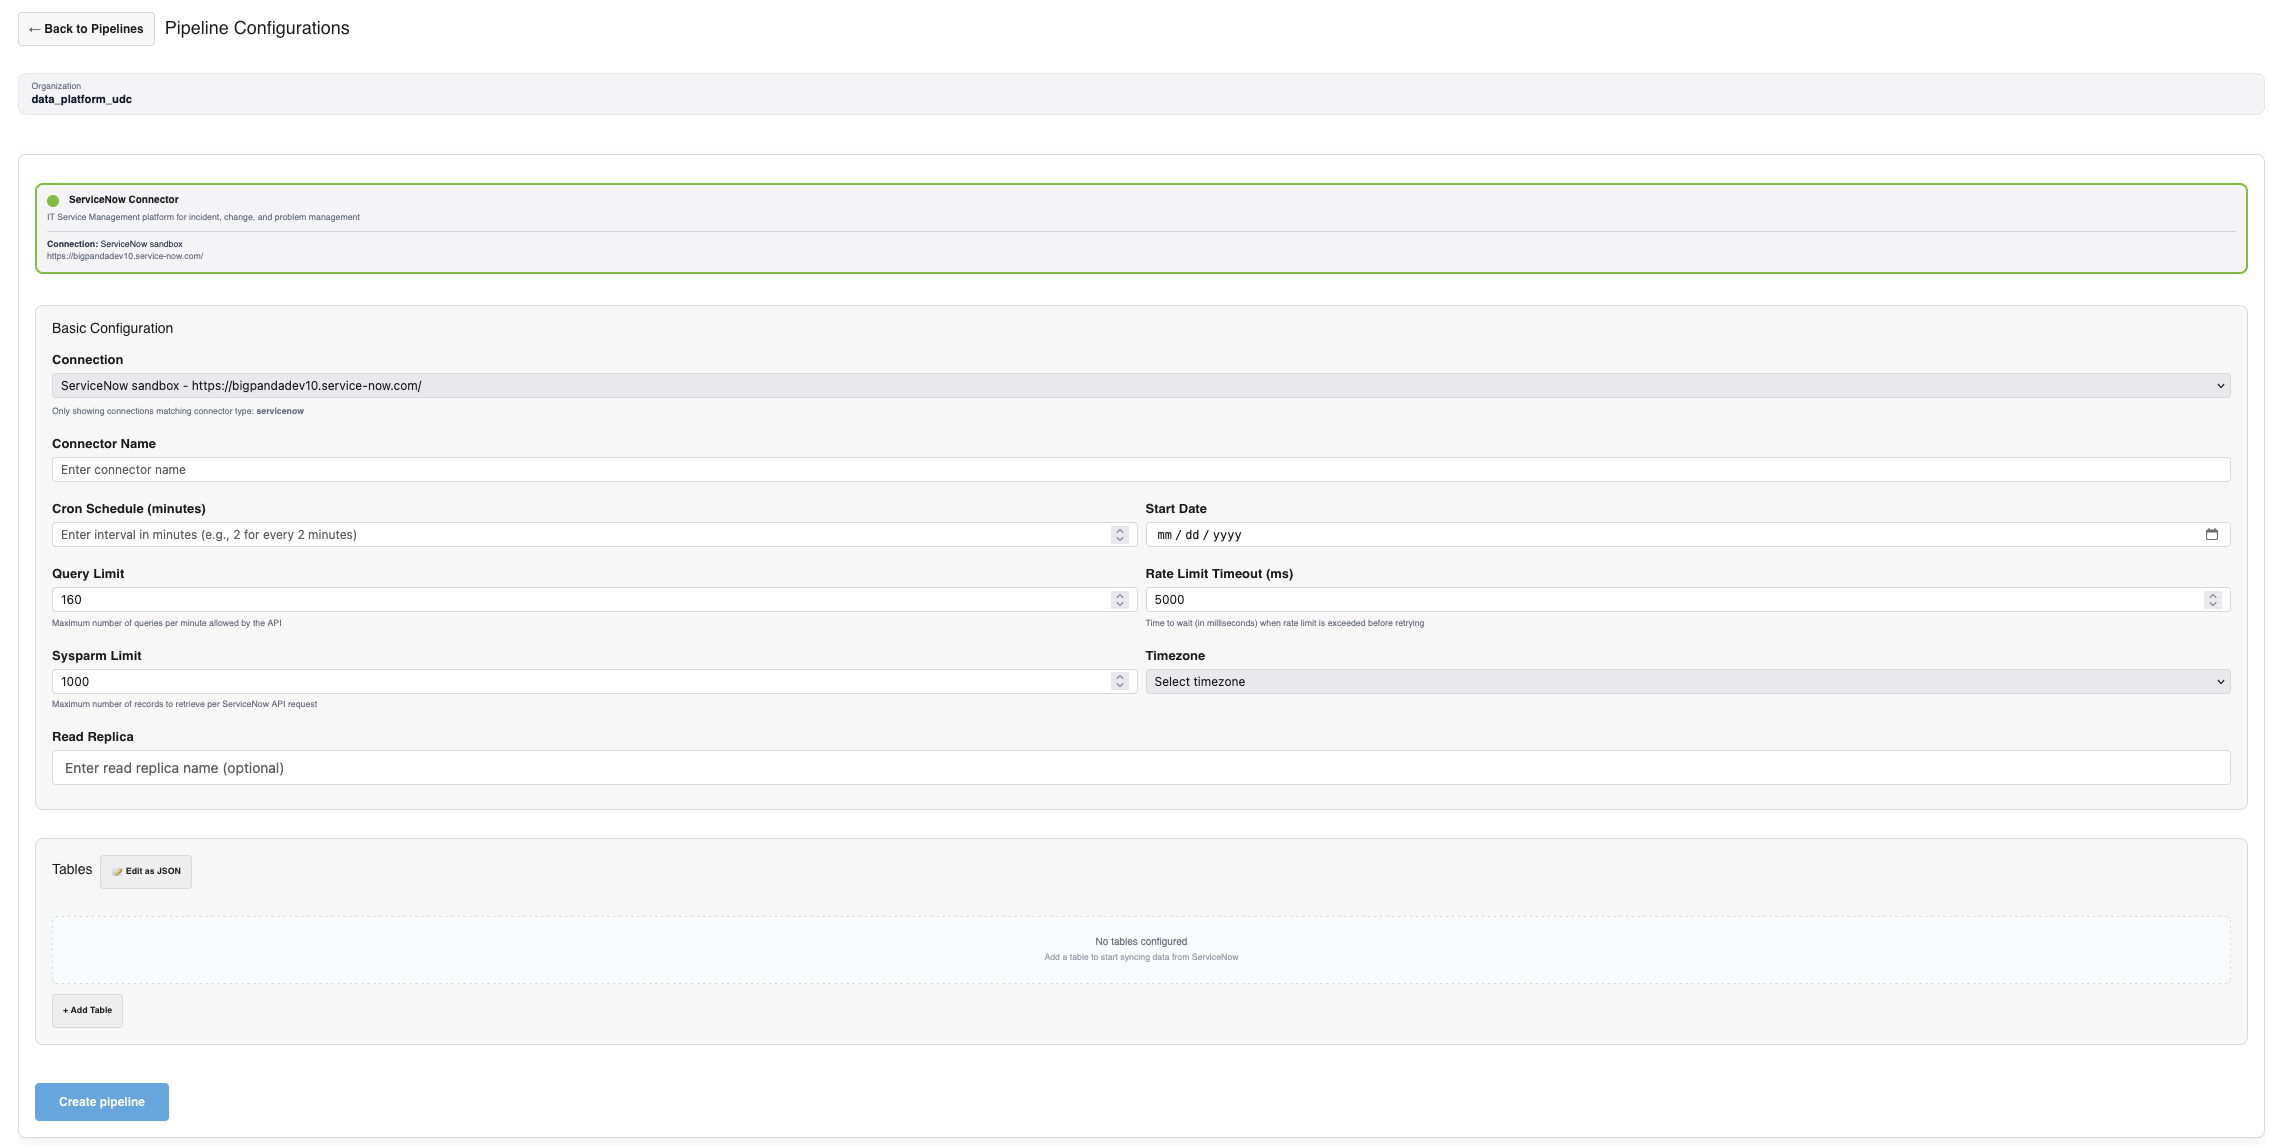
Pipeline configuration example for ServiceNow
Add a new pipeline
To create a pipeline, click the + Add Pipeline button at the bottom of the Active Pipelines table. Either select an existing connection from the dropdown, or click the + Create New Connection button. Then, fill in the following information:
Connector Name - Give the connector configuration a short, meaningful name. Connector names do not have to be unique, but we recommend making them descriptive.
Cron Schedule (minutes) - Enter the number of minutes that should pass between data polling.
Start Date - Select a date for how far back to begin historical data. (Note that this setting cannot be edited via the self-service tool. If you want to change the ingestion start for a pipeline after it's already been activated, reach out via the #udc-field-collab Slack channel for assistance.)
Timezone - Which timezone should define the scheduled data pulls.
Rate Limit Timeout (ms) - Can be edited for tools with strict data rules. We recommend keeping as default when possible.
Query Limit - Can be edited for tools with strict data rules. We recommend keeping as default when possible.
Sysparm Limit - (ServiceNow only) Can be edited for tools with strict data rules. We recommend keeping as default when possible.
Read Replica - (Jira/Confluence only) Specify a read replica database URL to improve performance on large instances.
JQL - (Jira only) Use a custom JQL query to filter issues. (For example:
project = PROJ AND status != Done)Page Size - (Jira/Confluence only) Number of results per API page. The default is 50.
Space Keys - (Confluence only) Enter space keys one per line or comma-separated. Alternatively, click Edit as JSON to edit as a JSON array.
Configure tables (ServiceNow)
When creating a ServiceNow pipeline, you must also configure every table you want to ingest. See our UDC Data Requirements for ServiceNow documentation for details on which tables and fields are required for certain features.
To configure a ServiceNow table,
Click Add Table
Enter the table name (e.g.,
incident,problem)Configure table-specific settings:
Filter: (Optional) A ServiceNow query filter. (For example,
active=true^priority=1)Related Tables: Comma-separated related table names
Fields: Comma-separated field names to sync (Example:
number,short_description,priority,state)
(Optional) Use the Edit as JSON button to edit the entire table configuration in JSON. Click Save JSON when finished. If you want to return to the form view, click Close JSON Editor.
Strict field selection
By default, every table that specifies a field list also receives a built-in minimum set of fields in additional to your list.
Strict field selection changes this: when it is enabled, the strict_fields flag is set on the connector, and each table's configured list becomes exactly what is fetched.
Strict field selection is a connector-level setting and applies to every table on the connector. It is off by default, so connectors that don't enable it remain unaffected and retain their current field lists and behavior.
When strict field selection is on:
Tables that specify a fields list pull only those fields, plus sys_id and sys_updated_on.
Tables that do not specify a fields list continue to stream all fields. The setting has no effect on those tables.
sys_id and sys_updated_on are always retained because the pipeline needs them for deduplication and incremental sync. If a table's fields list omits either one, the connector adds it back automatically and logs a warning.
Minimum fields
When strict field selection is on, the built-in minimum set is no longer added automatically. Only sys_id and sys_updated_on are always kept; every other field must appear in the table's fields list, including ones that are otherwise required and that you might assume are present by default, such as number and sys_created_by. Before you request it, confirm that each table's list includes every field required by the BigPanda features you use — the AI Incident Assistant and AI Incident Prevention required fields, any AI Detection and Response requirements, and the incident-table fields used for business value reporting. Otherwise, those features may lose data. See Data requirements for ServiceNow UDC configuration
Strict field selection is enabled per connector by the BigPanda team. To turn it on:
Confirm the fields list for each table you want to constrain.
Contact the platform team to enable this setting.
Snowflake table streaming
Snowflake table streaming lets you stream a Unified Data Connector's (UDC) data, from ServiceNow, Jira, Confluence, and more, downstream into Snowflake and Analytics, directly from the connector page in backoffice.
This replaces a manual, engineering-owned task with a self-serve action: select the tables, click a button, and the data starts landing in Snowflake in about an hour. With Snowflake table streaming, you can:
Enable analytics reporting on a connector's UDC data without an engineering ticket.
Choose exactly which source tables stream to Snowflake, per connector.
Track per-table status, record counts, and last-updated times as data lands.
Naming
In backoffice this appears as Snowflake table streaming (also referred to as Unified Analytics pipelines). In field-facing conversation, refer to it as Snowflake UDC Automation.
The ServiceNow incident table is added automatically
For every new ServiceNow pipeline, the incident table streams into Snowflake automatically, no action needed.
In the Snowflake table streaming panel, incident appears as already Created, and its checkbox is disabled. All other tables, such as change_request, kb_knowledge, and problem, are added on demand.
The incident table lands using this naming convention:
DWH.RAW_INTEGRATIONS."BP_S3__2_0_0__<org>__UDC__INCIDENT"
Add a table to Snowflake
To add a table to Snowflake:
In Backoffice, open the connector and expand Downstream Applications.
Open the Snowflake table streaming panel. The
incidenttable is already Created automatically.Select the additional tables you want in Snowflake, such as
change_request,kb_knowledge, andproblem.Click Create Unified Analytics pipelines.
A confirmation appears, indicating that your Snowflake data will start streaming in about an hour. Each row then shows its status, record count, and last row update, reflecting what has already landed in Snowflake.
What the per-row status means
Status | Meaning |
|---|---|
Waiting for data | Requested. Streaming starts automatically once the source has data. |
Created | The table is provisioned and streaming to Snowflake. |
Good to know
Data arrival time: Data appears in Snowflake within about an hour, and up to roughly 2 hours, once the source has data.
Empty tables: A table with no source data yet stays Waiting for data and starts on its own once data lands. You do not need to select it again.
Re-requesting is safe: Re-requesting a table will not disturb a running pipeline and will not create duplicate pipelines.
Wait-for-data model: Because streaming only starts once the source has data, the feature will not create broken pipelines.
Enablement: The feature is turned on per organization. Coordinate enablement before expecting the Hub action to provision pipelines.
Supported tables
Snowflake table streaming offers different tables per connector:
ServiceNow:
incident,change_request,kb_knowledge, andproblem.Jira:
issues.Confluence:
space_contentandpage_attachments.SharePoint: lists.
OpenText: resources.
BMC Helix: forms.