Triggers (IA)
Triggers decide how and when Biggy acts. A trigger fires either when a message is posted in a channel you watch, or on a schedule you define. When a trigger fires, Biggy runs what you have configured, such as its own tool selection with Ask Biggy, a specific capability, or a workflow, and then posts the result where you choose.
Triggers are available in the web app at Manage > Workflows > Triggers.
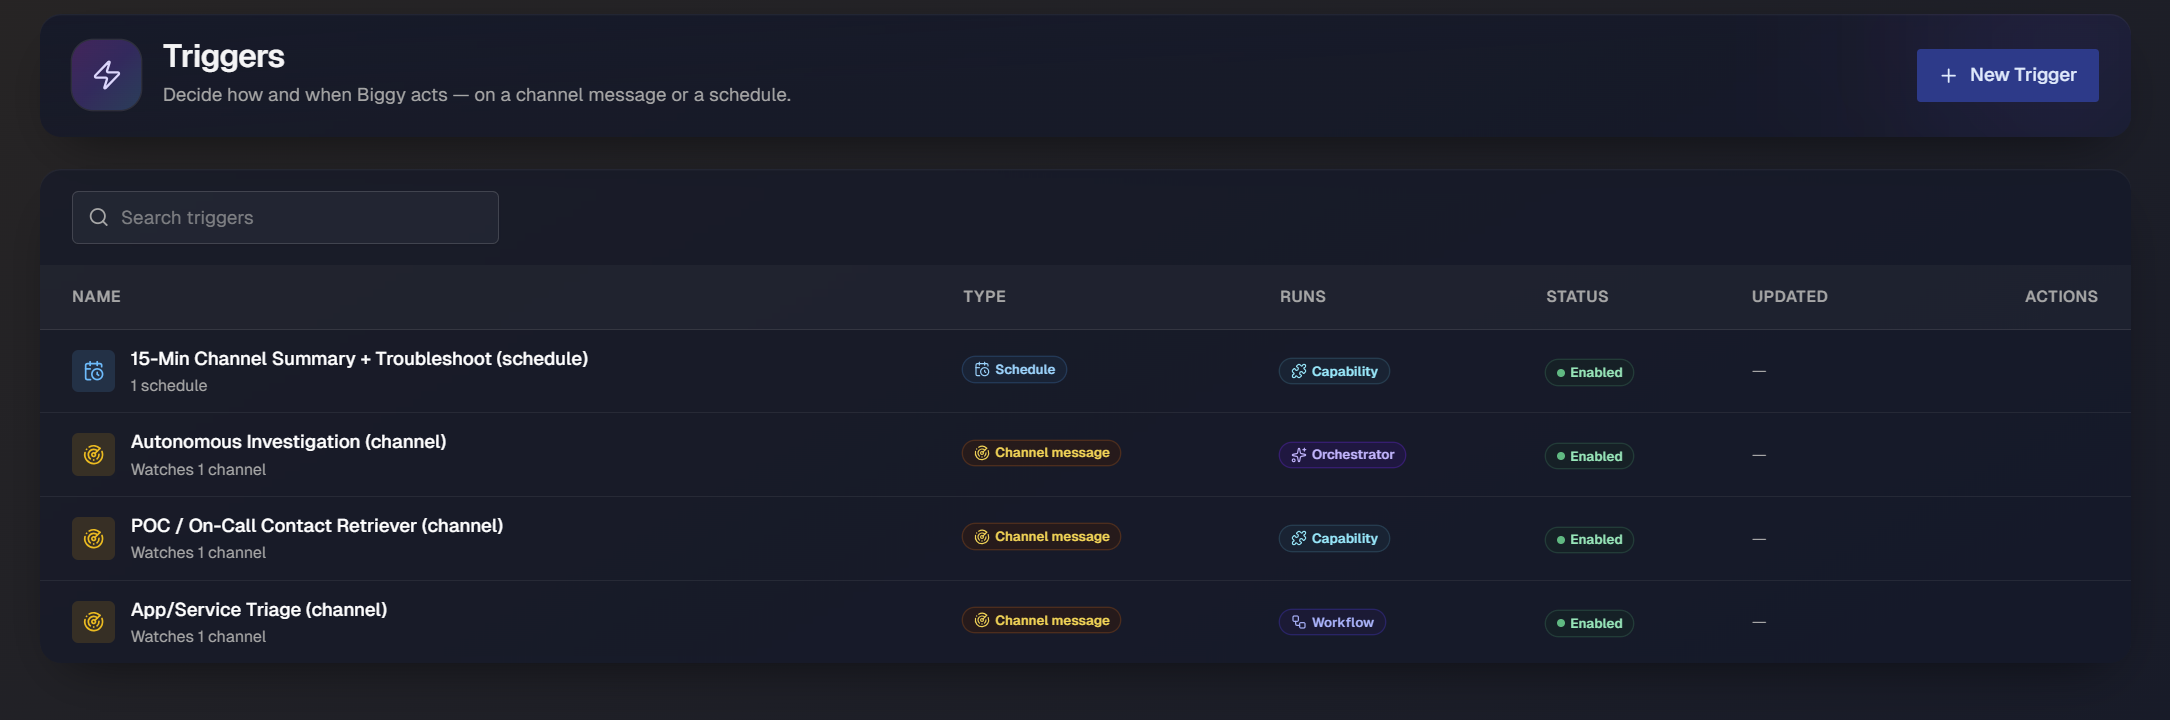
View triggers
The Triggers page displays all triggers configured for your organization. Each trigger includes the following information:
Name: The name of the trigger. A short line below the name shows how the trigger fires, for example
Watches 1 channel" for a channel message trigger or "1 schedulefor a schedule trigger.Type: How the trigger starts: Channel message or Schedule.
Runs: What Biggy runs when it fires. Values include Capability, Workflow, and Orchestrator (shown when the trigger runs Ask Biggy).
Status: Whether the trigger is Enabled or disabled.
Updated: When the trigger was last changed.
Actions: Controls to manage the trigger.
Use the Search triggers bar at the top of the list to find a specific trigger by name.
To create a trigger, in the upper-right corner of the page, select New Trigger .
Trigger types
Every trigger uses one of two trigger types. When you create or edit a trigger, choose a type from the Trigger type menu.
On a channel message: Biggy monitors one or more channels and runs when a message meets a condition you define. Use this type for real-time responses, such as auto-triaging a message that reports a service issue.
On a schedule: Biggy runs according to a repeating schedule that you define. Use this type for recurring automations, such as posting an hourly shift-handoff summary.
The selected trigger type determines which configuration sections appear. Channel message triggers include the Channels section, while schedule triggers include the Schedule section. Both types share the remaining sections.
Create a trigger
On the Triggers page, click New Trigger. The Create Trigger page opens.
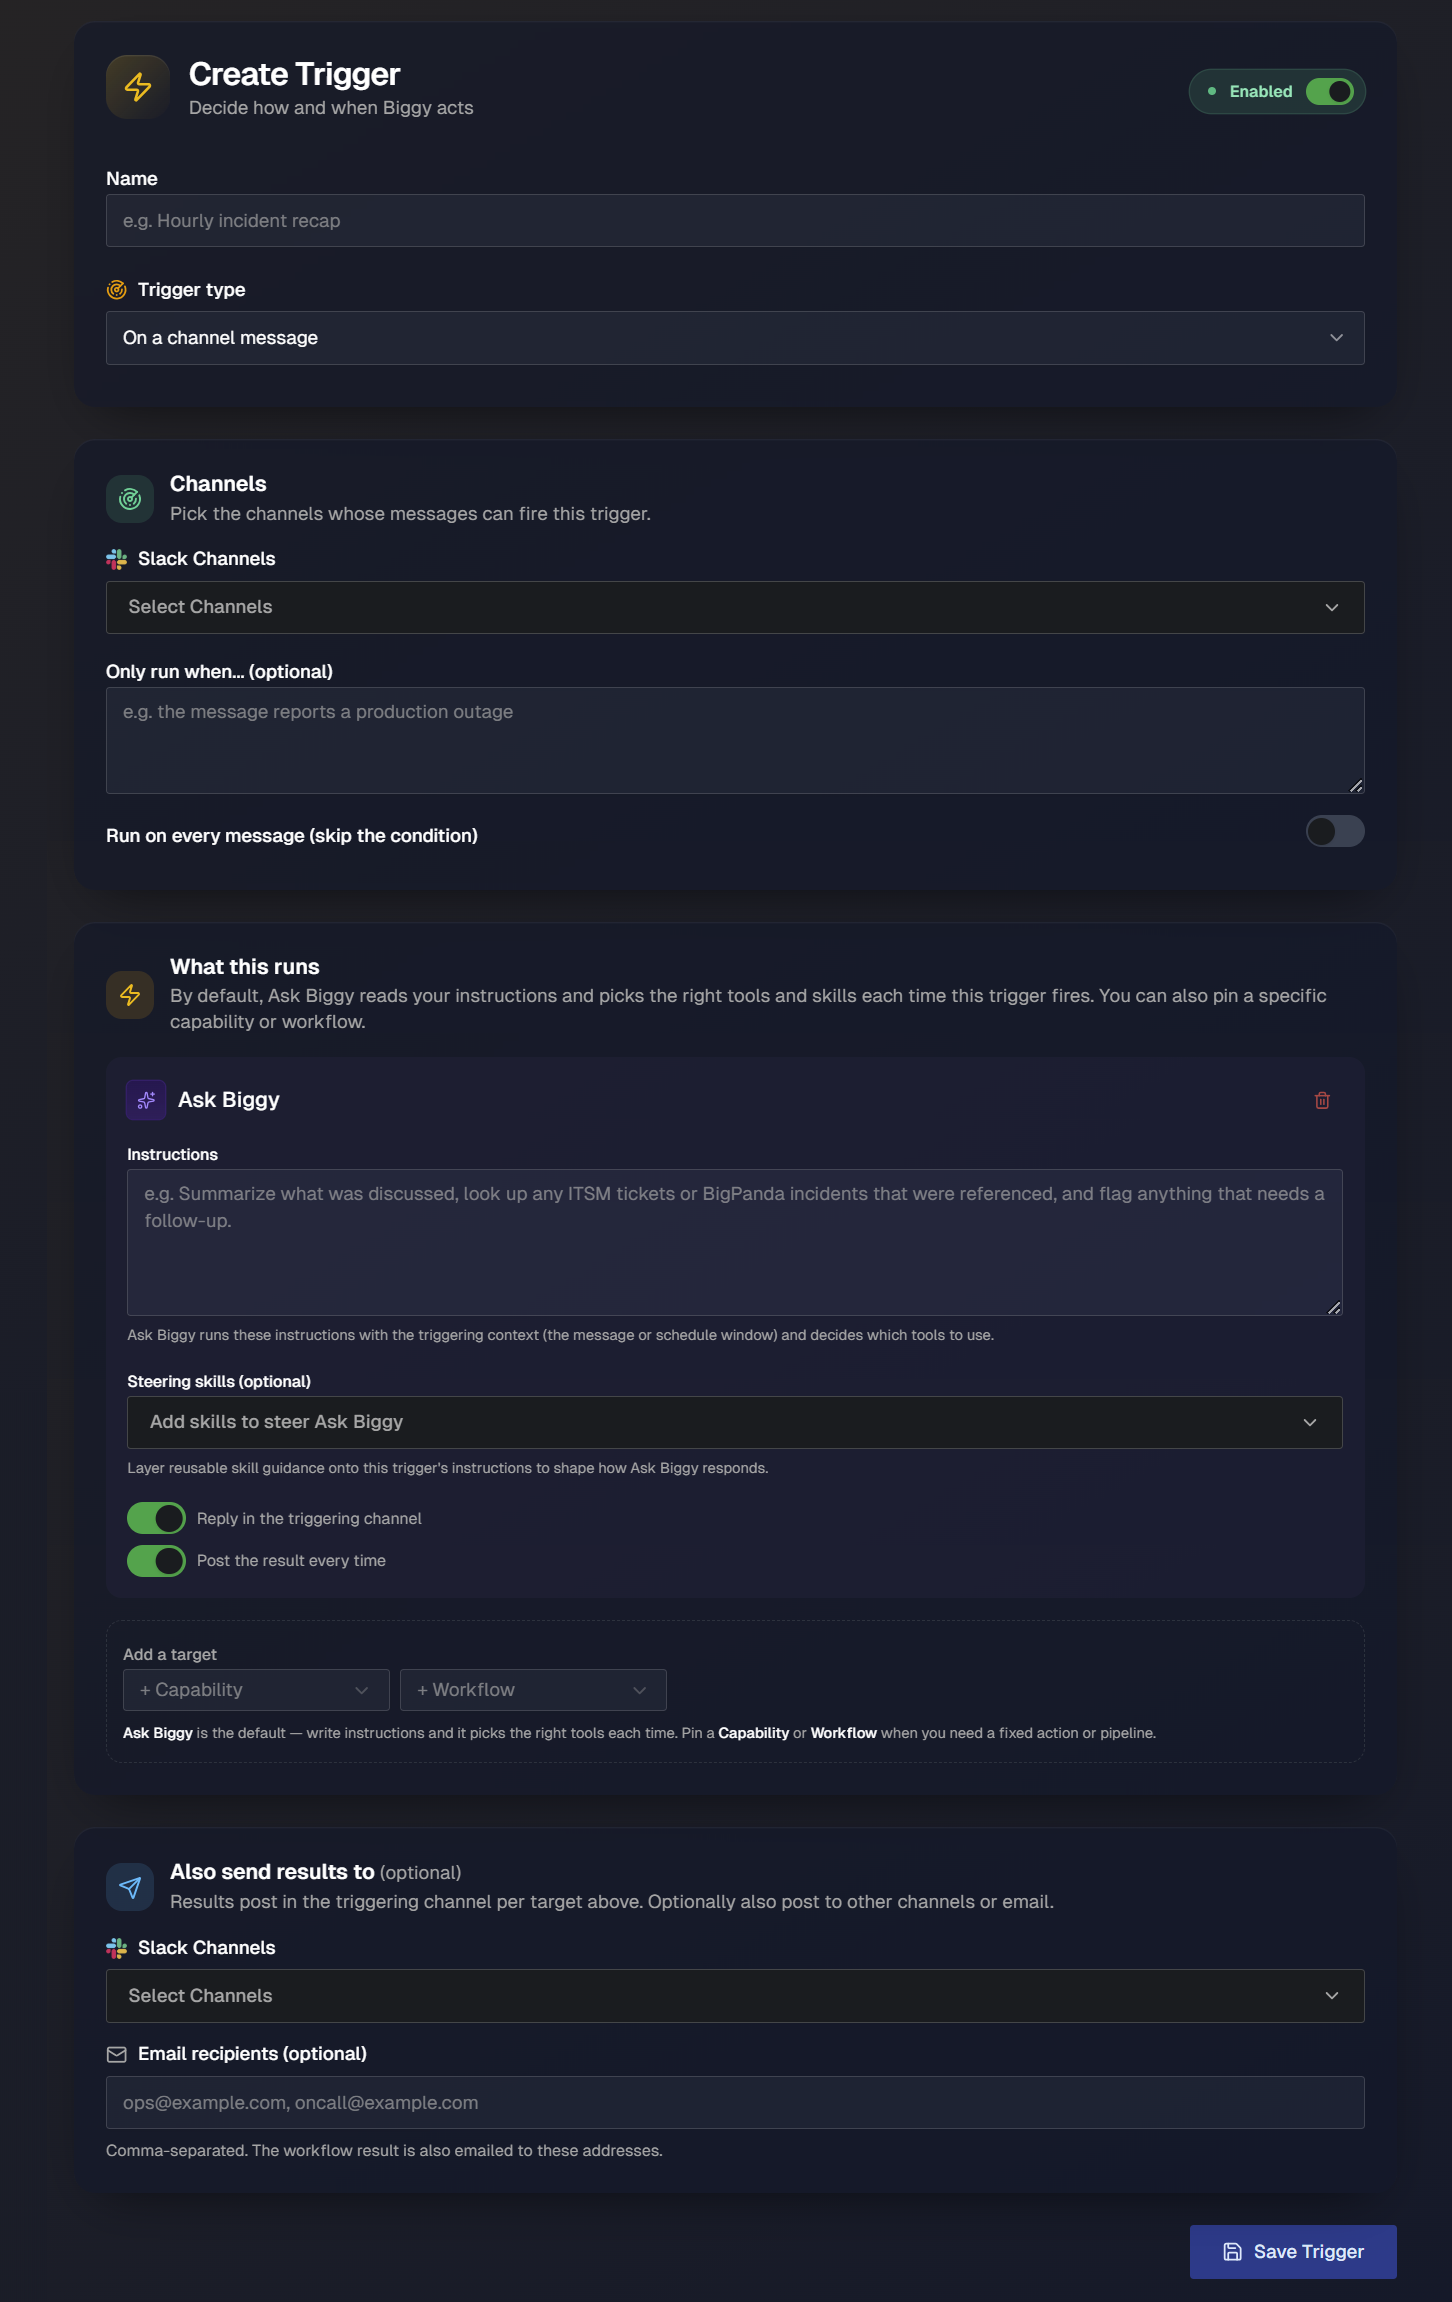
Configure the following at the top of the page:
Enabled: Turn on the toggle to enable the trigger when you save it. A disabled trigger is saved but does not run.
Name: Enter a descriptive trigger name, for example
Hourly incident recap.Trigger type: Select On a channel message or On a schedule.
Configure a channel message trigger
When the trigger type is On a channel message, the Channels section defines which messages can fire the trigger. Configure the following fields:
Slack Channels: Select one or more channels whose messages can fire the trigger.
Only run when... (optional): Describe in plain language the condition a message must meet, such as
the message reports a production outage. Leave this blank if you want a broader match, or use the toggle below to run on every message.Run on every message (skip the condition): Turn on this toggle to run the trigger for every message regardless of the condition above.
Configure a schedule trigger
When the trigger type is On a schedule, the Schedule section defines when the trigger fires. The section header shows your local time zone, which is shown in the section header.
Repeat every: Enter an interval number and select a time unit to set how often the trigger runs.
At minute: Enter the minute of the hour when the trigger fires.
Run at most once every N weeks (optional): Enter a number to skip in-between runs. Leave this field blank to use the schedule above without an additional weekly limit. For example, enter 2 to run an otherwise weekly trigger every other week.
As you configure the schedule, the Schedule Summary panel updates to show the resulting behavior:
Frequency: A plain-language summary of the schedule, such as "Runs every hour on the hour".
Next Run: The date and time of the next scheduled fire.
Cron Expression (UTC): The equivalent cron expression in UTC.
Choose what the trigger runs
The What this runs section defines the action Biggy takes when the trigger fires. By default, Ask Biggy reads your instructions and picks the right tools and skills each time the trigger fires. You can also pin a specific capability or workflow when you need a fixed action or pipeline.
To choose a target, use the controls under Add a target:
Ask Biggy: The default target. Write instructions, and Biggy chooses the tools to use each time the trigger fires.
+ Capability: Pin a specific capability. Biggy runs that capability every time the trigger fires.
+ Workflow: Pin a specific workflow. Biggy runs that workflow every time the trigger fires.
Ask Biggy
When the target is Ask Biggy, configure the following:
Instructions: Describe what Biggy should do when the trigger runs. For example, enter
Summarize what was discussed, look up any ITSM tickets or BigPanda incidents that were referenced, and flag anything that needs a follow-up.Biggy uses these instructions with the triggering context, such as the message or the schedule window, and selects the appropriate tools.Steering skills (optional): Add one or more skills to provide reusable guidance for how Ask Biggy should respond.
For a channel message trigger, two additional toggles control how results are posted:
Reply in the triggering channel: Turn on this toggle to post the result in the channel where the triggering message appeared.
Post the result every time: Turn on this toggle to post the result after every run, even when Biggy does not find relevant information.
Capability or workflow
When you select a capability or workflow as the target, it replaces Ask Biggy. Biggy then runs that capability or workflow every time the trigger starts. A selected capability displays its own input fields, which vary by capability. Complete the fields to configure how the capability runs. Required fields are marked Required.
Choose where results go
The trigger type determines where Biggy posts the results.
For a channel message trigger, results post in the triggering channel per the target settings above. To send results elsewhere as well, use the Also send results to (optional) section:
Slack Channels: Select one or more channels where Biggy should post the result.
Email recipients (optional): Enter one or more email addresses, separated by commas, to send the result by email.
For a schedule trigger, there is no triggering channel, so the Where to post results section defines where results post:
Slack Channels: Select one or more channels where Biggy should post the result.
Email recipients (optional): Enter one or more email addresses, separated by commas, to send the result by email.
Manage triggers
In the Triggers list, select a trigger. The Edit Trigger page opens with the same configuration used to create it.
On the Edit Trigger page, you can:
Change the name, trigger type, and configuration.
Enable or disable the trigger with the Enabled toggle at the top of the page.
Save your changes by selecting Save Trigger.