SCIM Provisioning
The BigPanda Microsoft Entra ID and Okta integrations are compatible with the System for Cross-domain Identity Management (SCIM) standard. SCIM is an open standard used for automating the exchange of user identity information between identity domains or IT systems. This facilitates and eases the management of user accounts in cloud-based applications.
SCIM allows admins to easily manage users, roles, and group information between BigPanda and your directory. As users onboard, offboard, or change roles, you can provision or deprovision BigPanda accounts from within your Identity Provider (IdP) service, saving you time and effort.
SCIM account management
Once a domain is set to use SCIM provisioning, you must use SCIM to manage your BigPanda users. Changes made to users in the BigPanda UI will not be retained and will not sync back to your IdP.
Assistance required
Enabling SCIM provisioning requires assistance from BigPanda. Contact your BigPanda account team if you are interested in enabling this feature.
Key Features
Keep your IdP in sync with BigPanda.
Provision users and update roles from within your IdP.
Manage user groups to quickly update your BigPanda accounts.
Before You Start
Before setting up the SCIM integration, you must have:
A BigPanda account with the Single Sign-On, Roles Management, and User Management Permissions.
An account in either Okta or Microsoft Entra ID with administrator permissions.
An Okta or Microsoft Entra ID plan that allows you to provision users via SCIM.
Microsoft Entra ID (Formerly Azure AD)
Follow the steps below to enable Microsoft Entra ID SSO with SCIM provisioning.
Limitations
Microsoft Entra ID has several known limitations related to SCIM provisioning, such as limits to the number of group members that can be updated at a time. See the Microsoft Entra ID documentation for more information.
Create a BigPanda SCIM Application in Microsoft Entra ID
To use SCIM provisioning, you'll need to create a new SCIM application in Microsoft Entra ID.
To create the application:
In Microsoft Entra ID, go to Manage > Enterprise Applications.
Select New Application.
Select Create your own application.
In the Create your own application panel, give the application a Name and select the third option, Integrate any other application you don't find in the gallery (non-gallery).
Click Create.
In your application screen, select 2. Set up single sign-on.
Select SAML as your single sign-on method.
In the Set up Single Sign-On with SAML screen, configure SSO as described in the Configure Microsoft Entra ID SSO documentation.
In the left navigation, go to Manage > Provisioning.
Select New Configuration.
Under Admin Credentials, populate the following information:
Field
Description
Tenant URL
Enter
https://api.bigpanda.io/scim/v2Secret token
Enter your BigPanda API key for the BigPanda organization associated with this app.
Click Test Connection to ensure the admin credentials are working.
Click Create.
Add Microsoft Entra ID to BigPanda
After setting up the SCIM application, follow the steps to Add Microsoft Entra ID to BigPanda.
Create Groups in Microsoft Entra ID
To manage users in Microsoft Entra ID, you’ll need to set up groups. When you create groups for the BigPanda SCIM connection, specific naming is required. Each group should use the following naming convention:
BigPanda_<bigpanda_org_name>_BPRole_<bigpanda_role_name>
Replace bigpanda_org_name with the original organization name set by BigPanda. Replace bigpanda_role_name with the name of the BigPanda role associated with this group.
Multi-org accounts
If you are setting up SCIM for multiple organizations, create a separate group containing the correct organization name and role for each BigPanda organization.
Case sensitive names
The organization name and role name are case sensitive. If the organization name or role name has spaces in it, replace them with underscores.
BigPanda organization name
The BigPanda organization name that you use in the group must be the original organization name. If you're not sure what the name is, contact your BigPanda account team.
See the Microsoft Entra ID documentation for information on creating groups.
Okta
Follow the steps below to enable Okta SSO with SCIM provisioning.
Add a BigPanda SCIM App in Okta
To set up SCIM, you must first add BigPanda as a new SCIM application in Okta.
To add the application:
In Okta, go to Applications > Applications.
Select Create App Integration.
In the Create a new app integration screen, select SAML 2.0 and click Next.
In the General Settings, enter the App name. You can also optionally add an App logo and adjust the App visibility.
Click Next.
In the Configure SAML section, enter the settings information for the integration. The following fields are required:
Single Sign-On URL - Enter
https://api.bigpanda.io/login/<your_org_name>/okta/callback(Replace<your_org_name>with your BigPanda organization name.)Entity ID - Enter
https://bigpanda.io/SAML2
See the Okta documentation for a detailed list of what is needed for each field.
(Optional) Click Preview the SAML Assertion to view the XML generated from the SAML settings that you provided.
Click Next.
(Optional) Enter Feedback to help Okta support understand how the app was configured.
Click Finish.
Configure Okta SSO
After creating the BigPanda SCIM app, complete the steps to set up the SSO connection:
Within the new Okta app you created, go to the right side of the app screen and click View SAML Setup Instructions.
Copy the Identity Provider Single Sign-On URL, the Identity Provider Issuer, and the X.509 Certificate, and follow the instructions in the BigPanda Okta SSO documentation to configure the integration in BigPanda.
Enable Okta SCIM Provisioning
After setting up the SSO connection, enable SCIM provisioning within Okta. If you're enabling SCIM for multiple organizations, you will need to do this for each app.
Go to Applications > Applications and select the BigPanda SCIM application you created earlier.
Go to the General tab. Under App Settings, click Edit.
In the Provisioning section, select SCIM.
Click Save.
Go to the Provisioning tab. Navigate to the SCIM Connection section and click Edit.
Populate the following information:
Field
Description
SCIM connector base URL
Enter
https://api.bigpanda.io/scim/v2Unique identifier field for users
Enter
userNameSupported provisioning actions
Select the following options:
Push new users
Push profile updates
Push groups
Authentication mode
Select HTTP header.
Authorization
Enter your BigPanda API key for the BigPanda organization associated with this app.
(Optional) Click Test connector configuration to ensure that the configuration is working.
Click Save.
Enable Provisioning to App
After enabling Okta SCIM provisioning, the To App and To Okta options are added to the Settings menu on the left side of the Provisioning tab.
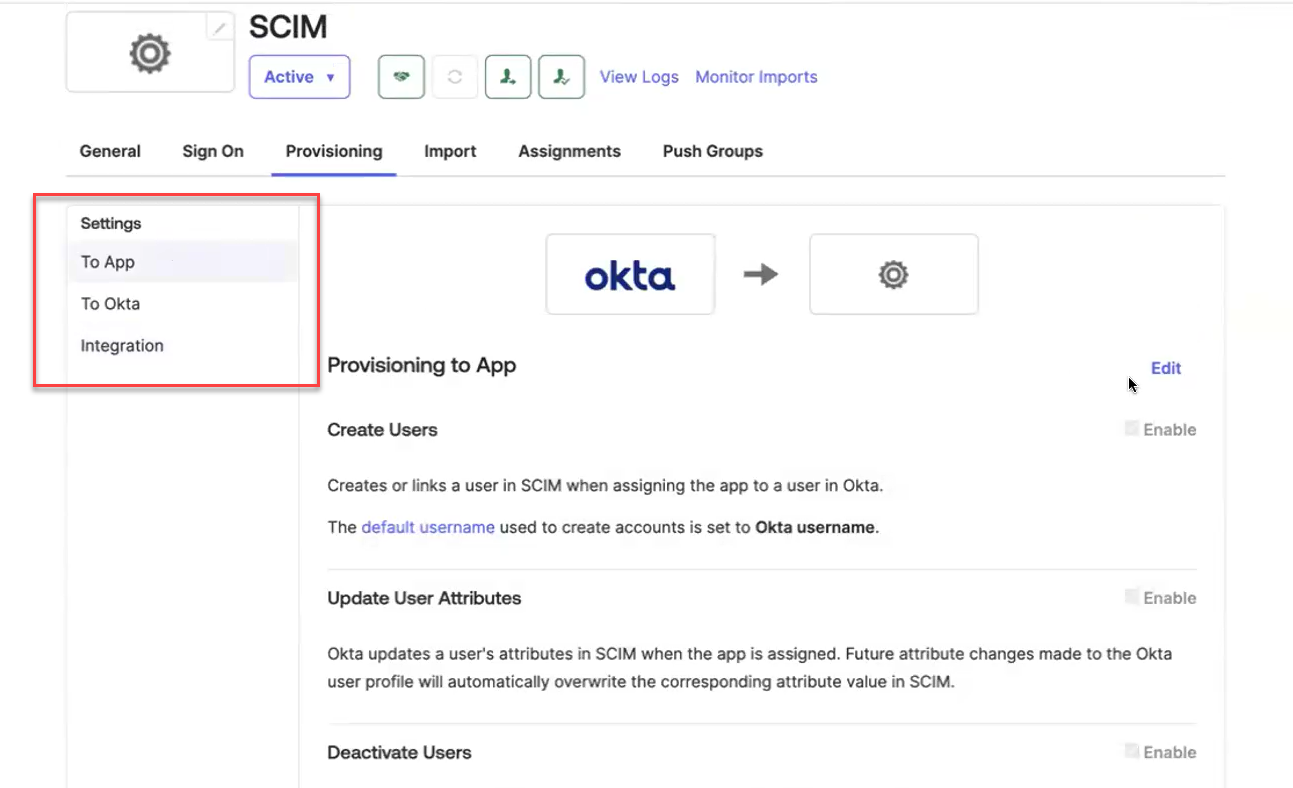
To complete the provisioning set up, you’ll need to enable provisioning to app settings:
In the Settings menu on the left, select To App.
Click Edit and then enable the following options:
Create Users
Update User Attributes
Deactivate Users
Click Save.
Create and Assign Groups in Okta
To manage users in Okta, you’ll need to set up groups. When you create groups in Okta for the BigPanda SCIM connection, you'll need to use specific naming. Each group should use the following naming convention: BigPanda_<bigpanda_org_name>_BPRole_<bigpanda_role_name>.
Replace bigpanda_org_name with the original organization name set by BigPanda. Replace bigpanda_role_name with the name of the BigPanda role associated with this group.
Multi-org accounts
If you are setting up SCIM for multiple organizations, create a separate group containing the correct organization name and role for each BigPanda organization.
Case sensitive names
The organization name and role name are case sensitive. If the organization name or role name has spaces in it, replace them with underscores.
BigPanda organization name
The BigPanda organization name that you use in the group must be the original organization name. If you're not sure what the name is, contact your BigPanda account team.
See the Okta documentation for information about creating groups.
After creating the groups, assign them to the SCIM application. To do this, go to the Assignments tab within the application, click Assign > Assign to Groups and select the group you created.
Push Groups to BigPanda
When you make a change to groups in Okta, you can manually push those changes to BigPanda.
To push group changes:
In Okta, go to Applications > Applications and select the BigPanda SCIM application you created.
Select the Push Groups tab.
Find the group that you would like to push to BigPanda. Navigate to the Push Status column and click the status.
Select Push Now.
SCIM Provisioning FAQ
What happens to roles in BigPanda that don't match a SCIM-managed role?
If a role does not match an SCIM-managed role, it can be removed via the BigPanda UI. However, if there is no SCIM-managed role that matches it, the role will not be updated via SCIM.
What happens when the last SCIM-managed role is removed from a user?
If a user's last SCIM-managed role is removed, SCIM will send a delete request to the user in BigPanda. This can occur even if the user has other BigPanda-assigned roles that don't match the SCIM role.
Can I make changes to a user in BigPanda after SCIM is enabled?
Once SCIM is enabled, you should not make changes to users directly in BigPanda. Any changes made in BigPanda will be overridden in the next sync.
What happens to accounts in BigPanda that have never had a SCIM-managed role?
If an BigPanda has a role that is not managed by SCIM and has never had a SCIM-managed role, it will be unaffected by changes in SCIM unless it is later assigned a SCIM-managed role.