Manage BigPanda Biggy AI Workflows
The Biggy AI Workflows module within the web app allows you to create channel hawks and scheduled workflows. These allow you to set up agentic workflows that occur either when a specific word or phrase is detected, or on a specific schedule that you configure. Use these modules to set up workflows that invoke action plans or prompts based on specific scenarios that you configure.
Prompt addendums and prompt templates
Prompt addendums provide additional instructions to the LLM for how Biggy AI should handle user queries.
For example, you can create a prompt addendum requesting that certain key components or applications are always mentioned in query responses.
Prompt templates allow you to create a standard format for how Biggy AI should present query responses. For example, you can create a template instructing Biggy AI how Executive Summaries should be created based on your organization's standards.
Both prompt addendums and prompt templates should be written using specific, natural language.
Key Features
Configure workflows that trigger based on new messages in your chat channels.
Invoke action plans or prompts during specific scenarios.
Schedule workflows that occur at specific intervals.
Channel Hawks
Channel hawks allow Biggy AI to watch a channel for specific messages that trigger an agentic workflow. Workflows can invoke one or more Action Plans or follow specific prompts that you create.
Channel hawk example
You could set up a channel hawk in an on-call channel that watches for messages asking who the current on-call point of contact is. When Biggy AI detects messages containing these phrases, it then runs the On-Call Retrieval action plan and posts a message in the channel.

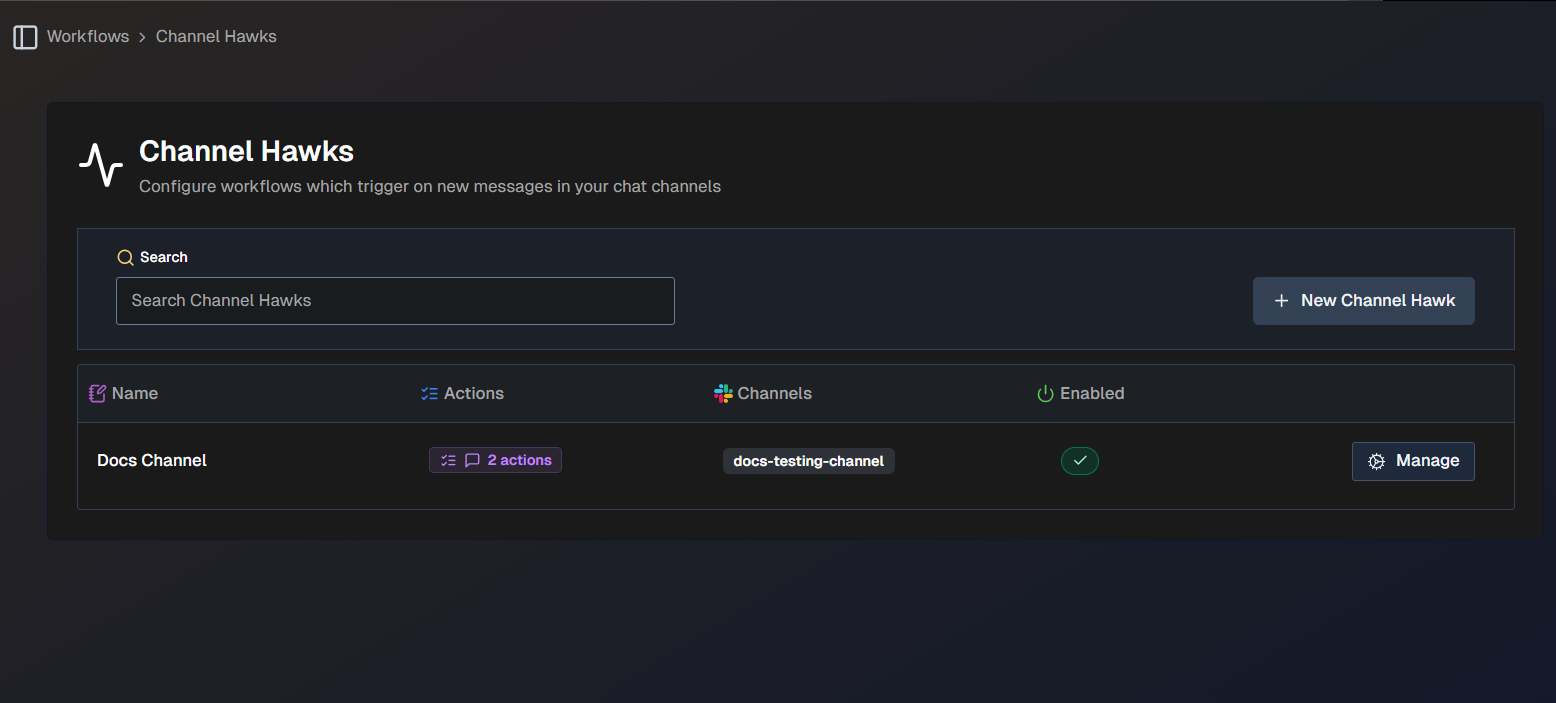
The following information about each channel hawk is displayed in the list:
Name - the name of the channel hawk.
Actions - the number of actions configured for the channel hawk. Hover over the number to view the types of actions.
Channels - the channel(s) where the channel hawk is configured.
Enabled - whether or not the channel hawk is enabled.
Click the Manage button next to any channel hawk in the list to view, edit, or delete it.
Use the Search bar at the top of the page to find a specific channel hawk.
Create a New Channel Hawk
To create a new channel hawk:
In the web app, navigate to Workflows > Channel Hawks.
Click + New Channel Hawk.
In the Create Channel Hawk section of the screen, configure the following fields:
Field
Description
Enabled
Use the Enabled toggle to choose whether the channel hawk will be enabled or disabled upon creation.
Name
Enter a descriptive name for the channel hawk.
Slack/Teams Channels
Select one or more channels where the channel hawk will watch for triggers.
Always Respond
When enabled, Biggy AI will always post a workflow result message, even if it does not find any useful information.
In the Trigger Condition section, specify when Biggy AI should execute the workflow. You can enter a specific prompt, or select Always Execute to always run the workflow.
Generation Mode
Use the Generation Mode button to allow Biggy AI to generate a prompt based on your input.
(Optional) In the Result Message Prompt section, customize how Biggy AI combines and formats the outputs from all workflow actions into a single message. Enter a specific prompt, or use the Generation Mode button to allow Biggy AI to generate a prompt based on your input.
Behavior without a custom prompt
Without a custom prompt, Biggy AI will generally default to displaying each action's output separately in sequence.
In the Actions section, you can add actions that Biggy AI will take when the channel hawk is triggered. Click + Add Action to create an action.
In the Create Workflow Action screen, configure the following fields:
Field
Description
Action Type
Select whether you would like the workflow to be based on a System Prompt or Action Plan.
System Prompt
This field only appears if you select System Prompt in the Action Type menu.
Enter a system prompt with instructions for what Biggy AI should do when this workflow action is executed. Use the AI Generation button to allow Biggy AI to generate a prompt based on your input.
Action Plan
This field only appears if you select Action Plan in the Action Type menu.
Select an action plan that will be performed when the workflow action is executed.
Prompt Addendum (Optional)
This field only appears if you select Action Plan in the Action Type menu.
Enter a prompt addendum containing additional instructions for the action plan.
(Optional) Repeat steps 6-7 to add additional actions.
Click Save.
Scheduled Workflows
Scheduled workflows allow you to create multi-action agentic functions that automatically occur at specific times or intervals. You can schedule any workflow to fully automate your prompts, action plans, and decision points. Monitor scheduled agentic results by configuring the workflow to post the results to a channel or email address.
Scheduled workflow example
You can configure a scheduled workflow to invoke the Generate Channel Summary action plan during an on-call handoff, so that the next shift can quickly get caught up on what has occurred.

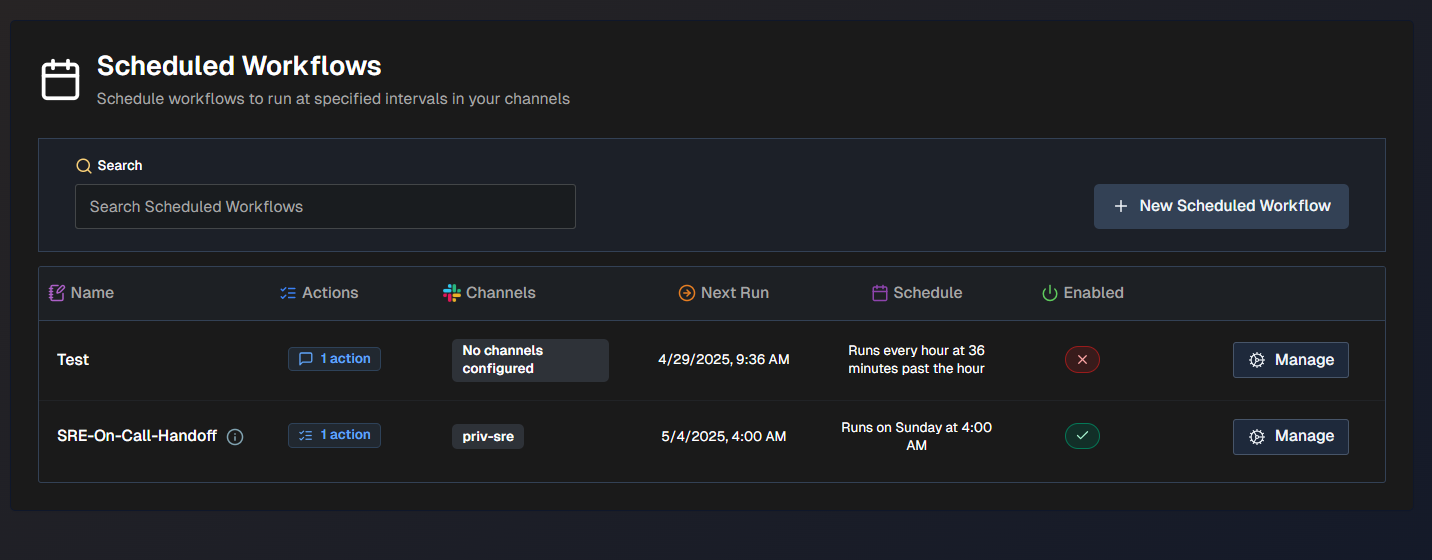
The following information about each scheduled workflow is displayed in the list:
Name - the name of the workflow.
Actions - the number of actions configured. Hover over the number to view the types of actions.
Channels - the channel(s) where the workflow is configured.
Next Run - the date and time when the workflow will run next.
Schedule - the scheduled interval for when the workflow will run.
Enabled - whether or not the workflow will run at the next scheduled interval.
Click the Manage button next to any workflow in the list to view, edit, or delete it.
Use the Search bar at the top of the page to find a specific workflow.
Create a New Scheduled Workflow
To create a new scheduled workflow:
On the Scheduled Workflows screen, select + New Scheduled Workflow.
In the Create Scheduled Workflows section, configure the following:
Field
Description
Name
Enter a name for the scheduled workflow.
Description (Optional)
Enter a description of the scheduled workflow.
Enabled
Choose whether or not you would like the scheduled workflow to be enabled upon creation.
In the Schedule section, define the intervals for when Biggy AI should execute the workflow:
Field
Description
Repeat every
Choose how often you would like the scheduled workflow to repeat. All workflows take place in your local time zone.
Enter an interval number and select a time format. You can choose from:
Minutes (maximum 59, minimum 15)
Hours (maximum 24)
Days (maximum 31)
Weeks (maximum 1)
Months (maximum 12)
Repeat on
This field appears only if you selected the time format of Weeks or Months.
Select the day of the week or month that you would like the workflow to repeat on.
At
This field appears only if you selected the time format of Hours, Days, Weeks, or Months.
Select the minute or time of day that you would like the workflow to repeat on.
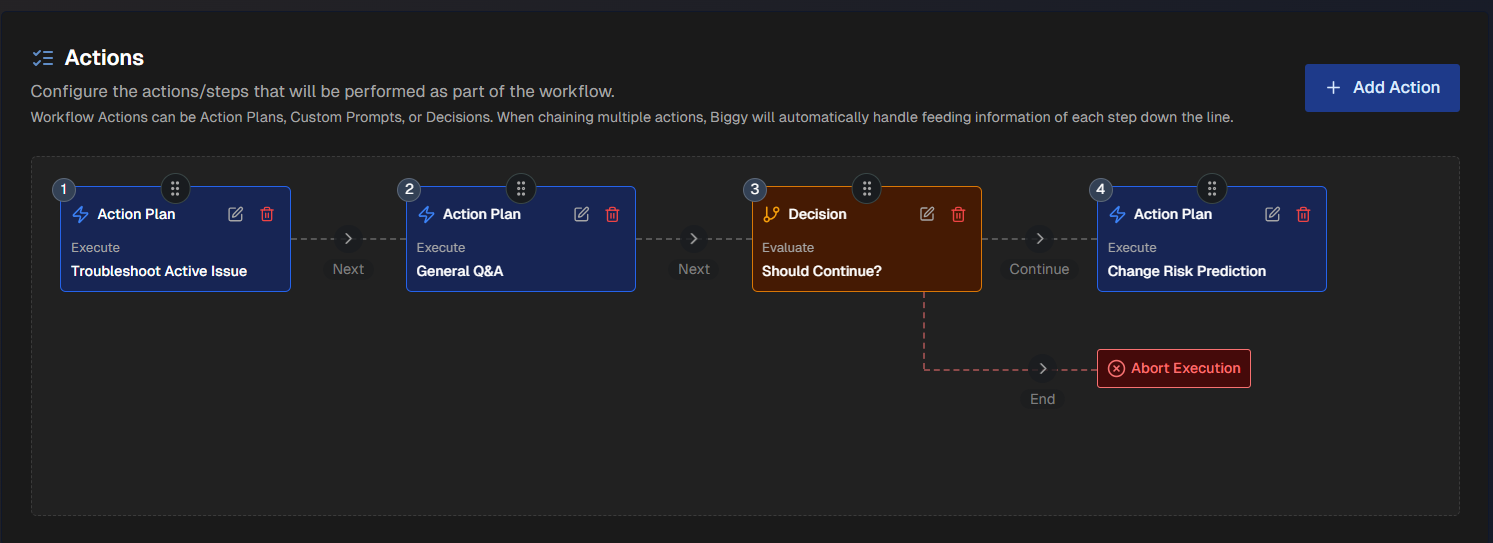
In the Actions section, configure your workflow steps.. To add an action to the list, click + Add Action.
In the Create Workflow Action screen, configure actions. Choose from System Prompt, Action Plan, or Decision action types, then configure the following fields:
Field
Description
System Prompt
This field only appears if you selected the System Prompt action type.
Enter a system prompt that defines what Biggy AI should do when this step is executed. Use the AI Generation button to have Biggy AI generate a complete, detailed prompt based on your input.
Action Plan
This menu only appears if you selected the Action Plan action type.
Select one of your configured action plans to use when this workflow is triggered.
Action Instructions (Optional)
This field only appears if you selected the Action Plan action type.
Provide any instructions to help Biggy AI successfully execute the action plan. These instructions tell Biggy AI:
the goal of the action in the context of the larger workflow
how to transform the previous action's output into useful input for this action
Decision Prompt
This field only appears if you selected the Decision action type.
Enter a conditional logic prompt to determine whether or not the workflow continues based on the results of the previous action.
Click Add to complete the step and add it to the scheduled workflow.
(Optional) Repeat steps 5-6 to add additional actions.
(Optional) Adjust the order of actions by dragging and dropping them into place.

In the Response Behavior section, determine when Biggy AI posts workflow results. You can choose to always post results, or specify conditions for when Biggy shares results. Use the Always Respond toggle to choose between these options.
(Optional) If Always Respond is toggled off, you can enter a Condition Prompt for when Biggy AI posts the workflow results. If a condition prompt is not provided, Biggy AI will use its best judgment to determine when to post workflow results.
(Optional) In the Result Message Formatting section, enter a Formatting Prompt to customize how Biggy AI combines and formats the outputs from all workflow actions into a single result message.
In the Output Results section, configure the following fields to let Biggy AI know where workflow responses should be sent:
Field
Description
Send Results to Channels
Enable this field to send the results of the scheduled workflow to the channel(s) you select.
Channels
Select one or more channels to send the results of the workflow.
Send as Email
Enable this field to deliver workflow responses to one or more email addresses.
If you enable this field, enter email addresses in the box below separated by commas.
Click Save.