Advanced Configuration for the BigPanda Agent
Configure the BigPanda Agent behind a proxy server
You can configure the BigPanda Agent to work behind a proxy server.
Before You Start
Install the BigPanda Agent on your server by following the installation instructions for the related integration.
Procedure
Use
sshto connect to the server where the Agent is installed.Open
/etc/bigpanda/bigpanda.confin a text editor (ie:sudo vim /etc/bigpanda/bigpanda.conf)Add the proxy configuration under the backend section of the configuration JSON.The proxy configuration semantics are based on the semantics of the Python Requests library.
{
  "root": {
    "backend": {
       "proxies": {
         "http": "http://10.10.1.10:3128",
         "https": "http://10.10.1.10:1080"
       }
    }
  }
}
Save the configuration file and restart the agent.
Debug the Proxy Configuration
Connectivity issues are often manifested as connection errors inside the agent log file. You are able to debug the root cause of connectivity issues when configuring the agent behind a proxy.
Before you start
Ensure that you have:
Agent version 8.3.0 and above.
Python version 3.6.8 and above.
python3-pip.
Additional Requirements for <=10.2.0
Python 3.8 is required for Agent version 10.2.0 and above.
Process
SSH to the server on which the agent is installed.
Run the following command and save the output to a file.
bigpanda-check-proxy --proxy <proxy_url>
Run the following command and save the output to another file.
curl -v --proxy <proxy_url> "https://api.bigpanda.io/health/data"Send the output from both commands to BigPanda support. We will work with you to troubleshoot common connectivity issues.
Configure the BigPanda Agent with a DMZ
You can set up the BigPanda Agent to communicate with a monitoring server that is behind your corporate Demilitarized Zone (DMZ). First, configure the monitoring server to send alerts to a server in your DMZ. Then, set up SSH keys to allow the monitoring server to communicate with the DMZ server. Finally, configure the DMZ server to integrate with BigPanda.
The following example demonstrates one method for implementing this setup on CentOS 7 using rynsc to transfer and synchronize files between the monitoring and the DMZ servers.
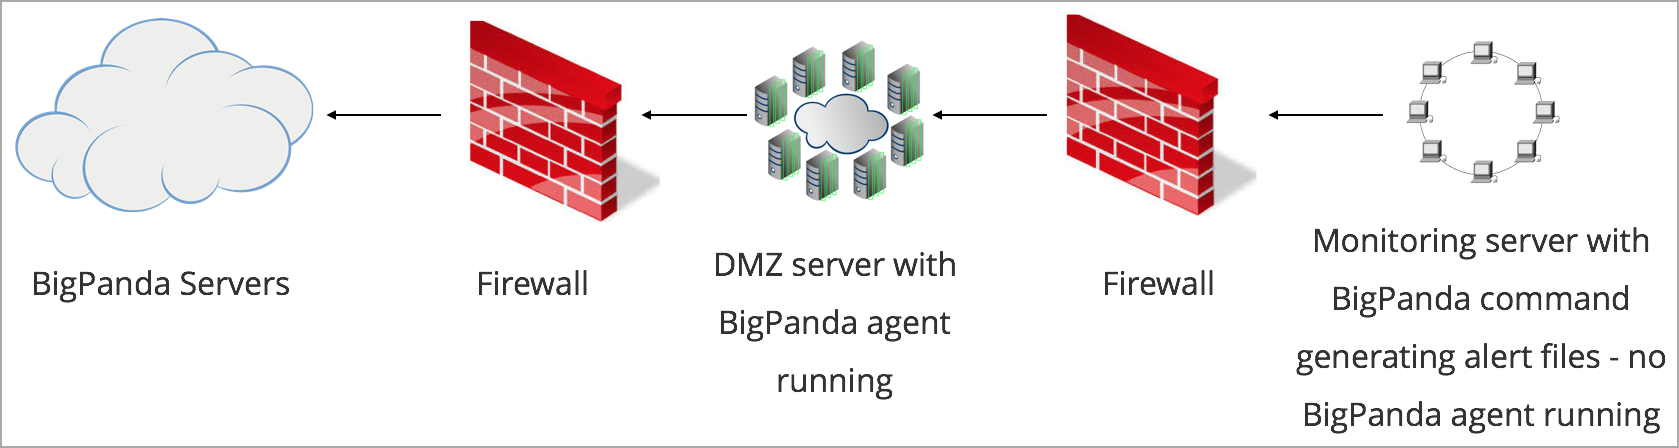 |
The BigPanda Agent with a DMZ
Permissions
You will need administrator access to both the monitoring and the DMZ servers. You will also need administrator access to BigPanda.
Set up permissions to execute the rsync ssh commands, granted either through RSA keys or in the rsyncd.conf file.
Configure the monitoring server
On the monitoring server, install the BigPanda agent by following the install instructions for your specific OS.
Configure a scheduled task to run the following rsync command every minute.
rsync -a -e "ssh" --remove-source-files /var/lib/bigpanda/queue/ $DMZ_servername:/var/lib/bigpanda/queue
Caution
Be sure to replace $DMZ_servername with the network name of your DMZ server. The /var/lib/bigpanda/queue directory will be created when you install the BigPanda agent on the DMZ server.
You can use Windows Scheduled Task facility or a cron job. For example, follow these steps to create a cron job that runs as the root user.
Open a crontab file by running the following command.
cron -u root -e
Add the following line in the crontab file.
***** root /usr/bin/rsync -a -e "ssh" --remove-source-files /var/lib/bigpanda/queue/ $DMZ_servername:/var/lib/bigpanda/queue
Caution
Be sure to replace $DMZ_servername with the network name of your DMZ server.
Set up SSH keys
On the monitoring server, generate a public SSH key with no password by running the following commands.
ssh-keygen -f ~/.ssh/id_rsa -q -P ""
cat ~/.ssh/id_rsa.pub
Copy the key to your clipboard and log in to your DMZ server.
If the SSH folder does not exist on the DMZ server, create it manually by running the following commands.
mkdir ~/.ssh
chmod 0700 ~/.ssh
touch ~/.ssh/authorized_keys
chmod 0644 ~/.ssh/authorized_keys
In the
~/.ssh/authorized_keysfile, add the SSH key that you copied in Step 2.
Configure the DMZ server
On the DMZ server, install the BigPanda agent by following the install instructions for your specific OS.
Install the appropriate BigPanda agent integration by following the on-screen instructions in the BigPanda console.